It has taken me longer to write about making this bed than it has to actually make the bed. I've spent about two days on this project so far, and it's time to work on the side rails. Now the fun begins.
I've made more than a few beds, and it took me a little while to figure out how to cut a wide slot for the hardware on the end of the long rail. The challenge is cutting the recess, or mortise, which allows the hanger to sit flush with the end.
It's all about this collar.

Or as some people call it - a template collar. Or a bushing. Or... well... whatever. Let's get to work. Here's the bushing I'll be using. I chose this size because the router bit I'll be using needs to fit inside of it. This one has an outside dimension of 3/4".
Using this bushing, and a jig that I'm going to make, I'll be able to clamp the jig onto the end of the board, and rout a slot for the hanger.
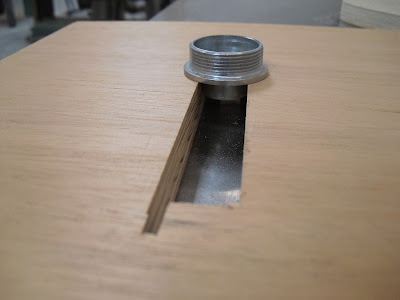
Here's a piece of scrap plywood in which I've cut a slot.

I did this on the table saw, raising the blade up through the plywood, and then lowering it, over and over, until the the slot was wide enough for the collar to slip inside it.

I just approximated the length for now, based on the 4" rail hanger.
Here is the bushing installed on the router base plate.

I'll be using this plunge router for cutting the slot; here you can see the general idea of how this will work.

Now it's time to tweak the final length of the jig, so that the hardware fits perfectly. This is the time consuming part - it took me about six practice cuts until I got everything nailed down. You can tell by all the slots on the board I'm using how many times I had to adjust and re-adjust the jig, until everything fit perfectly.
As it turns out, the piece of hardware was just ever-so-slightly wider than my router bit, so I had to widen the slot on that plywood. It's probably because the router bit is old and has been sharpened a few times, making it a hair smaller than 5/8", which is the width of the hardware piece.
It is stuff like that that makes you want to scream. Tweaking the jig is time consuming; you may even sense a little bit of my frustration. The good news is - once this jig is perfectly sized, the routing is very simple.
I took the plywood template and centered it over my board. Then I nailed a couple of 2x4s on each side, to provide support for the plywood, as well as to give me a clamping surface.

I'm going to be using my plunge router on it's side, so that it essentially becomes a horizontal slotter. This router is a little heavy for me, it always kicks my ass holding the router this way, but it's really the easiest method for cutting this slot.
Now it's time to make the side rails. They're planed, ripped to width, and

then crosscut to their final length. The bottom edge is eased with a small round-over bit, which makes it much nicer on your hands if you ever want to move the bed around.

Time to clamp the side rails onto my bench and get to work. Finally!

Here this jig is slipped over the edge, and clamped in place. Let's start cutting, already!!

Easy, right? If you do this at home, take your time and think everything through, before you jump in and start routing. You don't want to make a mistake at this point.
The router bit leaves you with rounded corners,

so grab a chisel and square the corners off, so that the hanger fits in the slot.


Cutting these slots took the better part of the afternoon, and quite frankly, when they were done, it was time for a break. I'm getting really close to finishing this bed - all that is left is slotting the head and foot board posts, so that the female part of these bed rail hangers can be installed. I'll be ripping this jig apart, so that I can use the same piece of plywood as my bushing guide.
A little sanding and some coats of oil - and I'll be ready to cut the plywood deck for this bed. But for now, a glass of Riesling is calling my name.
3 comments:
Thanks for posting your pics and video. I will be doing same steps shortly and appreciate the preview. You bed looks great!
Any concerns about fastening/screwing into end-grain? Some say to add vertical hardwood dowels for the screws to bit into. One guy used blocks glued/screwed to inside of rail so he could screw into long-grain wood.
If you use a high quality screw that is beefy enough, you won't have any problem. I think used 3" screws, and with three of them, there is a lot of holding power.
I've never had one of these joints fail.
Post a Comment