Tuesday, July 31, 2012

Let's get this bed assembled!


When the glue was dry, I scraped the board and ran it through the planer. I already knew the length it needed to be - the same as the footboard length.


A scrap of the cut off let me set the sawblade height up to cut the tenons. Yes, I do almost everything on my tablesaw. And yes, it might have been easier to cut them with a router. Still - I can do just about anything with a tablesaw - quicker and better.
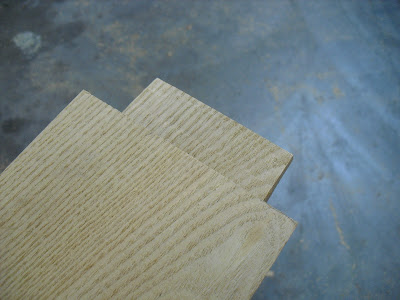
Here's the sample


which allowed me to cut this muy rĂ¡pidamente.


A really nice fit!


I used the same saw setup to score the tenon on the wider headboard rail.

Then I made a series of sideway skims over the blade, to eliminate most of the waste. I don't recommend you do this in your shop, but know it can be done.


A shoulder plane allowed me to fit the tenon perfectly. Here, the headboard is finally starting to take shape.


My last step is to complete the headboard.

To tell you the truth - there are so many choices, that I am having a hard time deciding what to do! Should I carve it? Inlay some tile? Apply something else on top of it? There are too many choices!


I'm going to order some panel material for the decking, and think about what I want to do. I usually do better by letting a few days pass before making a decision.

Sunday, July 29, 2012

Let's taper these posts


Once I cut all of the mortises - for both the bed hardware, as well as the headboard and footboard - it was time to taper the posts. Taper jigs are a little frustrating - I've never found one I've really bonded with, nor have I ever seen a shop built one that was built to last. They take a little bit of trial and error to set up.

And in this case, these bed posts were so thick, I had to make two cuts on each post to get through the 4.5" thickness. It wasn't hard, I had to use the taper jig once, to cut the leg normally, from one side. Then reverse it to cut the other side.

That was a little scary, and one of my fellow tenants snuck up behind me while I was cutting and nearly gave me a heart attack. Those second, reversed cuts took a little extra concentration, that's for sure.

Here are the footboard posts being tapered.

And the taller headboard posts.

This is how they will eventually sit, when the bed is assembled.


I attached the side rails to the posts and set the bed up, to get a dimension for the headboard and footboard rails.


My supply of Sassafras boards was dwindling - and I chose the best four boards left to complete the bed.


The only piece that required gluing was the wide headboard piece, so I glued and clamped it together.


Then I started on the other pieces while it dried. The footboard was was easy - I cut it to length, and then machined some tenons on the end, using a straight bit on the router table. Normally - this would be a pretty dicey cut to do by myself - but this wood is light, and it's easy to handle a long board, even by myself.


The footboard fit into the post mortises perfectly - my next step will be to add a bit of carving on the footboard.


Here's what I have in mind.

I love playing with fonts and layouts on my computer, and when I get everything right, I rubber cement it to the wood and then carve right into the paper.


Luckily, Dennis is teaching a carving class at my shop, so I might ask for some help with this! And if I'm lucky, I'll borrow a chisel or two from his amazing collection.

Thursday, July 26, 2012

Thanks for the tip

A few weeks ago, I wrote about adapting some chains to make lid supports.

The really cool thing about this blog is that I hear from people all over the world. They send me tips, correct my typos, offer suggestions, point out my mistakes, and are generally very kind to me. I'm very proud to call many of these people friends, and I've even met a few when they've visited Vegas.

(Everybody visits here!)

So a few weeks ago, someone gave me a link to a chain supply company. Wow - SCORE! They had exactly what I was looking for, including these chain ends.


And the chain - in the color I wanted, too. I'm so not a "bright brass" woodworker, and often seek hardware in darker finishes.


These ends rock!

I liked them so much, I ordered fifty sets!


Here is how they look installed.


So - a huge thank you to Sam, wherever you are, I really appreciate the link!

Tuesday, July 24, 2012

Happy National Tequila Day!


For the last few Saturdays, some friends and I have gathered at a workbench after hours, doing "research" in the woodshop. Oh, we're not discussing wood glues or joinery techniques - it's something far more important.

We've been conducting taste tests - and wow - last week's was a very thorough examination of two important items - tequila and salt.


Eric and I brought a nice selection from our respective stashes; you'd be amazed how different tequilas taste when sampled one after another. You'd also be amazed at how quickly you feel the effects!


The salt tasting was even more illuminating - who knew that there would be such a HUGE difference in the taste of various salts?

Eric bought some common salts that everyone might have in their pantry, and then three gourmet versions. Amazing!


Prior to that tequila tasting, we conducted another serious tasting of olive oils a few weeks back - and if you've never attended one, I highly recommend you call some friends and conduct your own research.

Grab a loaf of something crunchy and some small dishes, and pour out the various oils you've assembled. I'd never tried smoked olive oil, but I'm now a huge fan of it.


And - the winner is ..... Di Stefano Olive Oil. You will be shocked at the difference between this oil and the one you probably have in your cupboard right now.


One of the common complaints about Las Vegas is that everyone is a transplant here, from somewhere else. That it is hard to meet people, and even harder to meet true friends. You want to make friends? Host a tasting at your home. Invite everyone to bring a few samples of oil or tequila or salt or whatever, and start tasting.

I'm starting to enjoy the "after hours" part of Open Shop even more than everyone designing and cutting and building things. It's a wonderful opportunity to get to know everyone on a different, more personal, level.

Who would have ever guessed that that would come from hanging around a woodshop?!


Cheers!


Sunday, July 22, 2012

Follow up on one of my recent projects


A few weeks ago, I wrote about a small table I was making.

It's been sitting in my shop for a couple of weeks, awaiting pickup, and one of my blog readers wrote to ask if I would post a picture of it when it was finished.

Remember the top started off as a hexagon, Dominoe'd together,


and ended up in a circle, rabbeted for a sandwich of engraved plexiglas and double strength glass.


The photos aren't great; the sun was cooperating at all, but at least you can see the top here, with its engraved artwork. It's common for each graduating class to leave a gift behind at the local air force base, and this is one of those pieces.


This bar height table is probably holding a beer or two right about now. Congrats to the graduating class that commissioned it!


Thursday, July 19, 2012

The Sassafras BedPosts

In the last post, I made sides rails for a Sassafras bed.

Now it's time to make the bedposts.

This may sound strange, but when I'm building a piece of furniture, I can pretty much see all the details about it in my head. Like all the joints, the edges, the lines. Everything.

I know, weird. Right?

I pulled out a few more boards and sorted through them, picking out the most attractive ones for the headboard. The ones that weren't my first choice were perfect for the posts - which are going to be laminated into big, beefy columns.


These boards have been planed and cut a little longer than needed, for trimming later.


It's a good thing I have a lot of clamps!


I sorted through the boards, matching color and grain, for the most attractive posts I could achieve.


These are the footboard posts.


And the longer ones, for the headboard.


The next morning, I squared them up, and then cut them to their final length.


The bed hardware is really easy to install with a plunge router outfitted with an edge guide. I can't tell you how much I rely on Porter Cable routers; they're like extensions of my hands.

Here I routed a sample groove in a piece of scrap, to test the depth of the slot. It was perfect.


Here is the slot routed in the post, you can see my stop and start pencil marks.


Again, I squared off the rounded corners of the slot with a chisel, and then put the hardware in place.


This part of the hardware requires an additional slot, so I marked the area that needed to be removed,


and then routed the smaller slots with a narrower bit.


A perfect fit!


When all the hanger slots were cut, it was time to mortise the bedposts.


This was a lot of work to do in one day; it was hot in the shop and I was exhausted! I have an idea for a headboard carving rolling around in my brain, and I need to sleep on it.