Thursday, June 27, 2013

Rebuilding the Makita 2040 planer - part three


It really is rewarding to rebuild an old tool - and the work on the Makita 2040 planer is progressing smoothly. In the first post about this, I discussed taking out the old rollers, to have some work done on them

These rollers were in horrible shape! The foam on them had rotted, and they were sticky and impregnated with bits of sawdust.


 An Internet searching led me to Western Roller Corporation in Bend, Oregon. They couldn't have been more helpful, and knew exactly what I was talking about when I mentioned these particular rollers. 


I packed and sent them off, and started doing some final adjustments to the other rollers on the bed of the planer. 


This was very simple stuff - involving some straight edges and feeler gauges. If you're going to work on old machinery, you're going to need a GOOD straight edge!


 Adjusting the bottom rollers would have been easier if the manual wasn't so lame.  


The manual only gives you basic instructions, so it's up to you to figure out the tolerances you need. 


The bed rollers were adjusted to be just slightly above the bed surface - that way the boards slide just above the surface of the bed.  


And those two rollers were adjusted, I put a long straight edge across the whole planer, to adjust the two outside roller supports. 


This all sounds tricky, but honestly - it was the easiest part of the whole job. Here you can see the roller is too low, by about a quarter inch.


When I'm working on tools, I often wish I had an extra pair of hands - but clamps work just as well. With the straightedge clamped down, it was a breeze to adjust the two outside rollers into the correct position.


The re-covered rollers came back in about two weeks - covered with a neon chartreuse  polyurethane material. Damn, I forgot to take a picture of them before we started installing them - but suffice it to say that WRC did an EXCELLENT job covering them for about $90 a roller. New rollers cost close to $300 a piece, so covering them was the best option. 

Installing the newly covered rollers was just a bit tricky, and it helped to have an extra set of hands. As always, Eric is a godsend in the shop. He loves working on tools as much as I do! (Thanks for taking all the photos, Lupe!)


 Each end of the roller had to fit into a small bushing, and then secured in place with a plate and a couple of screws. the only difficult part was the spring that had to also be inserted. The spring put downward pressure on the roller, while we needed to compress it in order to attach the roller in place. 


 The picture below really shows what was involved, and we used a large block of wood under the roller (while raising the table) to compress the springs. 


Once the roller was in place, it was easy to screw the plate into place. There is not a lot of room for your hands, but I've worked in more cramped spaces than this. 


 It took a couple of attempts before we muscled everything into place. 


 The first roller took a while, maybe a half hour, but once we got to the second roller... piece of cake! It went in very quickly. 

Next was re-attaching the sprockets on the ends of rollers, and then mounting the chain, which was thoroughly cleaned. There was a crust of 30 year old grime on it!


 The chain went back together using its master link, and then we buttoned everything up - attaching the guards back into place, and the dust hood on top. 


Time to fire it up!


Let me just say that the surface of this wood after it was planed was remarkable. It felt nearly as smooth as hand-planed wood, with a perfect sheen and absolutely no chattering or machine marks.  Seriously, if you were building something with this wood, you could probably start sanding with 180 grit paper, right out of the planer. Maybe even 220 paper. 


So there you have it - a 32 year old planer that works as well today as it did when it was new. This is one of those times when I'm reminded that buying good quality tools is always preferable to saving a few dollars. 

Tuesday, June 25, 2013

A little shameless self-promotion...

Is it considered shameless self-promotion if someone else writes about you? 

My friend Diane Eugster asked if I'd participate in her "10 questions" profile series - where she "interviews" various artists.

On a related note - here's a link to Diane's Etsy store


Her store - Rag Dolls Rising - features some amazing eco-friendly rag dolls, completely handmade with amazing materials and craftsmanship. 


It's always nice to cross-promote each other - thanks for the interview, Diane!

Sunday, June 23, 2013

Let's finish up those end grain cutting boards

There are too many posts just dangling  out there - I still need to post pictures of that tall dresser I built and blogged about a couple of months ago, as well as wrap up the cutting board post. 

So - let's finish up these end grain boards.

After cutting and gluing the boards a second time, you end up with a wooden blank that still needs to be crosscut to form the small vertical pieces that will form the top of your end grain board. There were eight people in the class, and all eight made a blank, which was sawn into 1 1/4" strips. 


Cutting the board is easier with two people.


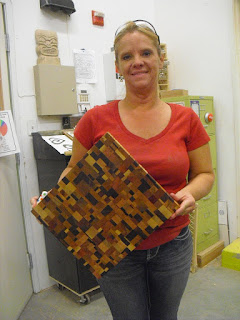
The cool part about this being a group project is that everyone put their strips on the table, and then we mixed and matched everyone's pieces together, making amazing boards. Here they are, grouped by each person's board blank. 


And here we are, grabbing for cool pieces of wood!


Now I've read in forums and magazines that say you can't run an end grain cutting board through a planer, but that's just not true. Sure, the tail end of the board can blow off, once it passes the cutter head unsupported. But the key to minimizing that is to glue a scrap board on the back end of the piece. I keep some 2x4s in the shop that work perfectly for this. Here's a board ready to be glued together.


Here are all the boards, awaiting the planer. 


This is another one of those "it takes a village" projects, with several people pushing the board into the planer, and someone on the back side, catching it as it exits the planer.


We still have to square up the board, as the ends are uneven. If your board is too big to fit on the miter gauge, just flip the miter gauge around and cut it the other way. 


One thing is certain - these boards need a lot of TLC - much more sanding than a regular cutting board. But - wow, they're worth every bit of the effort. I don't think you'll find a more gorgeous board out there!


 Congratulations to everyone for a job well done on these boards! These were a terrific team project, and everyone walked away with a masterpiece!


Thursday, June 20, 2013

Awww... this makes me sad....

This is sad - I'm not a huge TV watcher. But I have to admit - I absolutely love The Sopranos. It reminded me of all the weird intricacies of being Italian. 

RIP James G... way too young.


Here's another good one...

Wednesday, June 19, 2013

Taking the reins...

It's funny how things come full circle, if you wait long enough. Years ago - and I mean YEARS ago! - I used to frequent a very cool woodworking store in Cleveland. Think Lee Valley, only thirty years ago.


 I don't even know if they're still in business; I can't find anything out about them. But  I remember being a young (broke) woodworker who would visit their store and drool over the woodworking benches they sold.  


Leichtung Tools sold Lervad benches back then. I don't believe there are any US dealers who carry them anymore. That's a shame - they make a full line of excellent benches - for jewelers, carvers, and everyone in between. 


Out of the blue a couple of weeks ago, a woman called me and said she had a bench that she wanted to give away. Her husband had passed away, and she wanted to find a good home for it. 

I arranged a time to pick it up, and imagine my surprise when I walked into her garage and saw this Lervad Model 610 just sitting there,


 in nearly mint condition! 


She even had the original manual with it! It's a terrific
 little bench - complete with bench dogs 


and two vices. Yup! A tail vise and a shoulder vise....perfect for holding wood while planing 


or cutting joinery. 


This bench has literally been around the world - her husband bought it while in the military, and had it shipped to Europe, where he used it for light carving projects. The address on the paperwork she gave me even had his APO address on it.


It always feels special when someone donates a piece like this to the shop - like I've been given the guardianship of it. Not to sound corny, but receiving a bench like this commands that some respect be given to it. There's a responsibility that comes along with it. 


 You don't want people dripping glue all over it while gluing something up, or getting spray paint all over the top of it. 


So for now - I'll just find a good spot for it in the shop, and hopefully - let some people use it who will treat it well. 


Oh - I thought it might be a nice idea to commemorate it - so I ordered this plate. Many thanks to the Hall family for this... we'll take good care of it.

Thursday, June 13, 2013

Making the best cutting board ever! (Part one)

Sometimes these blog posts materialize quickly, like the last one,which popped up in a day. But this one has been in the works for a very long time. 

See - when you have a woodshop where there are classes running constantly, and steady stream of woodworkers making things, then you have a ton of scrap material that builds up quickly. That's not always a bad thing - because you can turn this scrap into some of the most lovely end grain boards that you'll ever see. 

I call them - confetti boards. They look like you've thrown a bunch of wood bits into the air, and they come down landing like this.


Years ago, I visited my buddy Larry's woodshop, and realized that he had more scrap than anyone could possibly use. Seriously, he probably had scraps from the 1970s laying around his shop. I showed him how to make this type of board, and he's been making and selling them ever since - commanding top dollar for these boards! 

Yes, end grain boards are in high demand, as they are kinder to knives than traditional cutting boards, which look like these.


As the theory goes, end grain boards are "self healing" with knife marks and cuts eventually "closing back up." I'm not so sure I buy that 100%, but I know that the end grain's vertical wood fibers are more open to the knife edge. Or as Pete in the Sin City Woodworkers group described - imagine a broom turned upside down. Now imagine using a knife on the very vertical edges of those broom bristles. When the knife cuts into them, the bristles part. When the knife is pulled away, the bristles go back together. That's the concept of an end grain board.

Me? I just think they look WAY better, and the fact that they're kinder to my knives is simply a plus. 

But they're a TON of work - in some cases - the amount of work is quadrupled. That's why they're so damn expensive. See - with a traditional board - you glue it up 


and plane it down. 

You can add some plugs to spice things up. Or not. 


These traditional boards are pretty simple. Just a few steps and you have a work of beauty. 

End grain boards are a whole different beast. 

It starts with scrap.  


Lots of it.


You'll need more scrap than you could ever dream about, if you want to make a lot of these boards. 


I save and eventually sort the scrap into piles. 


Each pile is sorted into boards that are relatively the same thickness, so that I can glue up the "blanks" that are needed for these boards.


Each blank is glued randomly - and honestly - the more random, the better. Thin strips work really well - so even if you have a quarter inch piece of material, it will play a part in this project. (This project may turn you into a hoarder.)


The only thing you should aim for is contrast - light/dark woods. 


Over and over again.


And - over and over again.


When you plane these down, you want them in random thicknesses - honestly - anything goes!


Now here's the tricky part.  You're going to rip some of these boards into strips, turn them on edge, and re-glue them back together.  Like this board - I ripped it into strips about 1 1/2" wide, and then flipped the strips up vertically.


Like this. 


Now you can start to see how we're developing some vertical and horizontal lines in these "blanks." 

I suppose there is one thing you need to think about - and that would be the width of your laminations. If you want your board to eventually be - let's say 18" wide, your final blanks need to be maybe 19 of 20" wide. 


Still - we're only halfway there.  

Stay tuned for part two....