A few weeks ago, I got a phone call from someone, asking if I could make some stools with storage in them. I was a little hesitant to commit to this project, so I told them I'd do a little research on it and get back to them.
And then I jumped down the rabbit hole known as woodworking.
![](https://blogger.googleusercontent.com/img/b/R29vZ2xl/AVvXsEiphdmcfXA-7wLvBJfoW8lF-DrGsAoNRahorToxIrb2AK8oGtCS-D9jMKInKYEJNcikAU0iA-tkLNZ5j8TnwFmr3_b4gegEWT2eyt8X-jc9janfJX3pf1ib07zylStz6CRaNghyLFDoEsRj2JcnnHL9HajJ2t3iGE8ayMN2hj-P-izUXs7wAtRY/s320/Screenshot%202023-08-15%20at%208.41.27%20AM.png)
There are so many great examples out there, and I found a few that I really liked. These would be good starting points for this project. And luckily, I was given some design freedom to come up with whatever I wanted.
Finally - I decided to build one for myself, to see if making 8 of them was something I wanted to undertake. I really liked this simple design, except for the slotted handle.
![](https://blogger.googleusercontent.com/img/b/R29vZ2xl/AVvXsEhfeYI4cgrI3AHCzvLbZTRjBV42XIFnsm5u5c-gII-FmK3R5fde4szEprL6IF-173Vz0P7vBqGfdcH79BdBWpIovLQnqN6IuZAVYW6xERiaCJZqXsIhxtE0Wpbof-Q0e9KowAnZGTjztyE4es44lC33yKVpNHmuAkQT-AU3W48Gc7CMotGVY8OJ/s320/1.png)
My buddy Andrew had given me a huge stack of walnut, so the material choice was an easy one to make. I prepped some pieces, and started my research.
![](https://blogger.googleusercontent.com/img/b/R29vZ2xl/AVvXsEi7-eeDzjwNcnFYV4Z6WUtIe-IZATx842kba72_uyfJN4mVrJyU5KT9QX3CEIACSCRAfFkI2LfQFAWzSJcy4sfFI_V2o7X6r-HXZrkV5hWqcN1EbiuNUjuuU_tyUAJhgKRV8cu3xbXEzfYCawa9JKzf_Ghj9XvWFKkU-a3wbbWzV9BlkMfKzo5b/s320/3.HEIC)
Since this will be used this as a seat, the height needed to be around 18”.
![](https://blogger.googleusercontent.com/img/b/R29vZ2xl/AVvXsEglhsp4JKuzMHktaAbvrhrSozMDqVCr7lNfyg63rIR8Jb7HwW06iXgMRyAg1x-kaPQHyFa_DGtFy7gclKrbn8y2tBvbzyLVaJelW8N2Dcu5xQ3KDI4BqTbcc1S0EECXBypRONzkDm8NjhQ0MEyRIzzlWDHOw-qo5oAT-Uf2gXNzBjh_AgWhMVVn/s320/2.heic)
I haven’t decided if I’ll upholster the seat, or make a wooden top for it. Either way - the total height for this glue-up needed to be around 17” tall.
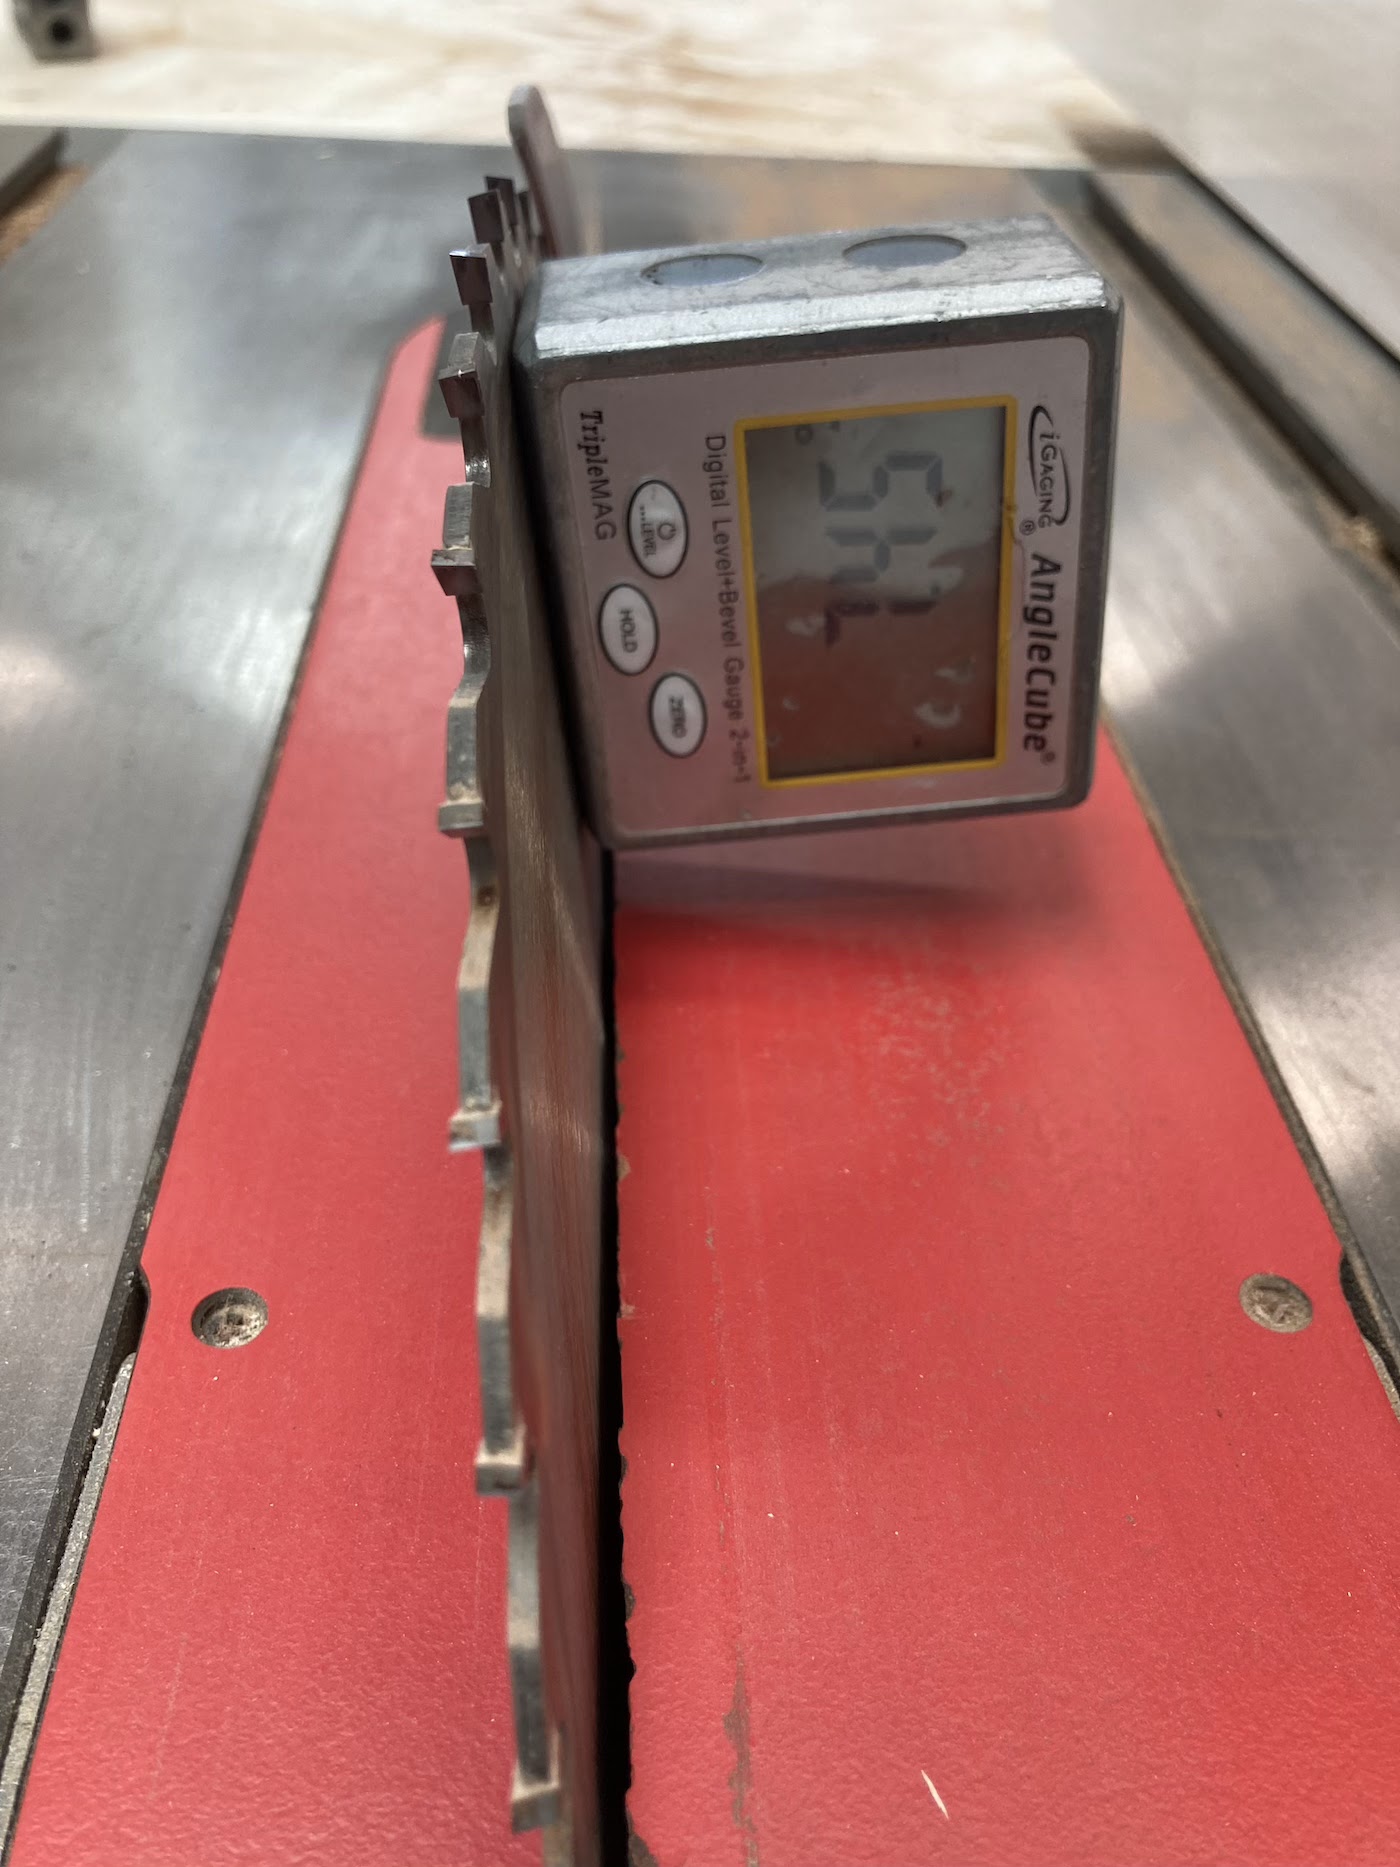
I started off by using an online calculator to figure out the angles that I would need to cut, based on the design.
![](https://blogger.googleusercontent.com/img/b/R29vZ2xl/AVvXsEixxrPYmwSfkCA2b-_JrXsNyXtFhbmw92rz3RZpOkYor2BG0nzdYyKVZKv2BH8cGh7AAbGIBg46R27r39P_0NrLqlX1fg9w-dTCnrbStzp7aNpC_2zpI_dWvM9dzEkwol4R2r9ItVieIviBuD2R63Sh-AR6LPHUirL_ZQKsSc7e9LfMmxwxBePR/s320/6.png)
Then I tilted the blade to start cutting some angles.
![](https://blogger.googleusercontent.com/img/b/R29vZ2xl/AVvXsEgsI87alPEPfG9n4AsyHxOreZBv89TKHGWRPtjpaHO7jlP81wXlxdInJc-k4NKHX8sPZbajXJqEcR-UJ1bfzPT1r1IhzSNTUpvqXlXaaJltPrLslimrDF6DBKBSSSvT4ydxD86OcsX_ubEQa321y869vIfNrRmiJUFisQ3PEgRuXdg1dysc9Tk4/s320/5.HEIC)
This online calculator made it pretty easy to figure everything out.
These pieces will end up needing a compound cut - the wood will be both angled, and tapered. A little tricky, but - hey, my saw and I can handle it.
![](https://blogger.googleusercontent.com/img/b/R29vZ2xl/AVvXsEh1CANOCntXtohoQvvzghA4Ibgj97epUQW_sVRzQU-lY7PgnLNPwO1zxbQhPzJ7IV7_Vqr5JctesCOhP4bD4_htYDp0gr3Rj-YE-2QFnTrj8fQu59FXHJgsiwx-oabbtKSDXlcSeNOwkpzR42QVHk4Y0v9-qlTfelwp-sTYPKxEEpa4V5nBY4mF/s320/4.HEIC)
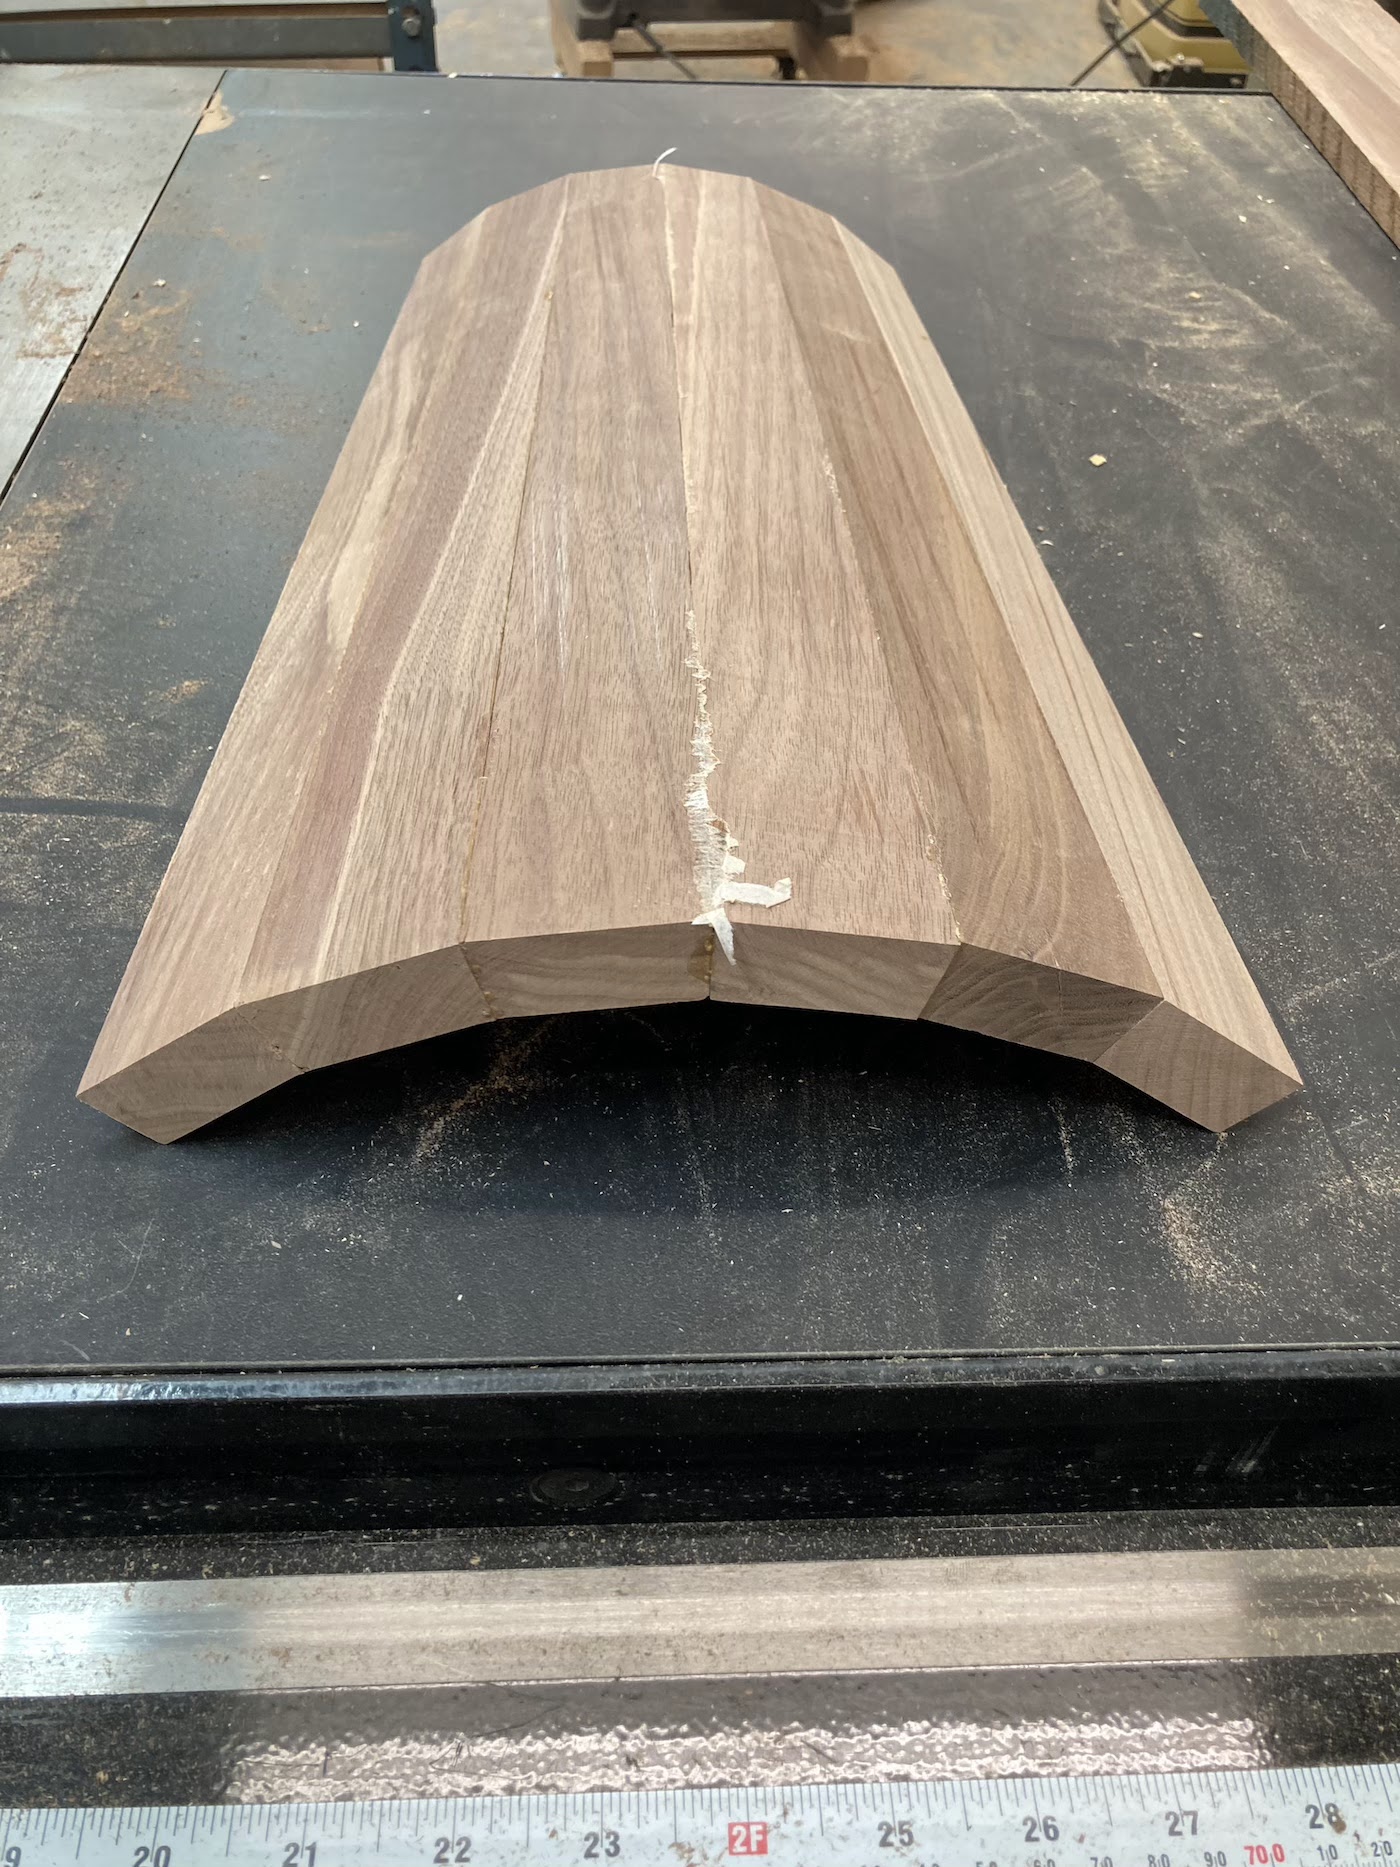
If I've learned anything, I know that jigs are the way to go. So I made a jig to cut the tapers, called staves, and cut 24 of them in total.
It was easiest to glue them together three staves at a time, instead of trying to glue the whole thing up at once. (Trust me, I learned this the hard way many years ago.). Masking tape makes life a little easier.
![](https://blogger.googleusercontent.com/img/b/R29vZ2xl/AVvXsEhpgbaUtu10QGWfl2O5kgQx1J7g1ew_rRyZtQ2d4qWy_noFNHXLfsHGmZRdDgNbImfu6Advc-1xMgMoJrZlR4aTVZ_jfF_wEAgEXqVZjPjWmRkDmN4RQljcrk8AJWffPlmfOFSnqfea6PqaiGb6mvGnThZ39h-EnPl6F0e51kUJTfmUmYZcbADu/s320/7.HEIC)
And since there were 24 staves, I glued three together,
![](https://blogger.googleusercontent.com/img/b/R29vZ2xl/AVvXsEhGDguXZ3ubGzUE3TH8LHsLdQyycKFkEhSAGLZqcH3caVXKcY5PqDiFYz6BjEBz-rS5nueWNl8xH3w-fZwWE4TSAgq0JSR7oSRuddw7L2YAcM540ukT0Xj44vUcL7r2URFebc-zSDOHCiLym9RQyCHDhL3MxzfM_3QGqjM_a74pbNx7f39tZ4kp/s320/8.HEIC)
and then three more,
![](https://blogger.googleusercontent.com/img/b/R29vZ2xl/AVvXsEh_BwaZSKOLsx5bPWq-1wQZQJkKW7wqV8r9PT2p1XrqhNbUBT6qml-b5dk6TZMU5sOl9XCIJyqZyDv0yO0D1x98B8yTWkeo3bBkED5IRszbSmJBIYX8xGghEdaCZECnXxRhjoSmKYN_GYWtHZ9EXt5x022c1pWdBwNHdT9W9CYNzP7mRbwxM8D8/s320/11.HEIC)
and so on…
![](https://blogger.googleusercontent.com/img/b/R29vZ2xl/AVvXsEi7nQabdF6U8PpOsj2t_rjtJrYN1_vMrSmcCBMqI6DXy0a_V1f8eUFfMYOZYc7oIfSLiKw3TMezGEnBUMph79C9FJt1In9c5pzDQKx_vEBr6-sYuPXjTgvZ_9xWivtS49DugByRGK-nFaLJc3h7eWnBGpU7K4eQ9Ph2eOl3yg-vLHUmSoHYNcWo/s320/10.HEIC)
until I had eight parts.
![](https://blogger.googleusercontent.com/img/b/R29vZ2xl/AVvXsEjpAHOW027WstKrJLd7EtuRHzwCULm2nWhuqBmvXLJ9F6Ilf_Sr_jjdruRFUrcQCgpZemVJjG90oXaSVlIu85GV5hTf-oawirFVAs43MhA9eI7kzDebDVgW2I7BoQK6tPi8LVWZbIk3OEIMaCk8UiD5-3xQs-CRw_2h7sLHY4GRvaE43gVwIJQn/s320/12.HEIC)
And then four parts. You get the idea.
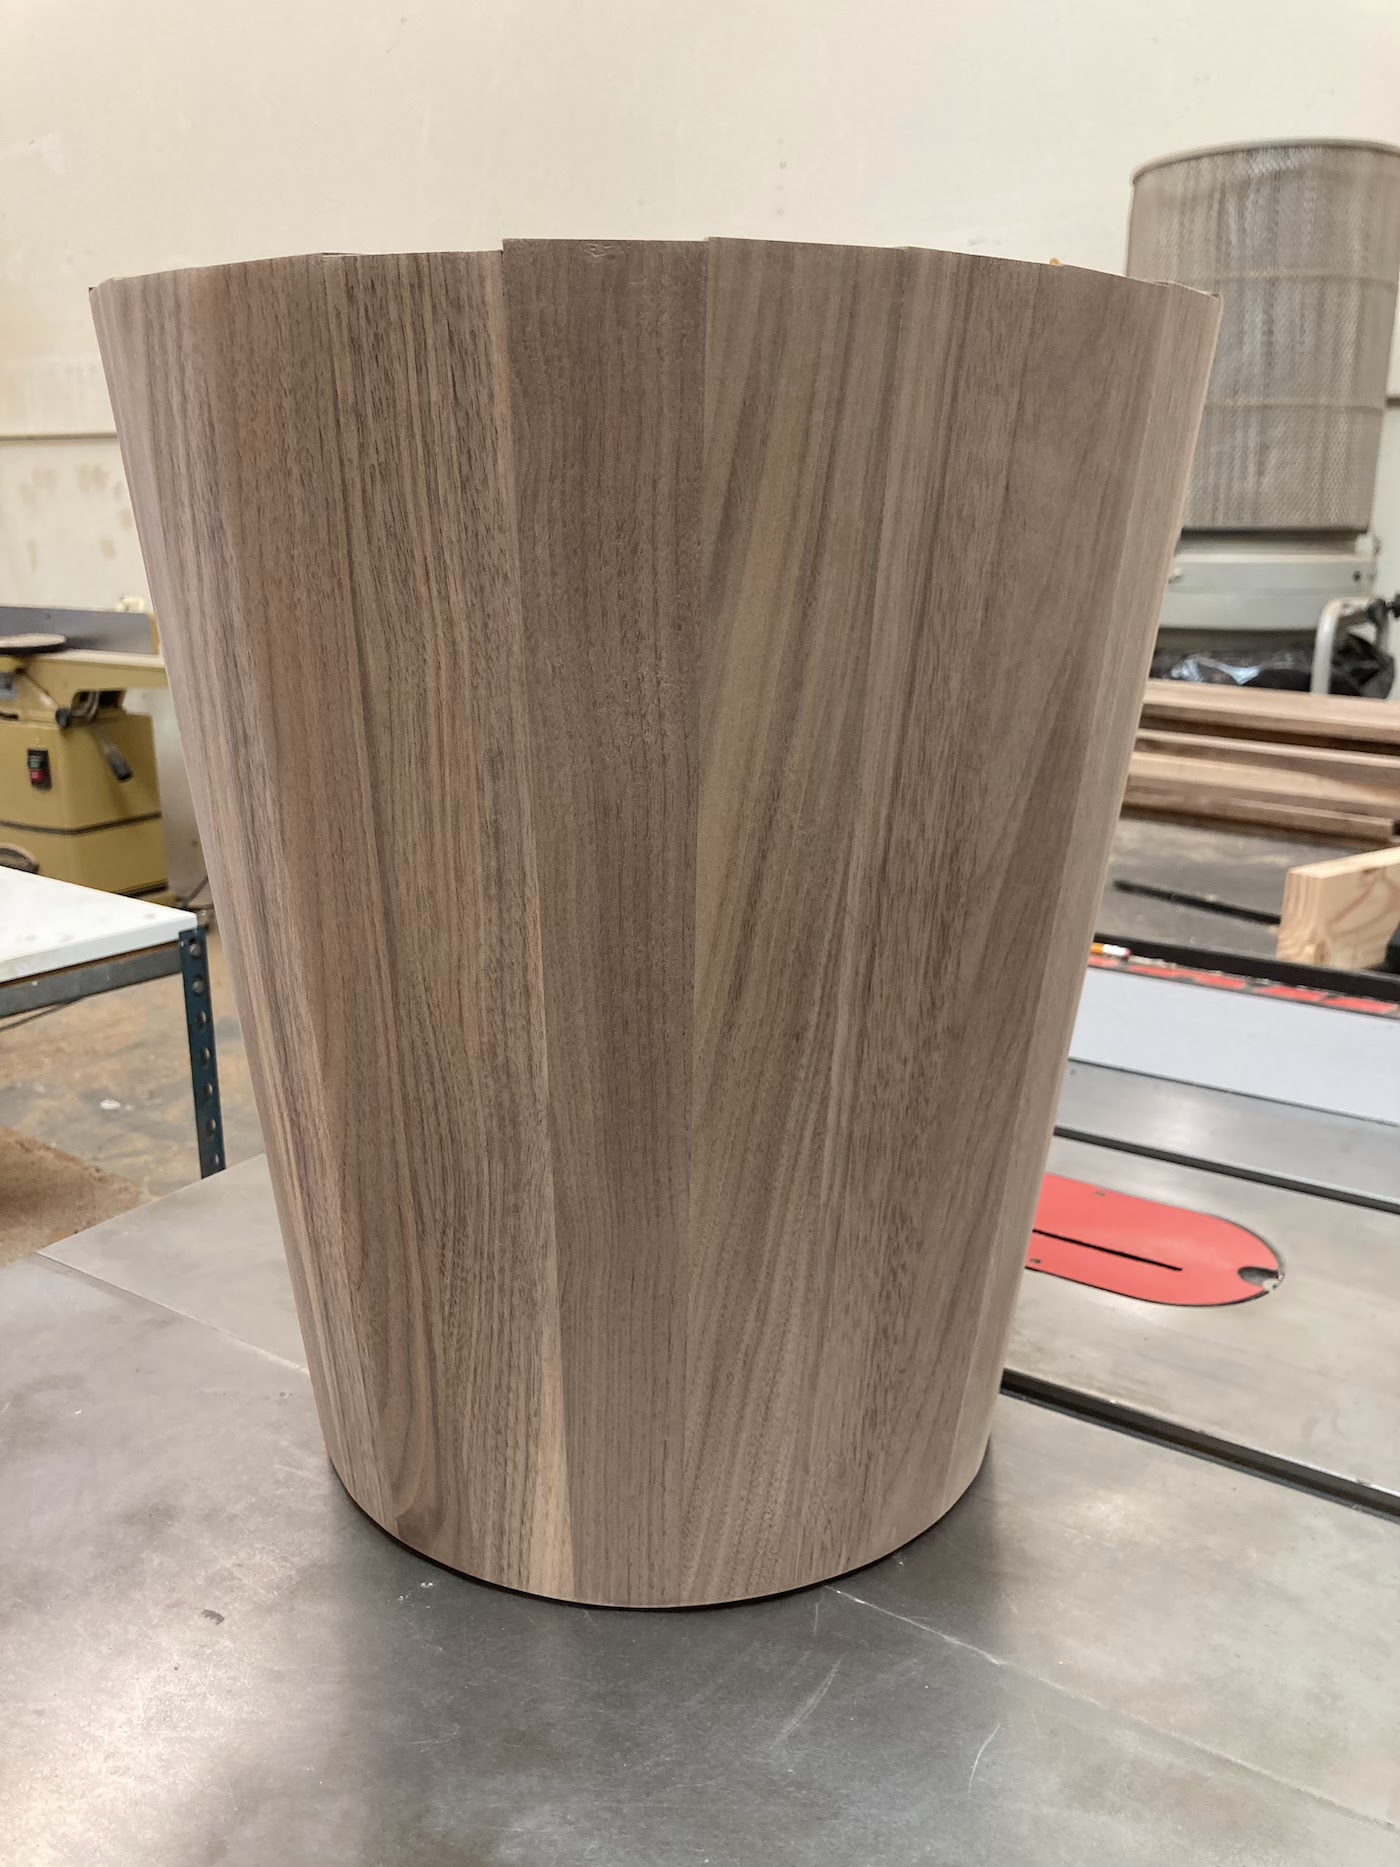
Finally, I wound up with 2 halves.
![](https://blogger.googleusercontent.com/img/b/R29vZ2xl/AVvXsEj1oH4W5FO86RkLf-MLAqBalPAPRT2KEdFTnB1Kkrvew53CjEmPwFX8AM3Rl2iml5yvPWz5HbR94dNolA3Uz4u9idIsZPqDtRW0tpQ74gdQt-iSE3Fxf3f4x4IdSHexEY3PXJT74x2QYjF2uTFWXg1We-vdv3xv_H_If1Xwn7oJ7Y92QeOItKYT/s320/13.HEIC)
Gluing up angles is tricky, your clamps can slip, which makes life hell.
So gluing everything into some sections made life a lot easier.
I actually got pretty good at it, and the final glue up was super easy.
![](https://blogger.googleusercontent.com/img/b/R29vZ2xl/AVvXsEgoCdWNPi1iOUIH6wvRq4N8I0lSYL0vK5mmLmhiizk3mt-9QZfWjocvCjiY3Ro-HPfgfGjq9cJDIhYk2jYxxbumbPYd0qz_ZXxNagj6RU7WstpXTPui-yQ2JFOUMteF-PFqPYkgjLYugUmR2f6-YPQ-7yqlj7D3n0yfgJ8CT3fnA5V-Wu2SIZTF/s320/15.HEIC)
I did have to add a few tapered shims, so that the strap clamps wouldn’t slip off.
![](https://blogger.googleusercontent.com/img/b/R29vZ2xl/AVvXsEiApSJ-1bYQattlW0qJn_-tIFqiJY4iPaDipzBshW99C-8kSwf44DBoLJhSX-WBz0l5GSNVYHvNNHb9YtZaFggTF6fnD0spSbc-5LIs5KMAdPI7zEtvWiM9eTexS4e8dWsl0kZxfml1iR4OoAMp7JbwUmczZRDUfjuFpYjiO6RjWCwRzvvAS7Qr/s320/16.HEIC)
Once it was glued, I needed to trim the top and bottom.
![](https://blogger.googleusercontent.com/img/b/R29vZ2xl/AVvXsEgORii3p1zmP8QcH6dQ5oDqRjg4y_m8DrYw24jbdUN7wT_cq8EyaDBPEjrbgRFmJjPP9ZoZfCjZELSwaMEV4JC5HSFqjndNlKi3IKcRLNfPEilV-j6qiWHq28QAumtt99rjIYrBYHP9dUHUJcAYiH8U48BFITUwwItAzijNrBZR0mbar2uP2MzP/s320/17.HEIC)
I learned a trick along time ago for fixing chairs that don't sit flat on a floor. If you extend your blade about a 16th of an inch or so above the table saw top, you can do very light skimming cuts to slightly trim the leg. So I scribed a line that I needed to cut and trimmed it carefully on the tablesaw. Of course, I kept checking to make sure it was flat, with no wobbles.
![](https://blogger.googleusercontent.com/img/b/R29vZ2xl/AVvXsEhvyPYcIVZV7GoGnvKh-fq9mpp7slQO6nNaLbyL4z2lHX3_2Bqjg2erO2wL34BeIzSo0wtSY_zuIrgiivyijFm1w0OjdriggQX0xi-vbOEAcmQZIodL_v1rjps2ZokQKKRPGbB3ylliUr1YPNcBMGVOo65_hclz40rC4TFFku5Rb9OTp3HohVfJ/s320/18.HEIC)
Once I had the bottom trimmed and sanded,
![](https://blogger.googleusercontent.com/img/b/R29vZ2xl/AVvXsEjvT3y5JnHaaOAI96hqNmcJmqb0vtXkWwLl9LebPqk9D11CvtqX6u78QfoB5cRobaCcNFPq6vbjLB_fEkmXVI8CtTO_q0HGNQCzHTOLBCXW4kRHsmh8af6LGFTkSekKaJKP8r6__0JaD0yT2AAZt6L6KEYxOzqtIXHD1uhmmzXAe7MZ-iuWmueC/s320/19.heic)
I drew a parallel line at the top, so I could trim the top edge. Again, I did this on the tablesaw it was pretty simple to accomplish. A little sanding and breaking the edges and this stool was starting to look fabulous.
![](https://blogger.googleusercontent.com/img/b/R29vZ2xl/AVvXsEjx6qcJf5b-TtsaMWaXDixvJmh0MeYBUVqtfMjgDe3sFP68sXgJLBux0Kg9I9YgsVgSYRbHXfxXJwBgtYPKQV-8RLcxosawlTbrzGFxgX98nZDJUb_-_l4sTExV6o8VqquxKaUONuXbVz86j25BW_qCfp5RwioKyBJjeM8fQStPP1hT_GrzkE00/s320/20.HEIC)
This was a super tricky build, and I didn't consider how I would put a bottom in the stool. A rabbet on the bottom edge? A disc dropped in from the top, and fastened in place?
I'll think about that tomorrow!