A forum for discussing woodworking, specifically furniture making. Feel free to post comments and questions about your current projects, tools, studio set-up, or whatever is on your mind.
This blog is moderated by Jamie Yocono, owner of Wood It Is! Custom Cabinetry in Las Vegas, NV. Her website is wooditis.com. If you need to speak to an actual human... call 702-672-8981!
Now...let's talk wood!
We're having some of the coldest weather in years here in Las Vegas. Of course, it comes right as I need a warm day to fume some picture frames. What is fuming, you ask?
Fuming wood is a technique for darkening wood by exposing it to ammonia fumes. This technique works particularly well with woods rich in tannins, like white oak. This process was commonly used in early Arts and Crafts furniture, and was discovered when people noticed that the wood in horse barns turned a lovely deep brown color. The change was occurring from the horse urine reacting with the wood.
Luckily, today you don't need a horse to get these results, just some very high strength ammonia.
Here are some photos of two white oak tables I made and fumed years ago. That is the color that the white oak will achieve.
So a couple of weeks ago, we all made white oak frames in a picture frame class I was teaching. I took everyone's unfinished frame home, so I could put them into a fuming tent and monitor the darkening process.
Of course, every single day - it's been too cold to do it! The process is greatly hastened by the addition of warmth, so I'll just have to wait for the next sunny day to attempt it.
Stella, the shop mascot, doesn't really like this cold weather either. So as I was making a few sweatshirts for her to wear in the shop, I thought it might make an interesting blog post.
My buddy Helen showed me how to do this many years ago, and it's a perfect way to re-purpose old sweatshirts. I don't know about you, but I always have old, stained sweatshirts laying around the house.
First, cut the sleeves off of an old sweatshirt, up near the shoulder.
Try to measure the circumference of your pet's neck. Or just hold the sleeve up next to their neck, to know where to cut the sleeve to length. Then - cut a few arm holes. Remember - the holes aren't completely on opposite sides, they're located more toward the front of the body.
Finally - cut the sleeve to length. I like to taper it a little, so it covers her body on top, but not on the underside.
As you can see, I left the sleeve a little long, to make a turtleneck out of this sleeve. Just fold it over, it's looks amazing.
She's such a ham, I put the sweatshirt on her, and asked her to tilt her head back, so I could get a nice photo of it.
Stay warm, and stay tuned... I'll have some images of the fumed picture frames as soon as we have a warm day here. Meanwhile, I'm heading to the shop with silk underwear under my jeans. BBBBBbbbbrrrrrrrrrrrrrrrr!
Matching a finish is always difficult, especially if the wood is stained, so I usually grab some different cans of stain and make a few samples. In this case, I tried some Watco Walnut, a Minwax Gel in Mahogany, Minwax Walnut, and to round out the batch, a Zarr stain in walnut.
After staining some scrap wood that had left over from making the base, I decided these two were the closest match. You always want to stain wood from the piece you've made, so that you'll get an accurate color match. I thought that was a given, but when I mentioned it to someone recently, they said they'd never thought of doing that.
You can see from this picture that the mahogany isn't dark enough.But the walnut is a little too dark, and needs more red tones.
So I mixed up a little of both in a cup, and tried it on another piece of scrap. It was perfect.
The stain goes on very evenly; if I have to stain wood, Minwax products are usually the ones I use.
The color match is nearly perfect.
The only real difference between the two sections of the legs is the sheen. The original section has a nice satin sheen, while the new legs, which are just raw wood, need some protection.
To bring some sheen to the wood, I used Mixwax Wipe-on Poly over the stain. We've been having a cold front here, so it is chilly in my shop. That makes the drying time very slow.
Here is the sheen (finally!) building up on the wood.
In the picture below, I have marked the area with the red line to show the new section of the leg. I think it turned out to be an pretty good match, don't you? And here is the final piece, finished and awaiting pick-up.
I'm going to say something I never thought I would hear myself saying, but after the last couple of repair jobs I have completed, I am actually starting to enjoy repairing old furniture. It gives me a chance to work with some different woods, study new construction details, and has given me an appreciation of woodworking that took place long ago.
After the replacement legs were turned on the wood lathe, the next step was to make the rest of the base for this piece. This was a perfect time to use the my Festool Domino, so I set it up and cut the various mortises on the appropriate components.
Because the turned pieces had a square section on them, it was quite easy to cut mortises in them.
Attaching the stretchers was simple - just cut them to length, and mortise the ends.
The pieces go together like Tinker-Toys, once all your joinery is cut.
The Domino even made attaching the new legs a breeze. On the back legs, I used a double tenon, for extra strength. The little piece of masking tape (with a line drawn on it) shows me where the center of that leg is, as opposed to drawing on the leg with a pencil.
It would be very easy to knock one of the legs off it with a vacuum cleaner, so I wanted to beef the joint up a bit.
Joining the newly turned leg to it's mate proved a little more problematic. But since I knew where the exact center of the leg was, I drilled a hole, installed a 3/8" dowel center,
and marked it's location on the upper piece. Then I drilled a hole into the existing legs, so that the two pieces would mate perfectly.
The dowel is acting both as a alignment feature, and a structural component.
With those double tenons on the back legs, that base isn't going anywhere.
Once the base was assembled, I set the cabinet on top of it, to see how it fit.
Perfect!
So I applied glue to the tenons, and assembled the base. Once it was dry, I slid the base in place, set the piece upright, and let gravity act as my clamp overnight.
A client recently stopped by the shop to ask if I could possibly make some legs for a dining room piece she owned. When it was new, the piece was probably about six feet tall. But someone had taken a saw and cut about seven inches from the legs.
WTF?
Now the piece was shorter, didn't match the rest of the dining room set, and frankly, looked out of proportion with the others in the dining room. Here is the sideboard, with the full length legs.
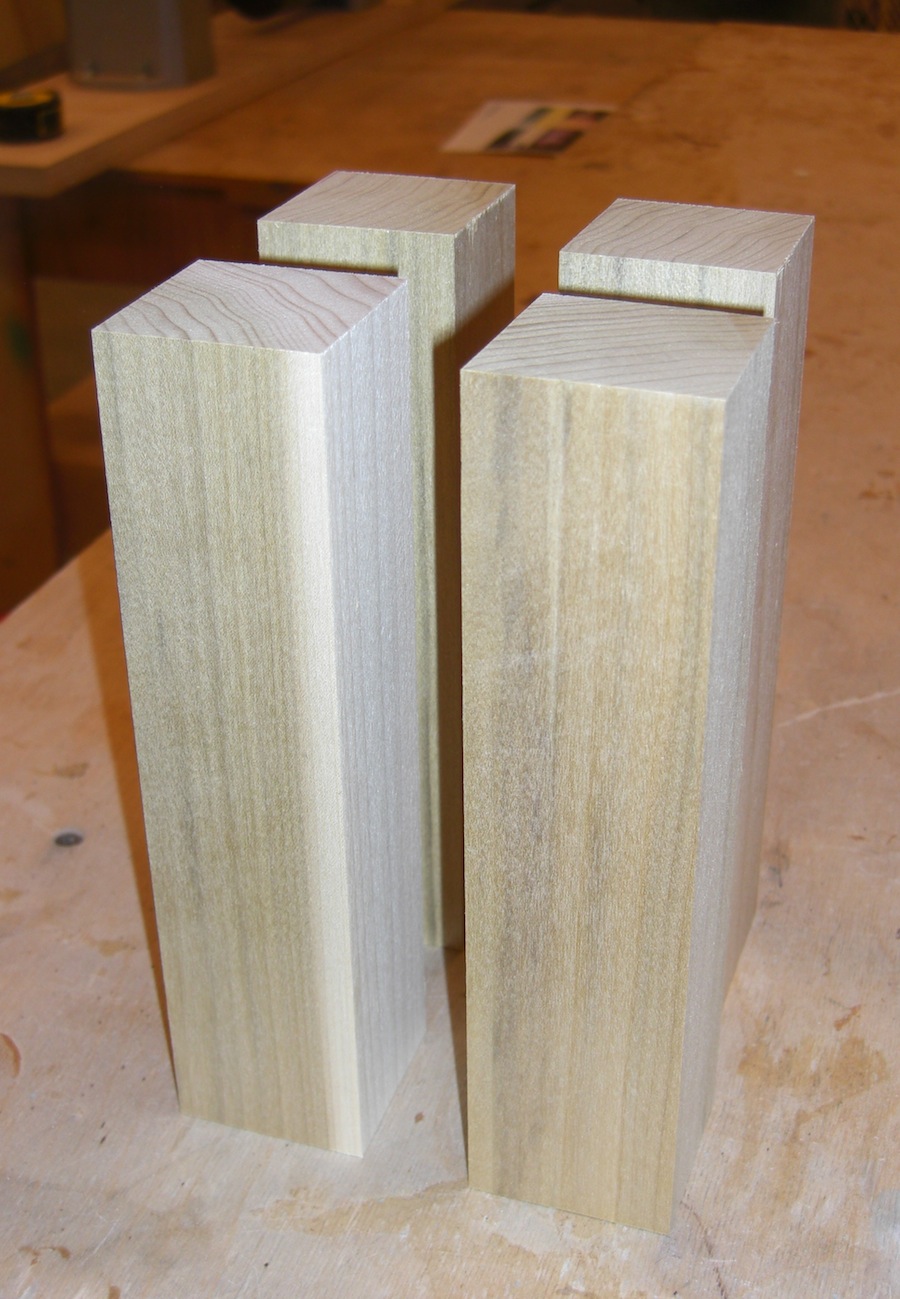
My mission? To make leg extensions for the tallboy, bringing it back to it's original height. The legs start off at nearly 2" square, luckily, I had a piece of Poplar in that thickness. I rough cut the material to length,
then set up a stop block and cut all four legs to their exact length, squaring the ends.
Only two of these legs have to be turned on the lathe.
I grabbed my contour gauge, which is a device that allows you to trace and copy irregular shapes and profiles. Thin metal needles are stacked in a holder; you press the device into what you want to copy, and it duplicates the profile for you — both positively and negatively. Sweet.
This is an easy way to get the outline of whatever you want to copy. I don't use this tool very often, but it's really helpful in a situation like this.
Here is a picture of what I need to duplicate; I've found it's really helpful to take photos of the piece next to a ruler or tape measure, so I can see the various measurements of what I'm recreating.
I transferred the measurements, as well as some crude shapes, to the wooden blank.
Here you can see how I've laid it out on the blank.
And now it's chucked in the lathe, where I can start turning it.
Turning wood on the lathe is fun and very addicting, but trying to duplicate something is quite the challenge. When people come by, asking me to duplicate a part, I usually warn them that my work will look generally like the original piece. Close, but no cigar, whatever the hell that means.
It's hard enough to find someone willing to repair furniture, let alone turn new parts, so most people seem willing to accept my caveat.
The first few cuts start to define the shape on the spindle.
And Stella sits on a bench nearby, watching me work. She's really just waiting for me to put the tools down and play with her.
The leg is pretty much where I want it to be, just need to do a little more sanding.
One down, one more to make.
Each leg took me about an hour, from start to finish. It's not perfect, but PDC. (That's pretty damn close, in woodworking terms.) My buddy Dan suggested I buy a duplicator, where I could mass produce wooden parts more efficiently.
Yeah... that's not going to happen. They're too expensive, and since I only do this about three times a year, it's just not worth the cost.
Now that they're made, I have to build them into the rest of the base.
I have another post for the rest of this construction coming. But here's a little video for you to enjoy while I work on the rest of the base. I think I'm finally getting the hang of video editing.
So last May, while he was off leading a group to Mt. Everest, I was thinking about Jon, and decided to make something cool for him. At the time, I was playing with a lot of clay, and decided to try making Jon's logo out of clay.
So here is Jon's The Rest of Everest logo on the lower left hand corner of this picture.
And here is the pattern I roughed out on my computer. I proceeded to make this pattern directly in plywood, so that I would be able to duplicate it, should I have the need to make any extra parts for this tile set. Once the clay was rolled into slabs, I cut out the various parts. They were subsequently bisque fired, glazed, and then re-fired, resulting in three full sets of this logo. Being a member of Over-achievers Anonymous, of course I made some custom wooden frames to hold these three sets. (Need you ask?)
Let's fast forward to today, where I finally got around to grouting these tile sets. For the first set, I used a light gray grout.
But after looking at it, I decided it wasn't the proper color. More mosaics are ruined by using the wrong color grout than anything else - including poor composition. Trust me on this. When it doubt, look for a unifying color on the piece - in this case, the dark brown frame should have sent me screaming messages that I needed to use dark brown grout.
For the next set, I used the dark brown grout. A small piece of burlap to clean up the grout works nicely.
If you sprinkle a little bit of the grout (in its powder form) on the mosaic, it helps clean up the residue.
Here is my favorite version, with the prayer flags as an integral part of the mosaic design.
The flag detail is awesome.
The other two versions were slightly different - I wanted a bit of three dimensionality to the piece, so first, I applied the background layer of tile, and grouted it.
Then epoxied the flags on top. One piece has five flags (in proper order, to boot), but I just couldn't get past the lighter colored grout. It was awful.
So I grabbed an X-acto knife and dug it all out. This color is much better, wouldn't you agree?
Here's the last piece - the three-dimensional piece with six flags. I just like the symmetry of starting and ending with a blue flag, call me anal.
There is a certain charm in making custom logos into tile sets.
Lets face it, it is not something that you can just go to a store and purchase. You have to know a ceramist, and one who is willing to take the time to do this. Here is another logo I made for a friend - in this case, the logo of the ranch that he owns. I am pretty sure this tile is hanging in his woodshop, hopefully in a frame that he has made.
Anyone else out there making custom tiles? I'll post photos of them if you send some pictures to me.