Repairing furniture isn't my favorite thing to do, although I get a lot of requests about it. I've always thought someone could have a helluva good business if they started a good repair/refinishing shop. It's just not my thing, but there is definitely a need for it.
About a month ago, a fellow stopped in to ask if I would repair some chairs. My usual response is - can I build you new ones, instead? These chairs weren't in horrible shape, and they were made of teak, so they were definitely worth saving. But one was wickedly broken. This back seat rail is split beyond repair. Luckily, only one chair was this bad.
About a month ago, a fellow stopped in to ask if I would repair some chairs. My usual response is - can I build you new ones, instead? These chairs weren't in horrible shape, and they were made of teak, so they were definitely worth saving. But one was wickedly broken. This back seat rail is split beyond repair. Luckily, only one chair was this bad.

Someone had tried to fix these chairs once before; there were at least two different types of glues in most of the joints. The first step was to remove the corner blocks. Whoever put those on wanted to make sure that they never came off! They were stapled, glued and screwed. With slotted screws, which are a PITA to remove. They were rusty and stripped, and made this part of the job pretty miserable.
The only way to remove the corner blocks was to cut them down the middle and break them apart.
 The wood was pretty soft, so it wasn't that difficult.
  But pulling out the staples was a little tougher. I use special pliers, made for removing screws. And channel locks for pulling out the staples.
This is the pile of debris from just one chair!

After everything is removed. there is quite a bit of scraping and clean-up to be done. If you don't scrape off the old glue and work with fresh wood, none of your repair work will hold.

You can see the sad state of these joints, each chair's corner joints were broken like this picture shows.
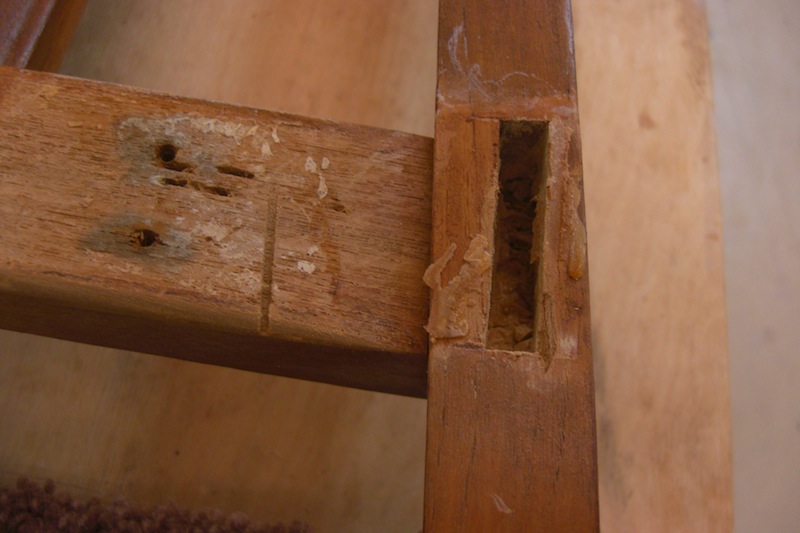
 Once everything is apart, more cleaning is needed. This tenon went from this
 Once everything is apart, more cleaning is needed. This tenon went from this
 to this.
The mortises were in very bad shape, which required quite a bit of work with a small chisel. Can you see why I don't like doing repairs?
 After all of the parts are cleaned and dry-fitted back together, the chair can be re-assembled. To ensure that nothing is going to come apart again, I pinned each joint with small cross-dowels.
 After each leg is pinned from both sides, new corner blocks are cut to size, and glued and screwed into place.
Once the glue in the pinned joints is dry, I carefully cut the pins with a flush cut saw. And then carefully sanded the area with with a flat sanding block. Here is a pinned joint on the front leg.

Here is the back leg joint.

And finally - the finished chair, reassembled and ready for Thanksgiving's company.
 It's not that repairing chairs is that difficult, it's just that the repairs take a lot of time. Everything is tedious. And you really need to be well-versed in joinery and gluing techniques in order to make repairs that will last.
It doesn't make sense to be lazy when repairing a chair; take your time, remove all the old glue and clean up everything. Reassemble the piece using smart joinery techniques to ensure that your repairs will last a long time. Otherwise, what you've repaired might end up in my shop someday!
No comments:
Post a Comment