First off - Happy Memorial day! I'd like to thank all the veterans out there for their service, and then re-post something I wrote six years ago. (It's below)
Here's my pop, as a very young seaman. (Handsome fella!)

It started with a phone call.
Could I possibly design a coffee table to hold two military casket flags? It sounded like a really sad project. But then I learned that the flags belonged to a husband and wife, both who had served in the military many years ago. This table was being commissioned to honor someone's grandparents. To hold their flags, and to display some of their memorabilia, including medals, patches, coins and dogtags. What a nice tribute. I love a good challenge, especially one that is near and dear to my heart.
I grabbed my sketchbook and drew a few different versions. Once I had a few ideas, I drew them using my favorite drawing program - MacDraft. Mac lovers, I highly recommend this! Here is what I present to my clients, when designing a piece for them.
 Once we nailed down a few details, like the type of wood she wanted, whether or not she wanted a shelf below, and the color of stain, I started this project by laying out the table legs on a full sized template of the tabletop. This table will eventually get a glass top, and the whole piece will be shipped back east to a family member. So I decided it would be best to plan on using a stock size of table top glass - a 24" x 48" piece. Designing that way works well, especially when the buyer is on a tight budget. These days, that's most of my customers!
Once the legs were positioned, I could figure out the lengths of the aprons (or skirt boards) and the position of the diagonal pieces that would encase the flags.

I'm very particular about grain management on the pieces I build, so I positioned the legs to ensure that the best (i.e. straightest) grain would be visible on the long sides of this table. Once I had the correct leg lay-out, I labeled them. (FL - Front Left, FR = Front Right, and so on.)
It's easy to screw this up, and I've been known to tear apart a table because I couldn't stand the way the ways the legs looked.

Since I'd already determined the length of the aprons, I cut them to length, remembering to add an extra 2.5" to the length, for the tenons on each end. The "inside" measurement is sometimes called an s/s meansurement, meaning shoulder to shoulder. Don't forget to add the extra inches for the tenons or you'll come up short. I cut a sample mortise so that I could do a "test-fit" when I cut the tenons.

Here are the tenons; they fit into that test piece perfectly.

After the tenons are cut, it's easiest to mark the mortises is to lay the apron right on top of the leg and mark their location. My 1-2-3 block helpsto align the tops of both pieces.

The tenons needed a little cleaning-up, because the shoulders were a little wonky. So I clamped it down and used a shoulder plane to clean them up a bit.

A Lee Valley shoulder plane is the perfect tool for this task.

And this bench clamp held the board down perfectly while I planed. If you hang around my shop for any length of time, you know how much this clamp gets used. It's simply indispensable.

The joint fit perfectly, so it was time to cut a small slot for the bottom to slip into. I put the joint together, and used a small saddle square to mark the location of the slot. I usually mark things like this with an X-acto knife, rather than a pencil. The line is much finer, and allows me to be more accurate.

I pulled out the double whammy of saws - this dovetail saw for most of the cutting, and then a Japanese saw for finishing the very corner of the notch.

It only took about two minutes per leg, maybe less.

Then I tested the fit with a scrap piece of the plywood bottom material. This was a great fit!

It's easiest to build furniture by breaking it down to a series of sub-assemblies. That way, you don't have to struggle to glue and assemble the whole piece at once. I've always found that assembling a piece into it's various components works best for me. So here, I assembled a mortise-and-tenon leg joint and pinned it together with small dowels. Pinning the joint together makes it incredibly strong. I used three pins per leg and left the sub assemblies to dry overnight.

The next morning, the girls and I headed back to the shop.
 You know what they had on their agenda.
Here is one side of the table, unclamped and in need of a little touch-up sanding. The other side is sitting on my saw, behind the cart.

I did a quick dry-fit of the table, to test fit everything one more time before it's final assembly.

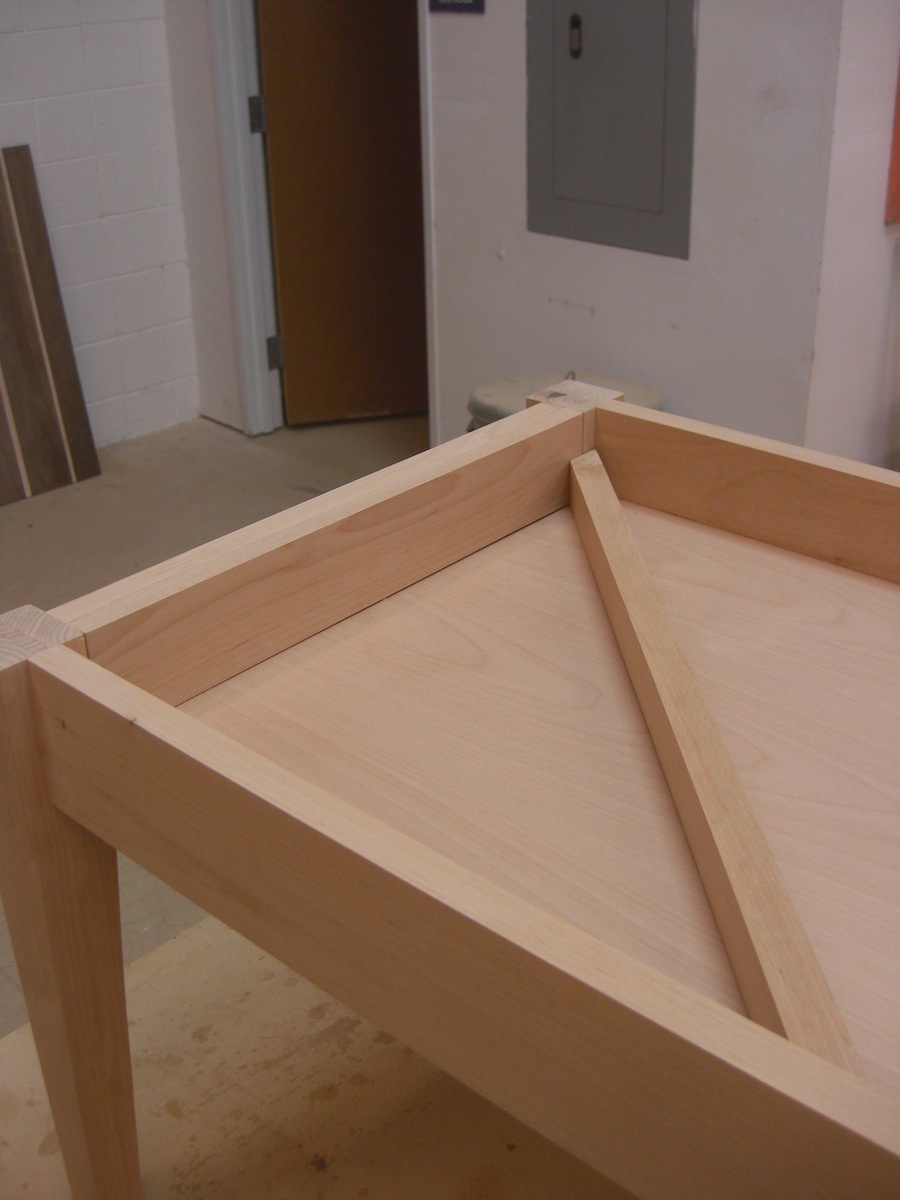
This isn't a good time for any surprises. Here is the table, assembled and ready for the final fitting of the flag frame.

I cut a piece of scrap for a sample divider, to see where it would fall inside the table's "shadow box" area. The bottom sagged just a tiny bit, so I marked the location of the diagonal pieces and decided to run a small screw up from the bottom, to eliminate the sagging. Sort of like a wood plastic surgeon.
Then I transferred the length of the sample piece to the pieces of wood I'd cut.

One end was mitered, and then I marked the other end so that I could cut it to it's proper length.

A saddle square is perfect for this, especially one that has a 45˚ end.

The sizes that military flags are folded into are very precise. So the length of this piece is critical.

Here are the two pieces in place, similar to the drawing at the beginning of this post.

I decided to stain everything separately, instead of staining around these cross pieces. Here is the first coat. (Thanks for the help, Dan!)

Since this piece is going to be shipped across the country, I probably won't get to see it finished, with the folded flags inside and the top in place. But I always ask my clients for a picture of their piece, once it's placed into their home. If I receive one, once this table finds it's final home, I will post it here.
Now all that is left for me to do is call my client and tell her the piece is ready for pick-up. Those are always the best phone calls to make!