A forum for discussing woodworking, specifically furniture making. Feel free to post comments and questions about your current projects, tools, studio set-up, or whatever is on your mind.
This blog is moderated by Jamie Yocono, owner of Wood It Is! Custom Cabinetry in Las Vegas, NV. Her website is wooditis.com. If you need to speak to an actual human... call 702-672-8981!
Now...let's talk wood!
No rest for the weary. No sooner did I finish my desk, then I completed another piece - one of my filing cabinet benches. The part that I love best about these benches is the tile.
Here's a set of hunter green tile I've been working on - modular and textured.
These pieces are roughly one, two, three, four, and five inch squares.
These sizes allow me to make various patterns in the tiled areas.
And the texture is amazing with this glaze - a Waterfall Green that I developed a couple of years ago. Cool colors like greens and blues look amazing next to the warm colors of wood.
Here's the bench, awaiting one last detail - the lid support that needs to be installed inside.
This piece features a full length piano hinge, an aromatic cedar bottom, and is sized to hold hanging file rails. These benches can be used as blanket chests at the foot of your bed, or as a filing cabinet in an office. A recent buyer of one of these told me she stores all her knitting supplies in the chest she purchased. What a great idea!
We have three of these chests in our home, and I'm going to add some cool wooden casters to the bottom of one and turn it into a coffee table.
It will be perfect for stashing the dog toys or holding an afghan for a chilly night.
Hanging drawer fronts might be one of my least favorite things to do. All of your work can be for naught if one is hung crooked. And it's not easy to do, regardless of all the tips and techniques you read about in woodworking magazines.
This three piece front started out behind the eight-ball because I'd run out of an attractive piece of wood. So I had to take the last board left, rip it into strips, and re-glue it back together, changing the grain orientation. I decided to take it a step further and create a faint herringbone pattern, with a center seam, for the center drawer front.
Luckily, my local Festool rep gave me a Domino to play with, so that joint is beefed up with some large tenons inside of it. After it was glued and planed, I routed a large sweeping curve into it. And then laid out the three pieces in order to line up the curve on the two outside pieces.
I couldn't decide if I wanted to keep the curve aligned along the entire front, or jog it down a bit on the two outside drawers. But the drawer faces were a little oversized, so I had some material with which to experiment.
Routing those curves was the easy part - I used the original template (that I used for making the desk top) and made a "mate" for it - that gave me a set of matching 48" radius circles - an inside curve and it's matching outside curve. Why did I need both pieces?
Anyone that's done routing knows that a router can have a mind of it's own, often traveling into areas in which you didn't intend to be cut! So I wanted to protect the drawer faces by using a plywood template that wouldn't allow my bit to veer off course.
I clamped the template to one of the outside pieces.
Then I routed out the area, using a straight bit and a template guide.
Someone asked me about my blog, specifically - how I shoot the photos and capture the various steps along the way. Honestly, I feel as if I do that pretty haphazardly. My workbench is always a huge mess, which is why I shoot these photos fairly tight. No sense in letting you see my clutter.
Once the curve was routed I had to do a little hand work with a chisel, since the router bit couldn't reach into the far corners of that curve.
In the end, I decided to align the routed curves on the faces.
To me, it's always the most stressful part of the building process to hang these fronts. If anyone out there has any tips (besides using two sided tape or those concentric drawer face adjusters), I'd love to hear how you do it.
Meanwhile, I'll just start "moving" into my new desk.
Way back in 2001, I taught a class where everyone made a Roll-Top desk. Or a desk with a tamboured hutch, depending on what you want to call it. Instead of this class being a typical six-week long session, we doubled it and built the desk in twelve weeks, or roughly 36 hours.
It was an amazing class, and to this day, I still hear from some of the people who took it, saying how much they love the desks they built.
Imagine this desk being passed down through the years to family members.
Cool.
So along with everyone else in the class, I built a desk too. Instead of including a upper hutch, I added a smaller storage area on top, where my laptop could be stored. I also played around a bit with curves, which I love, Love, LOVE.
Anyone who is familiar with my work knows I have an obsession with circles and squares. I'm not sure what that's about, but they're everywhere.
In tile.
And tops.
And insets.
And relief carving.
It's a weird thing - even one of my favorite albums of all time is In Square Circle.
And though you can't tell by the angle of this photo, the top on this desk has a large sweeping curve on both ends.
The fronts of the three drawers mimic this curve, and tie it all together. I was also experimenting with Milk Paint at the time, and decided to add a little color to the piece, so the teal areas that you see are milk painted and slightly sanded, so the wood grain shows through.
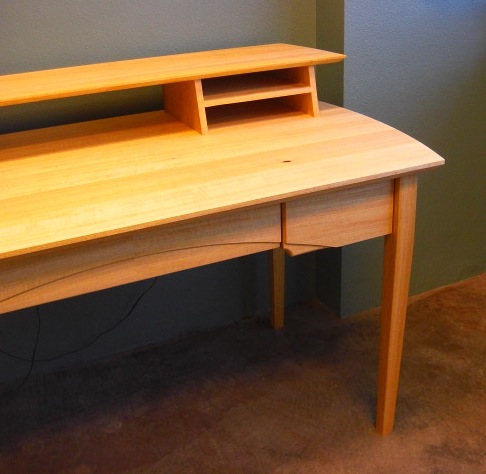
All of this leads up to the new desk I'm currently building.
I loved the design of the original desk so much that I'm building a duplicate - for myself. People who hang around my studio/school know I've been working on the desk for probably three months. It's tough to finish something like this when I only get about five hours a week to work on it.
So I'm in the homestretch - all that's left to do are the drawer fronts. Now usually, finishing the fronts is a little hectic for me, as they're the last thing I work on, and one of the more noticeable details.
Imagine my horror when I planed the piece of wood I'd saved for the drawer fronts, only to discover that the grain on it was awful. And of course.. it was my last piece of this wood.
What wood? Good question.
I bought this lumber at an auction, it wasn't labeled, but it was gorgeous. After a little calculating, I decided I had just enough to build this piece. I've been trying to identify the specie ever since, but every time I decide that it's a certain wood, I do a little research and decide it's not that wood afterall.
A little research helped me locate a wood identification service, so I recently sent a small sample of it off to their lab. Hopefully, I'll soon know what the hell this wood it! (And as a professional, I'm a little embarrassed that I can't identify it!)
So stay tuned - I'll be finishing the drawers in just a few days, and will post my solution to this design problem.
If you're looking for a one of a kind gift this holiday season, I'd like to show you something very cool.
Bob Ingersoll and I first met when he enrolled in one of my woodworking classes many years ago. In truth, Bob already knew his way around a woodshop when he took the class. Some people take that first class and decide that woodworking isn't for them. But others find their niche. Bob definitely found his with the design of these banks.
Bob specializes in making heirloom banks out of old post office box doors, some of which date back to the late 1800's. These one-of-a-kind boxes have wooden cases built around the door, and feature a very nice coin slot plate on top. On the bottom of each bank, Bob writes the combination for the door lock. Dial in the correct numbers and the door opens to reveal the inside of your bank.
You didn't really think I was going to show you my combination, did you?
Check out the detail on the front of this particular door.
Bob constructs these boxes out of various woods - anything from maple, walnut, cherry, or wormy chestnut - to some exotics like Brazilian cherry and bubinga. His finishing technique (Watco, of course!) is superb.
What did you expect? I taught him!
Talk about the ultimate gift for the person who has everything - a bank that matches the wood in their home. Or their desk. Or their office at work.
Now I'm not just bragging about him because he's a friend. And I certainly don't have any financial stake in his business. I'm writing about his pieces because they're very well made, quite unique, and are sure to become one of those items you can pass down through the years.
Bob can be e-mailed at ringers234@aol.com. His busy season is starting now, so if you're interested in one of his banks, I suggest you don't delay.
You never know when you're going to need to open a bottle of wine and not have a corkscrew handy. This tipsy Frenchman has an easy solution. Check this out!