It used to take me hours to replace the blades in my Delta 8" jointer.

Luckily, I've gotten much better at it, and a spare set of blades really helps, too. I receive quite a few e-mails asking for tips, and so I thought I'd do another post about it. First, remove the cutterhead guard.

Use an allen wrench and remove the bolt, and lift the whole assembly off. There will be a spring inside there - try to remember how it fits inside, or you'll go crazy later, trying to get the guard back in place.

Here is why I needed to take the jointer apart - there is a great deal of rust that has built up on the bed surface,

as well as a pretty significant chip in the blades.

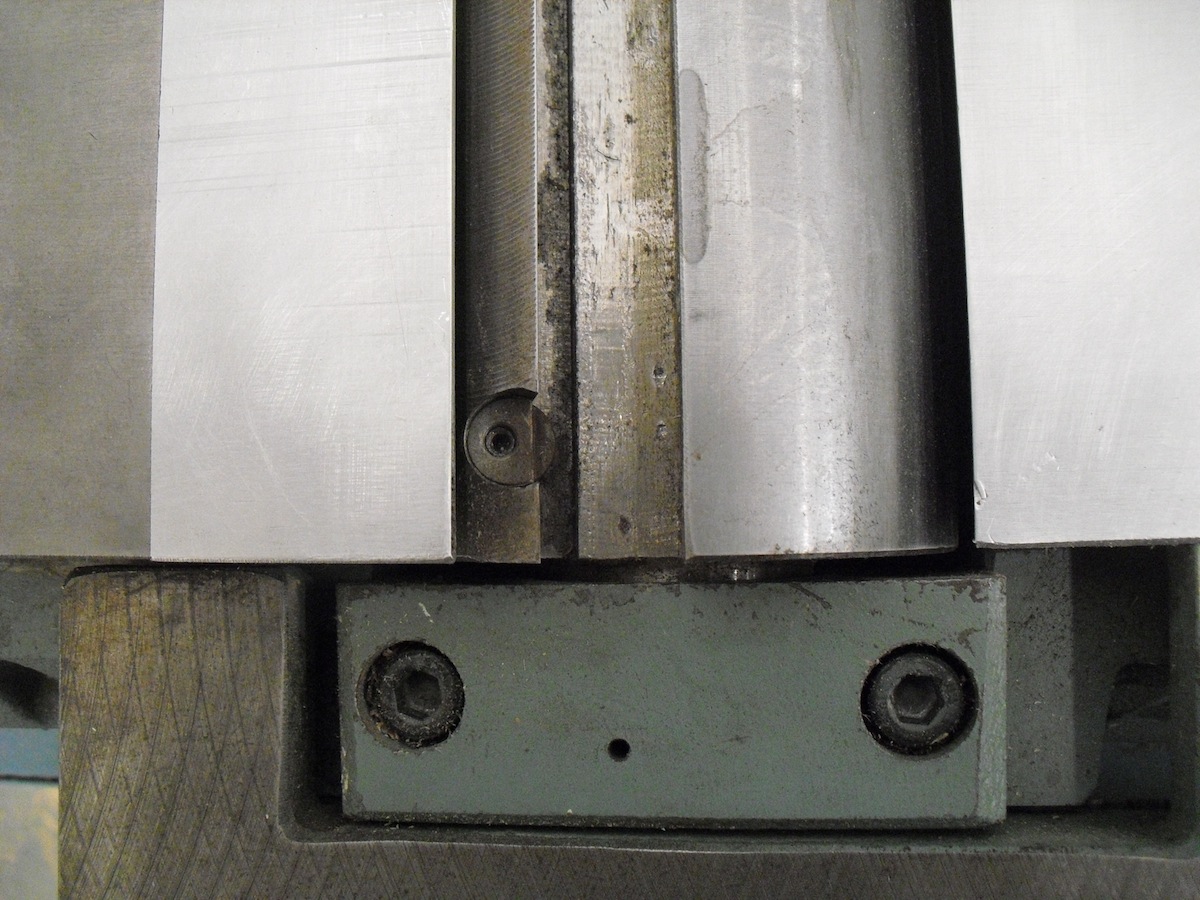
Start by loosening the four bolts that hold the blade bar in place. I used a 10 mm wrench for this.

Once they're loose, the blade just slips out. Before you rotate the cutterhead to remove the other two blades make sure you take out the two small height adjustment nuts that sit right next to each blade.

I usually pull them out with pliers.

If you lose them, or drop them inside the jointer, you're going to have a hell of a time finding them. Trust me on this.

When the parts are removed, you'll have an opening in the cutterhead that will probably be filled with sawdust and chips. Blow everything out of it.


It went from this

to this in minutes.

I am not a fanatic about my tools; so I don't freak out if they're not all clean and pretty. They are tools, you know? But in this case, cleaning the beds of the jointer made the wood glide over the table so much more easily. So it's worth making sure the tops are nice and clean.

This is really pristine, which will last about two minutes, in my shop.


Now it's time to replace the blades. The first time I did this, it probably took me three hours. Now I can do it in about three minutes, so it really does prove that practice makes perfect.
The most important thing to remember that the blades have to be the same height as the outfeed table. So that is what you're shooting for - and you'll need a good straightedge for this. I used a brand new combination square that has a nice keen edge on the blade. Here's what you need: a straight edge, needle nose pliers, a small block of wood, an allen wrench, your 10 mm wrench, and the jointer parts - the blade, nuts, and locking bar.


Start by rotating the cutterhead and slipping the nuts in place. Here is where the pliers help.
Then slip the locking bar in place. It's hard to see here, but that is what is shown in the photo below.

Now - carefully- slip the blade in place. It's sharp, be careful. And don't ding the sharp edge on anything!

The concept is that you want the blade height to be exactly flush with the outfeed table, as show in the image below.

Here is a little video of how to set the height set for the blade.
There are two things left to do after you get the blades in place. Double check your fence to ensure it is square to the table. A Wixey angle cube works wonders for this - zero it out on your flat bed,

and then flip it over to the fence. Adjust the fence until it is at 90˚ relationship to the table.

Last thing to do is re-install your cutterhead guard. This is a little tricky, but if you install the spring in place in the guard, and then flip the whole assembly over, it will fall into place rather easily. Make sure the spring engages properly.
To get some tension on the cutterhead, grab a pair of channel locks and twist a little tension into the spring, by grabbing the head of that large round cap. As you're twisting some tension into the spring, tighten that allen head bolt that holds it down. Now this is important - before you let go of anything - tighten the small set screw that is on the front of the jointer, right underneath the big bolt. That is the secret.

Tightening that keeps the spring from pulling everything loose, once you let go of it.
That's it, you're done. Go drink a beer, you deserve it.
2 comments:
Good post, and nice video. I haven't sharpened my DJ-20 knives yet, but I think I'll try your approach first. I was half thinking that I'd use a dial gauge to set the heights, but that might be overkill.
BTW, I like the style and quality of the furniture that you make.
You can remove the cutter guard more easily by loosening the set screw shown in your photo immediately above and lifting out the guard.
No need to mess around with the spring.
Post a Comment