Now there are a lot of systems out there for laying out these holes. Some people use a scrap of pegboard, because the holes are already spaced one inch apart. You cut a piece of pegboard, lay it on top of the piece of wood, and drill away.
But - I'm not a fan of that method. I've tried it. Pegboard is usually made of tempered masonite, but after the drill bit hits the side of the pegboard a few times, it makes it enlarges that hole. So your layout becomes sloppy, with the holes not lining up properly.
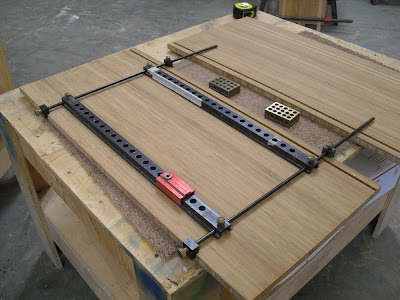
A better system is this Veritas shelf drilling system, one that I've used for years.

It's an adjustable system that clamps to your boards, and allows you to drill perfectly spaced, perpendicular holes in them.

Setup is simple, quick and accurate. If you have longer boards to drill, you simply drill the lower holes, and then move the jig up on your wood, indexing the pin holes so that the spacing remains the same all the way up the board.
This system comes with everything you need, but over the years, I found that I needed different lengths of rods that this device uses to hold the brackets together. My buddy Dave came to the rescue, and had some extra rods made for me, in various lengths. Sweet.
Sure, it's a little pricey. But make a bookcase or two without it and you'll gladly spend the money. When I teach a class where we make bookcases, this device helps everyone look like expert woodworkers!
I set up the jig using some 1-2-3 blocks, ensuring that the jig is perfectly adjusted to fit my bookcase sides.

Here are the sides, with the jig spaced 5" up from the bottom edge.

The jig is also spaced 2" in from the edge.

See - no measuring. You can't screw up that way!
The real key is this bushing carrier - the red device sitting on the drilling bracket.

This carrier slips firmly over each hole you want to drill, and has a 1/4" bushing in it, which allows you to drill perfectly perpendicular into the wood. The drill bit has stop collar on it, so you can't drill too deeply and pop out the side of your wood. But - as with all things wood - you always want to test that first.
Here I drilled a piece of scrap that is the same thickness as my cabinet wood.

Insert a shelf pin and check to see if the depth is right.

Perfect.
So everything is set up and ready to drill.

In this piece, I'm drilling holes for three shelves. I don't like the appearance of holes going all the way up the board. So I'll just drill a bank of four holes for each shelf.
I usually put some masking tape and mark the holes I'll be drilling.

It only took a couple of minutes to set this up and drill all the holes, and it sure helps with accuracy. Make sure you use a brad point drill bit, which cuts from the outside, for a very clean hole.


Click here to watch a short video of me using this jig.
Seriously, I could probably teach Stella how to set this up. Well, if I could get her to put her tennis ball down for a few minutes.

No comments:
Post a Comment