Friday, September 16, 2011

Changing Jointer Blades


It used to take me hours to replace the blades in my Delta 8" jointer.


Luckily, I've gotten much better at it, and a spare set of blades really helps, too. I receive quite a few e-mails asking for tips, and so I thought I'd do another post about it. First, remove the cutterhead guard.


Use an allen wrench and remove the bolt, and lift the whole assembly off. There will be a spring inside there - try to remember how it fits inside, or you'll go crazy later, trying to get the guard back in place.


Here is why I needed to take the jointer apart - there is a great deal of rust that has built up on the bed surface,


as well as a pretty significant chip in the blades.


Start by loosening the four bolts that hold the blade bar in place. I used a 10 mm wrench for this.


Once they're loose, the blade just slips out. Before you rotate the cutterhead to remove the other two blades make sure you take out the two small height adjustment nuts that sit right next to each blade.


I usually pull them out with pliers.


If you lose them, or drop them inside the jointer, you're going to have a hell of a time finding them. Trust me on this.


When the parts are removed, you'll have an opening in the cutterhead that will probably be filled with sawdust and chips. Blow everything out of it.

My cutterhead had significant pitch and sap built up on it, someone has been working with softwoods and the the whole thing is gummed up. So a good cleaning really helps here. Also, there was a layer of rust on the beds, so I used a rust remover and some fine steel wool to clean everything.


It went from this


to this in minutes.


I am not a fanatic about my tools; so I don't freak out if they're not all clean and pretty. They are tools, you know? But in this case, cleaning the beds of the jointer made the wood glide over the table so much more easily. So it's worth making sure the tops are nice and clean.


This is really pristine, which will last about two minutes, in my shop.


Once everything is polished up nicely, I sprayed a layer of TopCote on the beds. I don't like to use wax, as it's possible the wax can infiltrate your wood. At least I've always heard that, and it seems possible.

Now it's time to replace the blades. The first time I did this, it probably took me three hours. Now I can do it in about three minutes, so it really does prove that practice makes perfect.

The most important thing to remember that the blades have to be the same height as the outfeed table. So that is what you're shooting for - and you'll need a good straightedge for this. I used a brand new combination square that has a nice keen edge on the blade. Here's what you need: a straight edge, needle nose pliers, a small block of wood, an allen wrench, your 10 mm wrench, and the jointer parts - the blade, nuts, and locking bar.


Start by rotating the cutterhead and slipping the nuts in place. Here is where the pliers help.
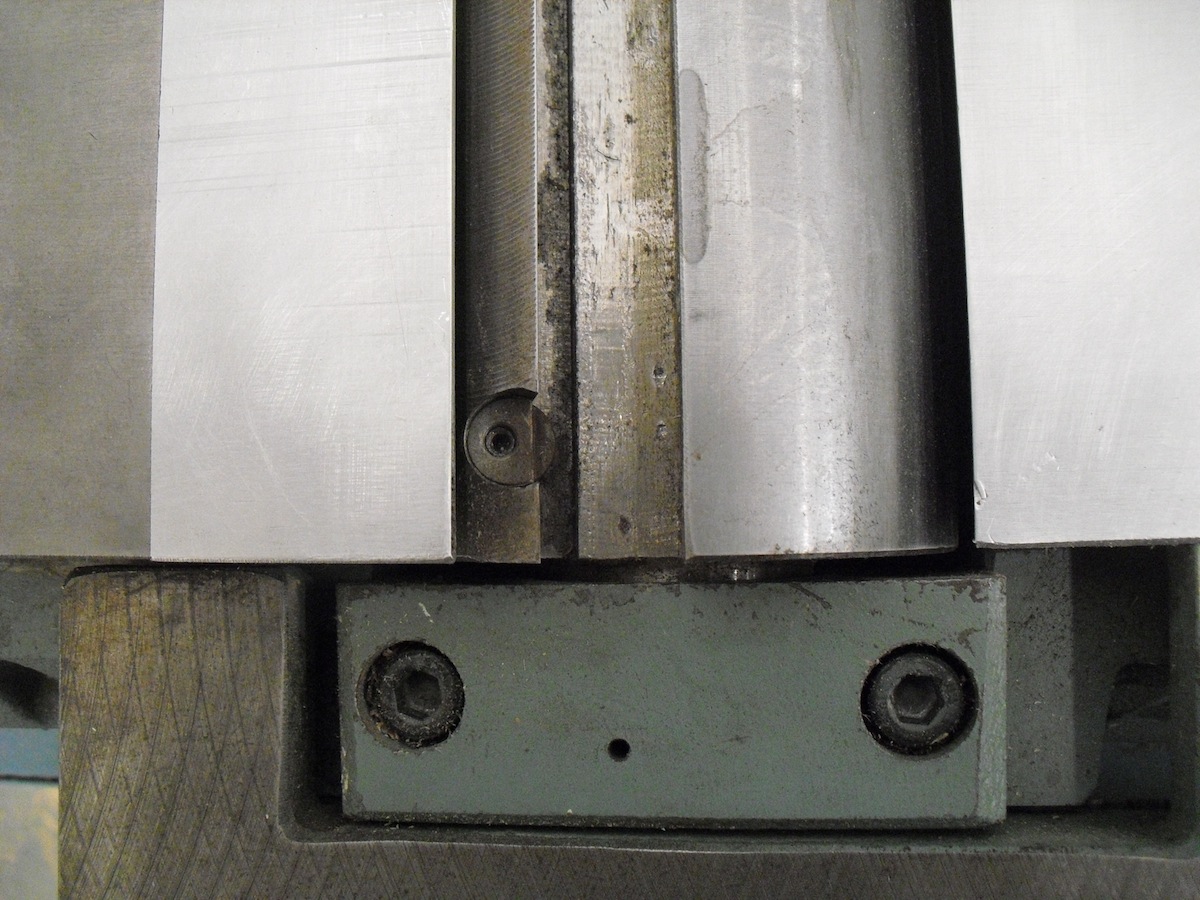

Then slip the locking bar in place. It's hard to see here, but that is what is shown in the photo below.


Now - carefully- slip the blade in place. It's sharp, be careful. And don't ding the sharp edge on anything!


The concept is that you want the blade height to be exactly flush with the outfeed table, as show in the image below.


Here is a little video of how to set the height set for the blade.


There are two things left to do after you get the blades in place. Double check your fence to ensure it is square to the table. A Wixey angle cube works wonders for this - zero it out on your flat bed,


and then flip it over to the fence. Adjust the fence until it is at 90˚ relationship to the table.


Last thing to do is re-install your cutterhead guard. This is a little tricky, but if you install the spring in place in the guard, and then flip the whole assembly over, it will fall into place rather easily. Make sure the spring engages properly.

To get some tension on the cutterhead, grab a pair of channel locks and twist a little tension into the spring, by grabbing the head of that large round cap. As you're twisting some tension into the spring, tighten that allen head bolt that holds it down. Now this is important - before you let go of anything - tighten the small set screw that is on the front of the jointer, right underneath the big bolt. That is the secret.


Tightening that keeps the spring from pulling everything loose, once you let go of it.

That's it, you're done. Go drink a beer, you deserve it.

Wednesday, September 14, 2011

Stella. Playing.


Did you ever have a friend who has a larger-than-life personality? Someone that just lights up the room when they walk in the door? Someone that makes you smile just thinking about them?

That is how I feel about Stella.

She always looks sad before a haircut.


And looks so happy after being groomed.


I guess we all feel that way after a haircut, don't we?


She's not the smartest pet in the world. In fact, when you throw a ball, half the time she can't even find it. She can't jump at all, so forget ever winning a dog-frisbee contest with her. She definitely rides the short bus, as my friends tell me.

But she just makes me smile. Here she is, after a recent play session. This is all about her gusto-for-life.


She has a weird way of playing, too. She takes a lot of aggression out on her toys.


Still, she's the best shop-dog/companion in the world. If I could just stop her from bringing pieces of scrap wood into my bed, I'd be happy!

Monday, September 12, 2011

Get out of the shop!

Wow, has it really been a week since I last posted here?

I know I always say this, but it's really been busy at my shop lately. John Eugster is teaching a hand tool class twice a week at the school, and I've been working like a maniac trying to get one of my commissions finished. Working forty hours in just three days wiped me out, and the project is still not finished!


My buddy Dan took one look at me and suggested I needed to step away from the shop for a couple of hours. (I'm pretty sure that was his kind way of saying that I looked like crap.) He had the perfect destination in mind, and five minutes later, we were pulling into a car show that was being held right around the corner from the shop.

Now I'm not a car fanatic. Oh, I love my little sports car, but honestly, if I looked at two trucks, I couldn't tell you their make. Chevy? Ford? Who knows. When I was in high school, I had a friend whose father owned a body shop. She could look at any car and know the year and make of it - and she never got it wrong. (Guys loved that, BTW!) How the hell do people do that?


The car show was a nice little break from my work, but the more interesting aspect of the show was the crowd. Oh don't get me wrong, the cars and trucks were great.


This car wasn't really getting much attention,


probably because the owner put this sign in the window.


I think it just made people want to stay away. Douche!

But frankly - for me - human dynamic was even more interesting than the vehicles. I mean - who uses an antique doorknob as a shifter knob?


Or a piece of tin from a bait box as a plate on the engine firewall.

Fuzzy dice were everywhere.


And the sense of humor that everyone put into their cars - fabulous!


I don't even know what this thing is - it looked like a beer keg/tap to me, but it may have been a souped up car stereo. It contained an amazing amount of chrome and detail.


I asked the woman who was wearing this patch if I could shoot a picture of it. With a patch like this, I think it's wise to ask first.


The fellow she was with said his patch was better - and suggested I shoot it, too.


I'm starting a new commission later this week, after a few things get squared away and delivered. Meanwhile, if you're cooped up, I highly recommend getting out and doing something fun for a few hours. It did the trick for me.

Monday, September 05, 2011

Making mortises - a simple approach

The glow of my little vacation getaway is long gone, and even though there aren't any classes going on right now, I am buried in work!

Have I ever mentioned how I hate deadlines? I'm working on a project for one of the local libraries, and while it isn't a particularly difficult project, there is a ton of detail work. I'm up against the wall; these pieces have to be delivered in less than 8 days.

This project required some rather large mortises to be cut into thick blocks of wood. You know what a mortise is - right? (It's a square or rectangular shaped hole.) My Powermatic mortiser took a beating during the Chairmaking class that recently finished - all of the bits are dull and the tool needs a thorough cleaning and adjustment, so I decided to machine the holes another way.

One of the easiest ways to make a mortise is to cut a dado into a board, and then rip the board in half. Fold it together and you have an instant mortise. By making it out of one wider board, you can bookmatch the pieces of wood, and the effect is gorgeous. Here's what I mean.

In this case, I needed a 1 1/2" wide mortise, so I set my dado blade up to cut a 3/4" wide slot. This set-up block lets me check the width, to make sure it is perfect.


Using my radial arm saw and a stop block on the fence, I cut two perfectly centered dados.

The board goes from this


to this.


Rip it down the middle and


fold it together like a book (hence the term - bookmatched) and you create a perfect mortise, with crazy-attractive grain in the wood.


These posts will fit into those mortises


and the final projects will end up looking like this. Here are two of the six partitions I'm building.


I brought Stella to the shop with me, I knew it would be a long day and I'd rather have her at the shop with me, than home getting into trouble. She was a little bored.


She really needs a hair cut, and my groomer isn't returning my phone calls, so I may end up adding "dog stylist" to my resume - I am going to try to shave her today. What's the worst that can happen?

Thursday, September 01, 2011

Back to work!


No rest for the weary.

Well, I take that back - there was some rest happening for the past few days. Don't faint - but I actually went away for a little spa getaway up in Utah, and it was quite refreshing.

Waking up to this labyrinth outside my door each morning was a treat. The red stone canyons and gorgeous iron oxide dirt is really amazing, especially if you're not used to seeing such vivid colors in nature.


Now I was pretty pooped by the time I got there. I have a way of working myself to near-exhaustion, so nothing sounded good when I first arrived. But a good night's sleep, a massage and some pampering - and I was starting to feel recharged.

You know you're in trouble when your massage therapist says your muscles feel like concrete.

How can you be up in Utah and not visit Zion National Park?


At least I thought ahead and brought hiking boots and some trail gear. Once you're inside the park, there is a shuttle that takes you around to the various stops along the way. You can hop off and explore any one of the places - from soaring canyon trails to the museums to the Emerald Pool trails.

Along the way, you might see anything from a buck with a full rack to college coeds with full racks.


But all things must come to an end - so I'm back to work, feeling more rested and ready to hop on the commission hamster wheel. It always seems like whenever I leave town, the phone rings off the hook. This week was no exception!