This is one of those times when blogging gets in the way of woodworking! When that happens, you (meaning - me!) have to make a decision about your priority.
So here is my confession - it's all about the wood. That has to be my priority.
Remember in my last post, I was hired to turn this fighter jet control stick into a walking stick for a pilot who was retiring. A few different people who inspected this piece speculated that it was either from an F-4 jet or an F-15.

Whatever. Let's make the stick.
The pilot who is receiving this retirement gift is tall, maybe 6'3" or more, so I grabbed a few of my height-endowed buddies and had them hold the handle in a comfortable position, as if they were hiking. That gave me the rough length of this stick. It also told me that my drill press didn't have enough capacity for me to cut a tenon on the end of the piece of wood. I was just short a couple of inches, so I lifted the drill press up on the step next to it, and swiveled the head around. I also had to tilt the table 90˚ so that I could clamp the piece of wood to it.

There is more than one way to skin that proverbial cat.
Then - things got dicey. I had a class starting in an hour so, and I wanted to finish up on most of the work on this. So I forgot to take pictures along the way. Sorry.
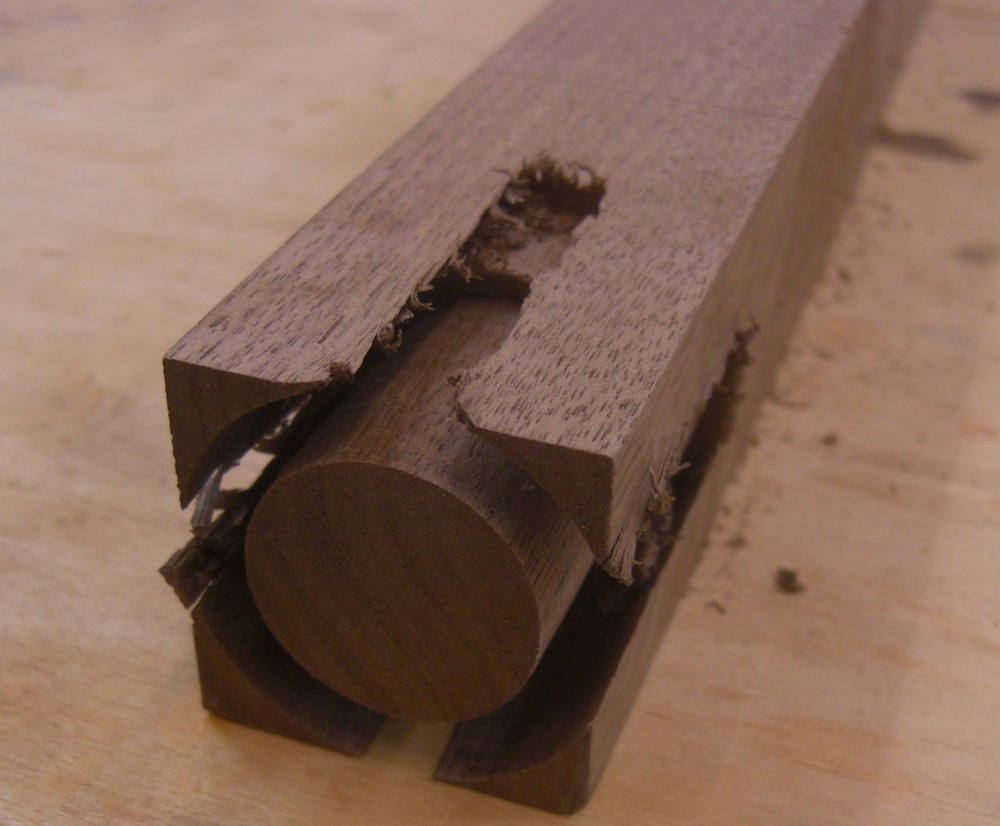
Here is the tenon formed on the end of the wood.

Next stop? Tapering.
I'll try to describe it - but it might make more sense if you scroll down to the bottom to see the finished picture of this piece. Notice how the wood tapers from about two inches at the top, to about 3/4s of an inch at the bottom? Cutting a taper like that using a taper jig with the tablesaw would have been nearly impossible.
The next best tool for tapering is the jointer, which is where I headed. Once you've tapered on the jointer, it's uber-easy. But here's a video that more or less shows how I cut them. I cut my tapers a little differently than this fellow cuts his - more conservatively, by taking many small passes over the blade, rather than the two big bites that he took. Also, He cuts his taper at the end of this piece of wood, and I start mine the nose of the piece of wood. Again - ask ten woodworkers how to do something and you'll get eleven answers. Whatever - as long as you accomplish the same end result, it really doesn't matter if everyone is safe while they're doing what they're doing.
Once the wood was tapered, I rounded over all the edges with various round-over bits on my router, so that the stick was perfectly circular. I started with a 3/4" bit, and then as the piece of wood tapered to a smaller dimension, I switched to a 1/2" bit, and then at the end, to a 3/8" bit. Again, being rushed for time didn't allow me to photograph any of this. But - it's a very easy way to make a long stick of wood appear as if it was turned on the lathe.
Yup, a easier way would have been to simply buy a wooden dowel and use that, but it wouldn't have had the same, graceful tapered appearance.

I considered putting a small metal cap at the end of the stick, to protect it from splitting in case it was actually used as a walking stick.
Since the metal on the flight stick was silver toned, I wanted to use a material that would look similar. A stainless steel cap was a perfect solution.

But - after putting a sample cap on the end, I decided I didn't really like the look of it. So I left it off. That's called artistic license, and I use mine liberally.

Next step was to apply some finish to the stick and mount the handle. I applied a couple of different finishes - first a coat of Watco Danish Oil, to bring out the color of the walnut. Then - after it dried for a few days, I applied a few coats of a handrubbed varnish, for extra protection. Using the combination of these two finishes gives you the best of both worlds - the great color that comes from using oil, and the protection that varnish provides. Sweet.

Finally, a coat of paste wax was applied. I masked off the tenon while I was applying the wax, as I didn't want to get it on the area where I would be applying epoxy.
 Some five minute epoxy and a screw through one of those holes, and that handle will never come off!

Just as I was taking these last two photos, my client came in to pick up the piece.

Congrats to the pilot who received this walking stick, thanks for your many years of service. I love making unique pieces like this - enjoy your retirement!

So here is my confession - it's all about the wood. That has to be my priority.
Remember in my last post, I was hired to turn this fighter jet control stick into a walking stick for a pilot who was retiring. A few different people who inspected this piece speculated that it was either from an F-4 jet or an F-15.

Whatever. Let's make the stick.
The pilot who is receiving this retirement gift is tall, maybe 6'3" or more, so I grabbed a few of my height-endowed buddies and had them hold the handle in a comfortable position, as if they were hiking. That gave me the rough length of this stick. It also told me that my drill press didn't have enough capacity for me to cut a tenon on the end of the piece of wood. I was just short a couple of inches, so I lifted the drill press up on the step next to it, and swiveled the head around. I also had to tilt the table 90˚ so that I could clamp the piece of wood to it.

There is more than one way to skin that proverbial cat.
Then - things got dicey. I had a class starting in an hour so, and I wanted to finish up on most of the work on this. So I forgot to take pictures along the way. Sorry.
Here is the tenon formed on the end of the wood.
Next stop? Tapering.
I'll try to describe it - but it might make more sense if you scroll down to the bottom to see the finished picture of this piece. Notice how the wood tapers from about two inches at the top, to about 3/4s of an inch at the bottom? Cutting a taper like that using a taper jig with the tablesaw would have been nearly impossible.
The next best tool for tapering is the jointer, which is where I headed. Once you've tapered on the jointer, it's uber-easy. But here's a video that more or less shows how I cut them. I cut my tapers a little differently than this fellow cuts his - more conservatively, by taking many small passes over the blade, rather than the two big bites that he took. Also, He cuts his taper at the end of this piece of wood, and I start mine the nose of the piece of wood. Again - ask ten woodworkers how to do something and you'll get eleven answers. Whatever - as long as you accomplish the same end result, it really doesn't matter if everyone is safe while they're doing what they're doing.
Once the wood was tapered, I rounded over all the edges with various round-over bits on my router, so that the stick was perfectly circular. I started with a 3/4" bit, and then as the piece of wood tapered to a smaller dimension, I switched to a 1/2" bit, and then at the end, to a 3/8" bit. Again, being rushed for time didn't allow me to photograph any of this. But - it's a very easy way to make a long stick of wood appear as if it was turned on the lathe.
Yup, a easier way would have been to simply buy a wooden dowel and use that, but it wouldn't have had the same, graceful tapered appearance.

I considered putting a small metal cap at the end of the stick, to protect it from splitting in case it was actually used as a walking stick.
Since the metal on the flight stick was silver toned, I wanted to use a material that would look similar. A stainless steel cap was a perfect solution.

But - after putting a sample cap on the end, I decided I didn't really like the look of it. So I left it off. That's called artistic license, and I use mine liberally.

Next step was to apply some finish to the stick and mount the handle. I applied a couple of different finishes - first a coat of Watco Danish Oil, to bring out the color of the walnut. Then - after it dried for a few days, I applied a few coats of a handrubbed varnish, for extra protection. Using the combination of these two finishes gives you the best of both worlds - the great color that comes from using oil, and the protection that varnish provides. Sweet.

Finally, a coat of paste wax was applied. I masked off the tenon while I was applying the wax, as I didn't want to get it on the area where I would be applying epoxy.
 Some five minute epoxy and a screw through one of those holes, and that handle will never come off!
Just as I was taking these last two photos, my client came in to pick up the piece.

Congrats to the pilot who received this walking stick, thanks for your many years of service. I love making unique pieces like this - enjoy your retirement!

No comments:
Post a Comment