
She's an incredibly talented painter, too, - but I needed help mixing some colors together to come up with the perfect brown that I envisioned for painting the carving on this bed.
I planned on using MilkPaint, which I loveLoveLOVE to use on wood.

I keep a huge box of various MilkPaint pigments in my shop, and even though I've read that Milkpaint goes bad over time, I've never had any trouble using it. It comes in a powder form - how bad can it be?
Stacey gave me some tips for coming up with a deep chocolatey brown color, and I took her advice. Perfect. (Thanks Stace!) I started with some colors I knew I would use,

and then kept adding and mixing until I achieved this color - a deep brown with just a hint of reddishness.

I had to be careful not to grab the wrong cup when reaching for a sip of my coffee.

Time to unclamp the bed and get it ready for painting.


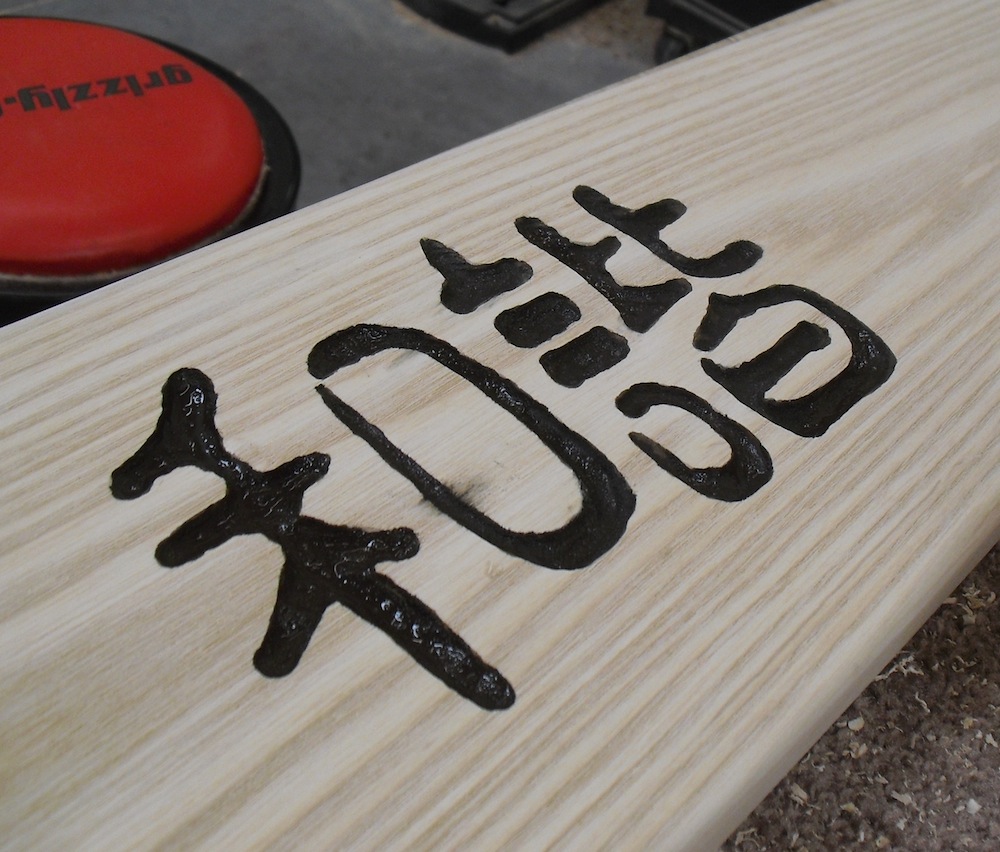
It's easy enough to paint the carving, and if you get a little sloppy, it really doesn't matter - you'll just sand it away after the Milkpaint dries. That little smudge on the second character will come right off when I sand.
While the Milkpaint was drying, I opened the package of bed rail hangers I had on hand.

I usually keep a few sets in my hardware stash; these have been in my shop for a long time - maybe eight years. Unfortunately, when I opened up the set of the ones I wanted to use - the 4" set of hangers, I discovered that two of the parts were missing.

@#$%&!!
I have a set of 6" hangers, but after laying one down on the bed, I know it's not going to work - it's just too big for this application.

I don't think I'd have much luck calling Rockler and telling them I'm missing part of my order from 2003, so I suck it up and order a couple of new sets, one for this piece, and one to keep in stock. I absolutely hate delays like this. This three day bed is turning into a longer project.
Note to self - next time, check your hardware when it arrives!
With the MilkPaint dried and the painted area sanded (to remove my sloppiness) - I gave the bed two coats of a handmade oil that I've started mixing myself.
It's a simple recipe - one part boiled linseed oil, one part varnish, and one part turpentine. Except for the bad smell from the turp, which disappears when it dries, I really like the way this stuff works. I love the protection it provides, and the finish it leaves on the wood is gorgeous. Here is the bed with two coats, which really makes the painted area POP.


Last step - making the side rails and installing the hardware. If I didn't run into this missing hardware issue, this bed would have been completed by now. It's always something.
5 comments:
I love milkpaint too, but wouldn't have thought of using it for that type of application. From what I understand it does go bad once it's mixed in liquid form, but the powders will last for many, many years. The more-than-three-day-bed looks fabulous!
Yep, milkpaint is great and I absolutely love the bed, great project.
Hi, Milk paint seems interesting. Back here in India, we get paint powder which we mix with water / stain and apply on wooden surfaces... Not sure if it is the equivalent of milk paint...
Could you share some insights on how the milk paint is used... How much do you mix to get the desired consistency... what do you mix it with ? I always wanted try the paint powder... but i do not get much help from the local carpenters (They do not want to share their trade secret with a hobbyist) on how to use it.
You can use milk paint in a variety of ways - I usually mix it with tap water, and then experiment by painting a sample piece of wood, until the paint is the correct viscosity.
Sometimes I use it very thinned out, so that it works more as a transparent wash. Sometimes I use it much thicker, as in the detail on this bed, so that it is opaque.
Don't mix up more than you can use, it goes bad. I've managed to put some in the fridge over night and use it the next day, but I never stretch it to more than two days of use.
Hope this helps! Go to milk paint's website for much more info:
http://www.milkpaint.com/
Hi, thanks for the tip... I wanted to see how best I can use it as a stain... And what I did for my latest project was to mix it along with paste filler and the outcome was pretty satisfying !!! I did take some inputs from a local professional woodworker who was more than willing to help. Will post some pics when am done with the project.
Post a Comment