Once a year, I visit Ohio to see family and celebrate my mom's birthday. So if you've been wondering why I haven't posted in a while, that's the reason. Traveling is a hassle, no doubt. The long lines, the crowds, the security checks - it's all an inconvenience. But the worst part? Being around so many people during the start of flu season. It didn't help that the ditz on the plane next to me kept sneezing in my direction. I guess she thought it was rude to sneeze on her boyfriend, so I was a better target. Now I'm fighting a cold, and starting a pot of chicken soup. But I'm ready to hop back into some woodworking, and I couldn't think of a better place to start than with a new tool I just bought.
(FYI - I bought this tool, I wasn't given one to review by the manufacturer.)
(I wish!)  When I'm building a piece of furniture, I almost always hide my fasteners by pre-drilling some countersunk holes. Once the screw is in place, I'll fill the hole with a plug that I make of the same wood, which more of less makes that screw disappear. But when I heard about this new tool by FastCap, I thought it might work for something I've been wanting to do - utilize square holes, more commonly called mortises.
 This tool is designed to cut small (5/16") mortises by striking the end of the tool so that the chisel
  can cut a perfect mortise for one of these,
 which are little plastic decorative buttons.
  Now I would never dream of using something as cheesy as these little plastic buttons, But I love the idea of striking a small chisel in order to cut my mortise. That means I'm not limited to only cutting these with my stationary mortiser.
Very cool.To test it, I chose a piece of soft wood first.  One or two strikes of my hammer cut this.
 The plastic button popped in place perfectly.
 Now if I want to install a screw in one of these, I'll still have to drill a pilot hole. Not a big deal.
It would be easy to cut a long "dowel" that is 5/16" square, and use those to fill the holes. But that would leave me with end grain showing, which I don't really want. So I'm working out a way to mass produce some flat grained, 5/16" square plugs.

While I'm trying to figure it out, I'll just have a bowl of "penicillin" and play with a couple of ideas I have. There are many ways I could make the buttons, but I want to come up with a SIMPLE method. Simple, as in - something I can make in five minutes or less.
If anyone has any suggestions, please feel free to let me know.
I'm adding a few more picture to this post, as last night concluded the Tablemaking classes I've been teaching. Seven out of the eleven people enrolled actually walked out with finished tables. I have to say, I'm quite impressed with their work.To think that twelve weeks ago, most of them had never touched a tablesaw, let alone attempted complex joinery is amazing.  Jim's small table in Cherry was surprisingly sturdy, with a slatted shelf, tapered legs, and mortise and tenon joinery throughout the piece.
 In this photo, Cal is pre-drilling some holes for the screws that will beef-up the leg joinery on his Parsons Table.Ann's project went from this
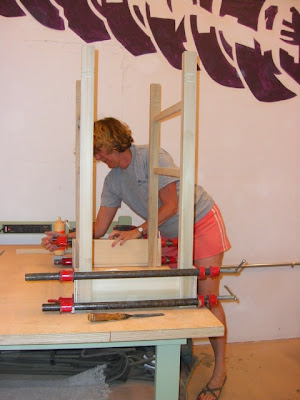 to this in no time!
  When I say that she's is thrilled with the barbeque cart that she made, I'm probably not adequately conveying the amount of enthusiasm she had for building this. She's been smiling and shaking her head in disbelief the whole time she's been working on this piece. This cart features two lower shelves, and a drawer, a towel rack, all perfect for her outdoor grilling needs.
  Allison comes from an amazing design background, and it shows in this small desk she's building. This Red Oak desk has pinned tenons, gracefully tapered legs, and will feature a small pencil drawer that she'll finish building (and hanging) tonight.
 She painstakingly chose the layout of her wood, so that the top and aprons feature some remarkable grain patterns. I'm thrilled with the job she's done, and can't wait to see this piece finished. From the comments on her Facebook page, it sounds like her friends are already starting to put in orders for the pieces they want her to build.And here's the (mostly) completed piece!
 As an architect, Betty came up with plans and was amazingly organized about building her Frank Lloyd Wright table. This was probably one of the more complex pieces built during this session, and it's simply gorgeous. This picture does it no justice, it's Walnut, and filled with some intricate details that she resolved on her own. I love having bright, enthusiastic people like Betty in my classes, I learned as much from her as (I hope) she did from me.
 I'm know I keep raving about the various students and the work they accomplished, but Joyce is on of those people you just want to succeed. When I "met" Joyce about three months ago on the phone, she explained that she'd always wanted to learn woodworking, but never had the chance. She wasn't sure she'd be able to do it, but - considering she's a fourth grade teacher, I thought - there's probably not much she CAN'T do!
  Imagine our delight when Joyce tackled building three tables at once! She built them for her classroom, and she couldn't have been more proud. Me, too.
  And finally, Mike the fireman, who literally attacked his table with more enthusiasm than I've seen in a long time. His Walnut and African Mahogany table (he wanted me to mention that it was constructed of two woods!) was the first big piece he'd ever attempted. I'm just guessing, but I think there will be many more to come. Even as he finished the last bit of work on this last night, I could see his wheels spinning, as he came up with new and better designs to build. Good for him, he has a lot of potential to become a great woodworker.For the most part, these pictures include everyone's tables that were completed, or close to being done. Pretty amazing work. I'll try to add the other tables as they're completed. Now I'm off to catch a plane and visit family back east...


