Sunday, December 30, 2018

Last Sunday of the year...


Sunday mornings are for sipping coffee, and lounging around in my pajamas! It's so easy to get sucked into watching vintage videos on woodworking - here are two of my favorites. 


Thanks for this one, Jim C!


Tuesday, December 25, 2018

Hope your holiday is warm and merry...

Sunday, December 16, 2018

Here's the latest scoop...


We've been making some ridiculously cool cutting boards in our Advanced Cutting Board class. Just in time for Christmas, BTW... but the funny thing is - when they make their boards, most of the students say they want to keep them, instead of give them away. I don't blame them, we've done some amazing pieces this session.

 Our end grain board on steroids is always a big hit, but we upped our game and made something really unique last week. 

To be frank, I'm a little tired of end grain cutting boards. In fact - I was just discussing that with someone this past weekend. She's made a gazillion boards for people, and told me that people always request end grain boards from her. Those take more work than a standard flat grained board, and most end grain board you see are... well... just boring. 

I wish I had a dollar for every one of these I've seen.... yawn....  


So when I was looking to add a new board as a class project, I remembered this scooping technique that a student and I tried a few years ago.  It involved making a jig for spinning a wood blank over the blade, to create a very nice bowl in wood. 

The jig is pretty simple - make a "bridge" that spans the blade, from the end of the left table, to the fence. It has to be tall enough for the wood blank to fit under it.


  After the bridge is made, we drilled a hole directly over the center of the blade. This is where the wood will spin. 


Here's the piece of wood I wanted to scoop, so I did some calculating to find the center of the scooped area, and then transferred the mark to the back side of the wood.


 I drilled a hole on that back side, and then determined how deep I could scoop into the wood.


 I figured about halfway was good, I raised the blade to that height. Then I lowered it back down, counting the number of revolutions on the elevation wheel of the saw. In this case, it was five revolutions. 


With the blade below the table, I used a drill bit and secured the wood blank into the jig. That will allow the wood to safely spin over the blade, without kickback. 


This works best with two people, one spinning the wood, and another raising the blade. But in a pinch, I've done it myself, so it's totally possible.  

After spinning to bowl and raising the blade five revolutions, here's the result - a very nice scooped bowl into your wood. 


I purchased some thick walnut live edge lumber from Andrew at Reclaimed Secrets, and our charcuterie boards are sweet! 


Can't wait to see these sanded and oiled!


Tuesday, December 11, 2018

Want to feel uplifted?

I'm so proud to call Rich Matta a friend... enjoy this video of one of his (famous) students sharing how Rich changed his life. 

Thursday, December 06, 2018

It's officially the Christmas season....

While the snow is already flying back east, it's been pretty nice here up until this week. Then all of a sudden - the  cold weather hit us, the leaves changed colors and fell off trees, and BAM! - 

Winter is here. 


In addition to teaching every night of the week, I've been cranking out a  huge amount of work for customers - and it's been hectic, but very rewarding.

I had a chance to fire up the lathe and make these juggling spools - the second time I've had the chance to make these for a local performer. 


And I couldn't be more proud of this live edge table that one of my students made - she and her husband are so excited! The photo below shows the unfinished table, 


but check out the colors that developed once it was oiled. 


Wow. 


Thursday, November 29, 2018

It takes a village!


It's great to have students making projects that they can give away as Christmas or Chanukah gifts.  So the usually holiday class is either Instant Gratification Woodworking, where we make amazing "quickie" gifts, or the Advanced Cutting Board class, where we make cutting boards in steroids. 

Can you guess which one is running right now? 


This end grain board might be the all time favorite one we offer - the colors and patterns (or lack of patterns!) make it truly a unique board - one you'll never find in a store. 


This board takes a village.

It takes three times as much wood as a normal board, and we rely on the fact that everyone in the class cuts and preps wood pieces to share with each other. We mix everything together, so that each student's board has pieces of everyone else's boards... it's quite a group project.

Because it's an end grain board that we run though the planer, we have to glue a sacrificial 2x4 on the back end of the board, so that the vertical wood pieces are supported and can't chip off. 


It's complex, with no repeatable pattern, and you can tell by their faces - they're pretty damn proud.  


We snuck in a simple Domino cutting board, too! 


We'll be making two more boards, and one of them is extremely cool. I'll be sharing a new technique that's life changing for our projects.

Stay tuned!


Thursday, November 15, 2018

Who you gonna call?...

There isn't a day that goes by when I don't get a call from someone asking me to make a woodworking cut, or fix something that's broken. 


Just this week, I built a trunk deck in a car for someone who wanted to camp and sleep in their car, trimmed the boards on a trailer deck,  and shortened some table and chair legs for a dining room set. It's not glamorous, but it sure does fill a need in the community. 


Click on that link above to read a disturbing story about the shortage of tradespeople. With most high school trade programs and apprenticeships drying up, as well as younger people choosing to not get involved in more blue-collar endeavors, it's going to be very tough to find someone to perform basic tasks like hanging a door, replacing a garbage disposal, or rewiring a lamp. 

I'm not sure what the solution is, but high school counselors should probably be steering more students toward these fields. Not everyone is college material, nor can many afford it. There should be a way to educate students about the need for woodworkers, plumbers, electricians, and more. Not to glamorize it, because trust me, there are days when it's ANYTHING but glamourous. 

But nothing beats doing something you love, and working for yourself. 


Friday, November 09, 2018

Another quick scooping technique

It's funny how things get away from you.... a student and I set up this jig on the tablesaw a while back, and I'd forgotten how cool and easy it was to scoop wood with it.  


It's simple to clamp a beam over the top of the blade, and then drill a hole directly over the center of the blade, so that wood can pivot over the blade. 


In this case, we used a drill bit as our pin. 


This simple jig will create awesome bowls in wood... you just rotate the wood, raising the blade little by little, until you get the desired depth.


Here's one in pine, 


and one in walnut.  If you look closely, you'll see a lot of texture from the blade, and frankly - it can be sanded out, or left there for a cool effect.  I ended up sanding this out, as I wanted a perfectly smooth surface, but I've seen some gorgeous pieces with the surface left textured, right off the saw.  


In an upcoming Advanced Cutting Board class, we'll be employing this technique on some charcuterie boards - can't wait to experiment with scooping some longer boards to see how this looks!


Monday, October 29, 2018

Pony/Jorgensen Back in the Saddle Again

These band clamps have see better days, but let me tell you - they've helped over 3000 people make their boxes in the classes I teach. That's outstanding, and no doubt we've gotten our use out of them. 

But...  these clamps are starting to show their age. 


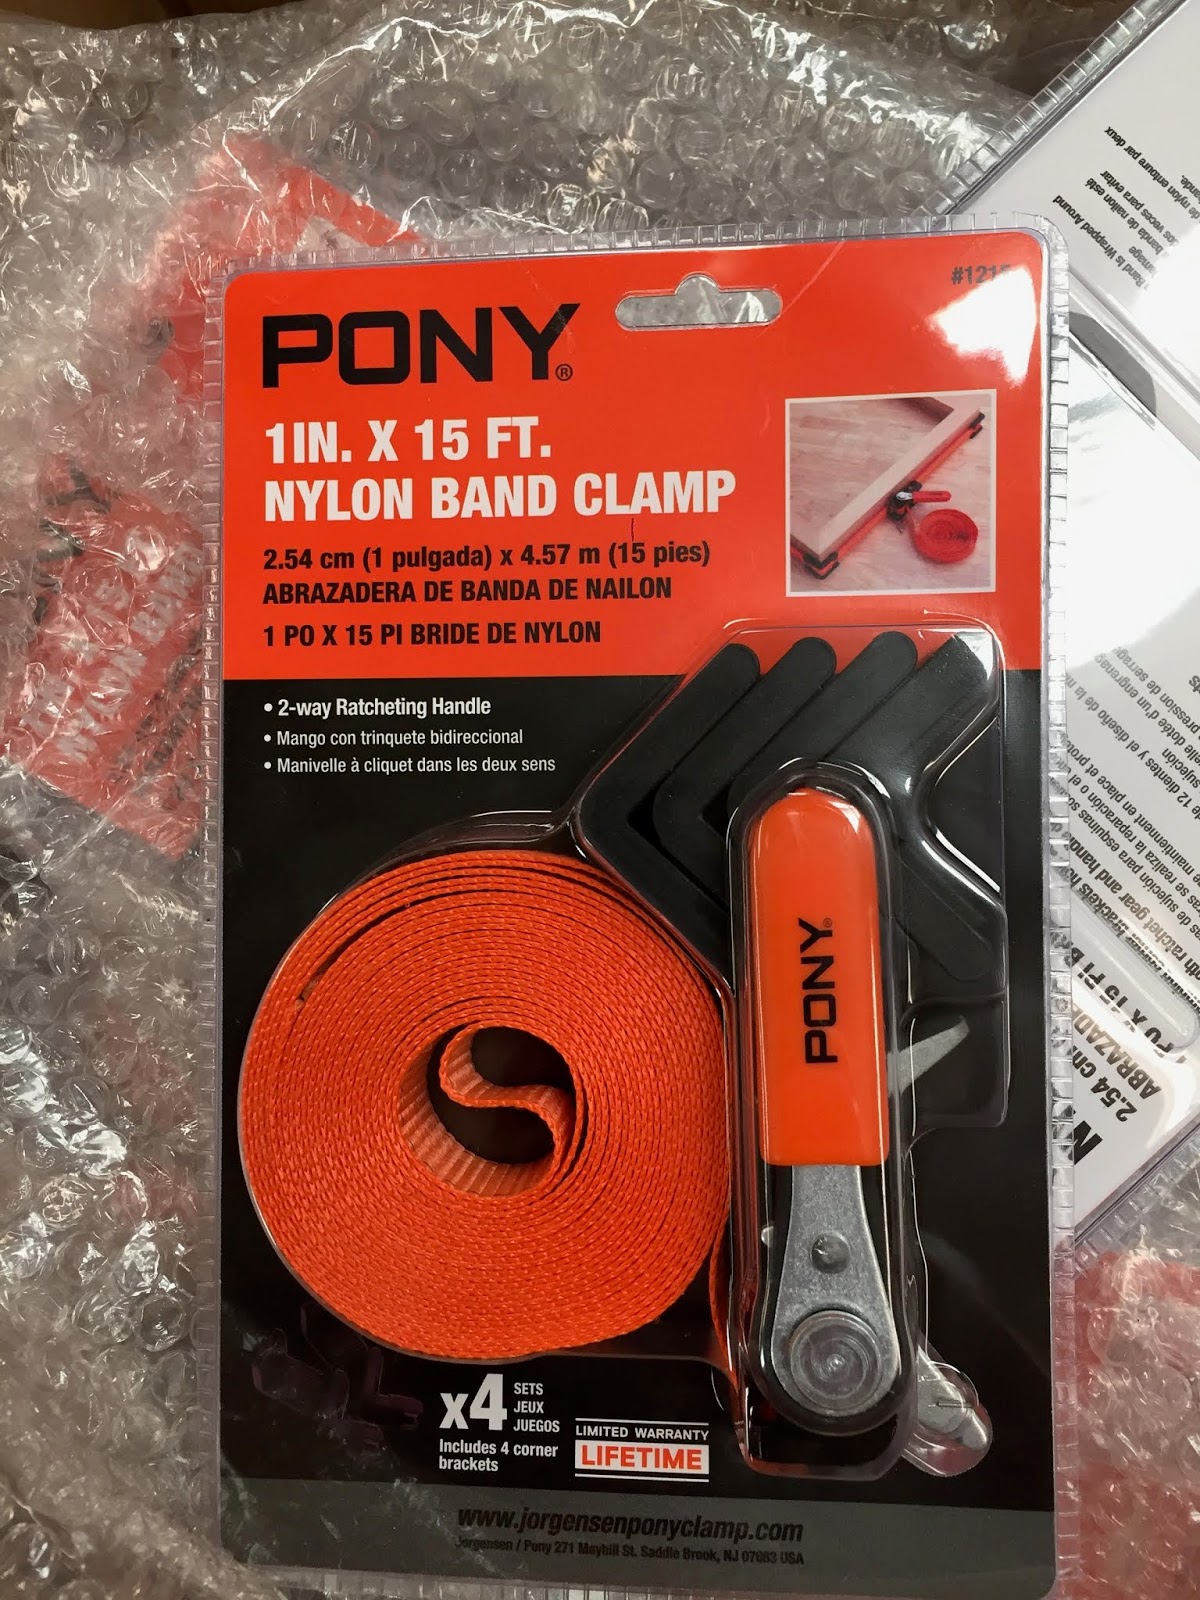
They used to be packaged like this - with four metal corners, and a cheesy little wrench that promptly ended up in the circular waste file... i.e. the trash can. 


These clamps are tired - the springs are wearing out, 


and the nylon straps are frayed and worn down. But they still do a hell of a job when gluing a box, making our corners match up perfectly. 


Seriously, thousands of people have used these, and the Pony/Jorgensen brand is far superior to anything else that's on the market. 


It was getting to the point where I was desperate, and considered buying some of the clamps shown below. But...whoever designed these bad boys (below) ought to go back to design school and rethink them. It's impossible to tighten them well, and they're awkward and bulky. OK, that's just my opinion, but whenever someone shows up with one of these at the shop, they quickly complain about it, too.


They're awful.


I started to panic just a bit when my clamps were showing their wear; they were hard to find, and mostly off the market, as Pony/Jorgensen was going through some issues. You can read about it here. 

There's no doubt that the Pony brand took a hit, and that they disappeared from the market. 

But at this year's Hardware show, I connected with some reps from the company, and explained how my school as in dire need of replacement clamps. We had a long discussion about the state of clamps in the country, and I lamented that one of the more popular brands had turned out to be a huge disappointment to me. They had sent me dozens of clamps to test, and almost every one was a failure. (I'll save that for a future post!)

So all the way back in May at the Hardware show, the Pony people took my information, and cheerfully told me they'd hook me up, when production resumed. 

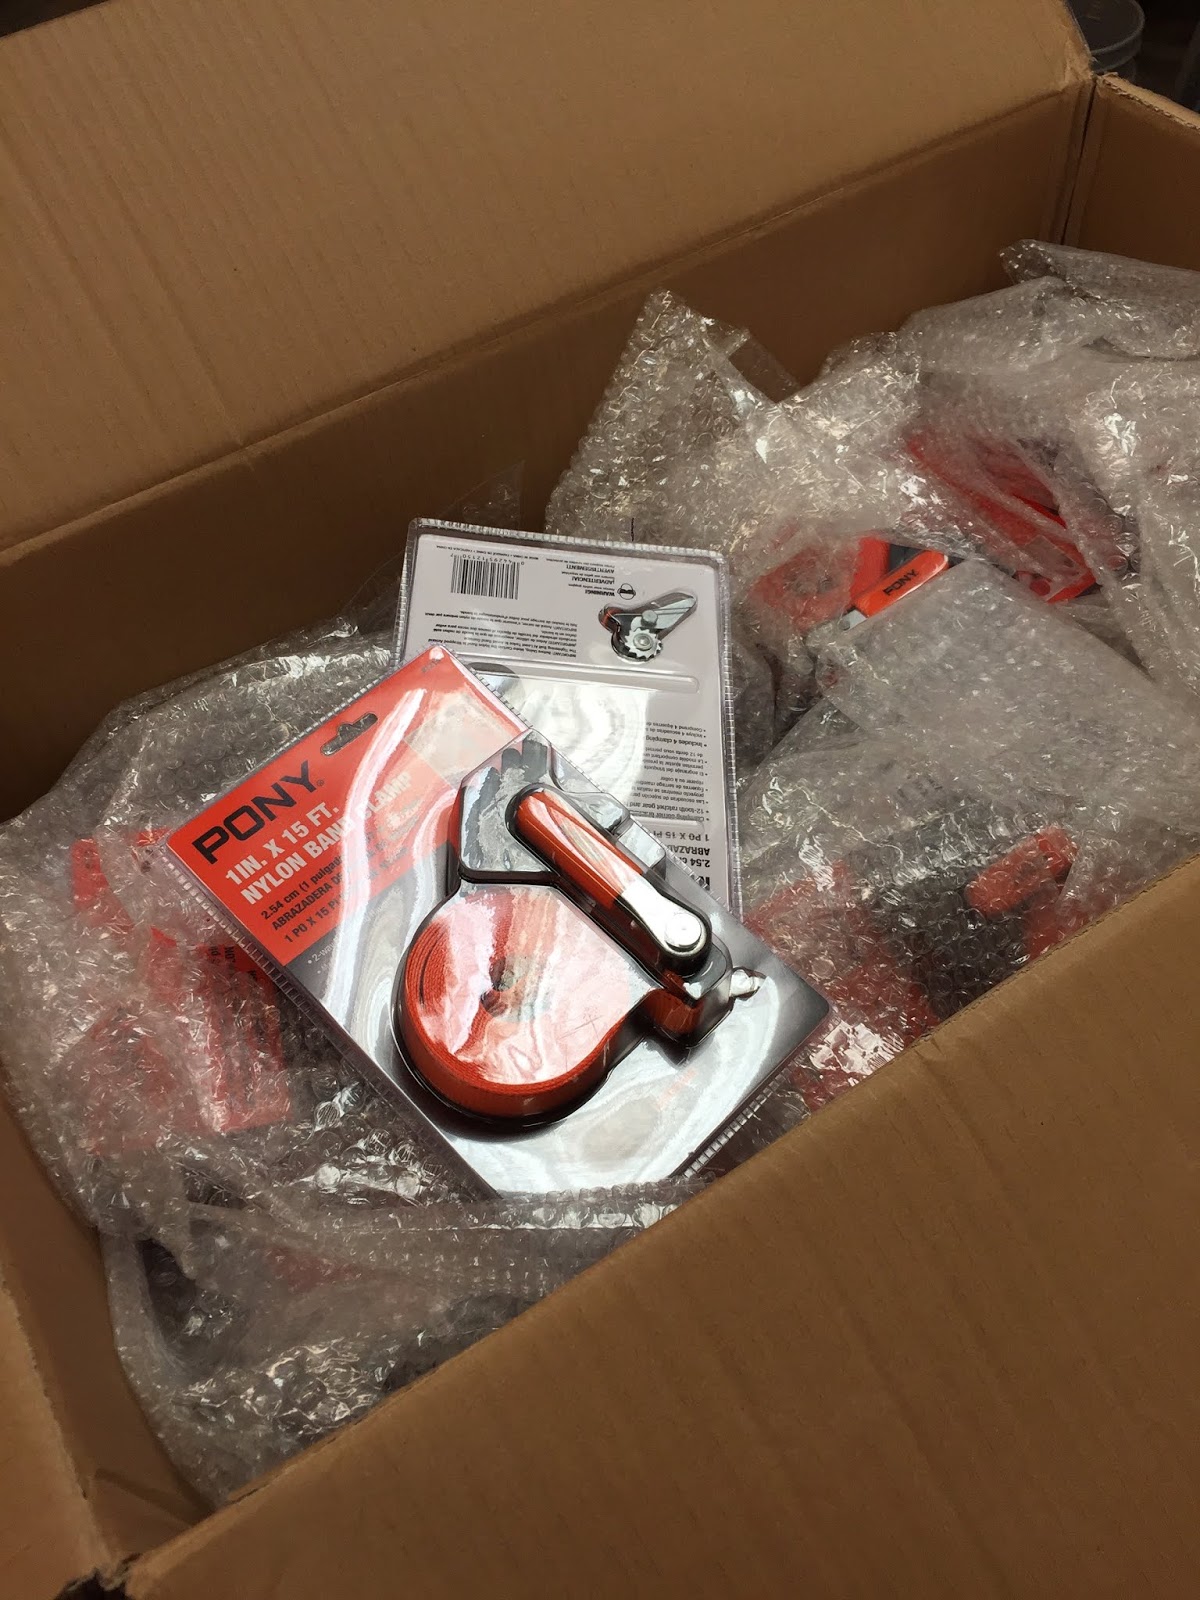
Imagine my surprise to get this box delivered to the shop. I hadn't a clue what it was.


The paperwork didn't tell me a thing...


But when I opened it, it felt like Christmas in October!  


Just as promised - a few dozen clamps, replacing our old tired ones. I'd told the fellows at Pony that I would test these out and give them a fair review, so here are a few first impressions. 


The clamps come rolled up, and the loose end has to be threaded through the body, to create the loop. The clamp also comes with plastic corners, which keep your wooden corners crisp, so no dented corners on softer woods. 


One of the newest features is an integrated wrench on the clamp. No more fumbling for a socket or crescent wrench to tighten the clamp. And even better - the wrench has a toggle on it, so you can loosen the clamp, too. 


Brilliant. 

The coil of strapping had to be unrolled, and the end threaded back through the clamp. 


Since the ends were roughly trimmed square, threading the end through the clamp was a little tricky. 


Since I had so many to thread, I clipped the end into a slightly narrower shape, which facilitated the work. It wasn't pretty, as the strap is beefy and hard to snip.


 But once the end was just a tad narrower, slipping it under the the lever was easy. 


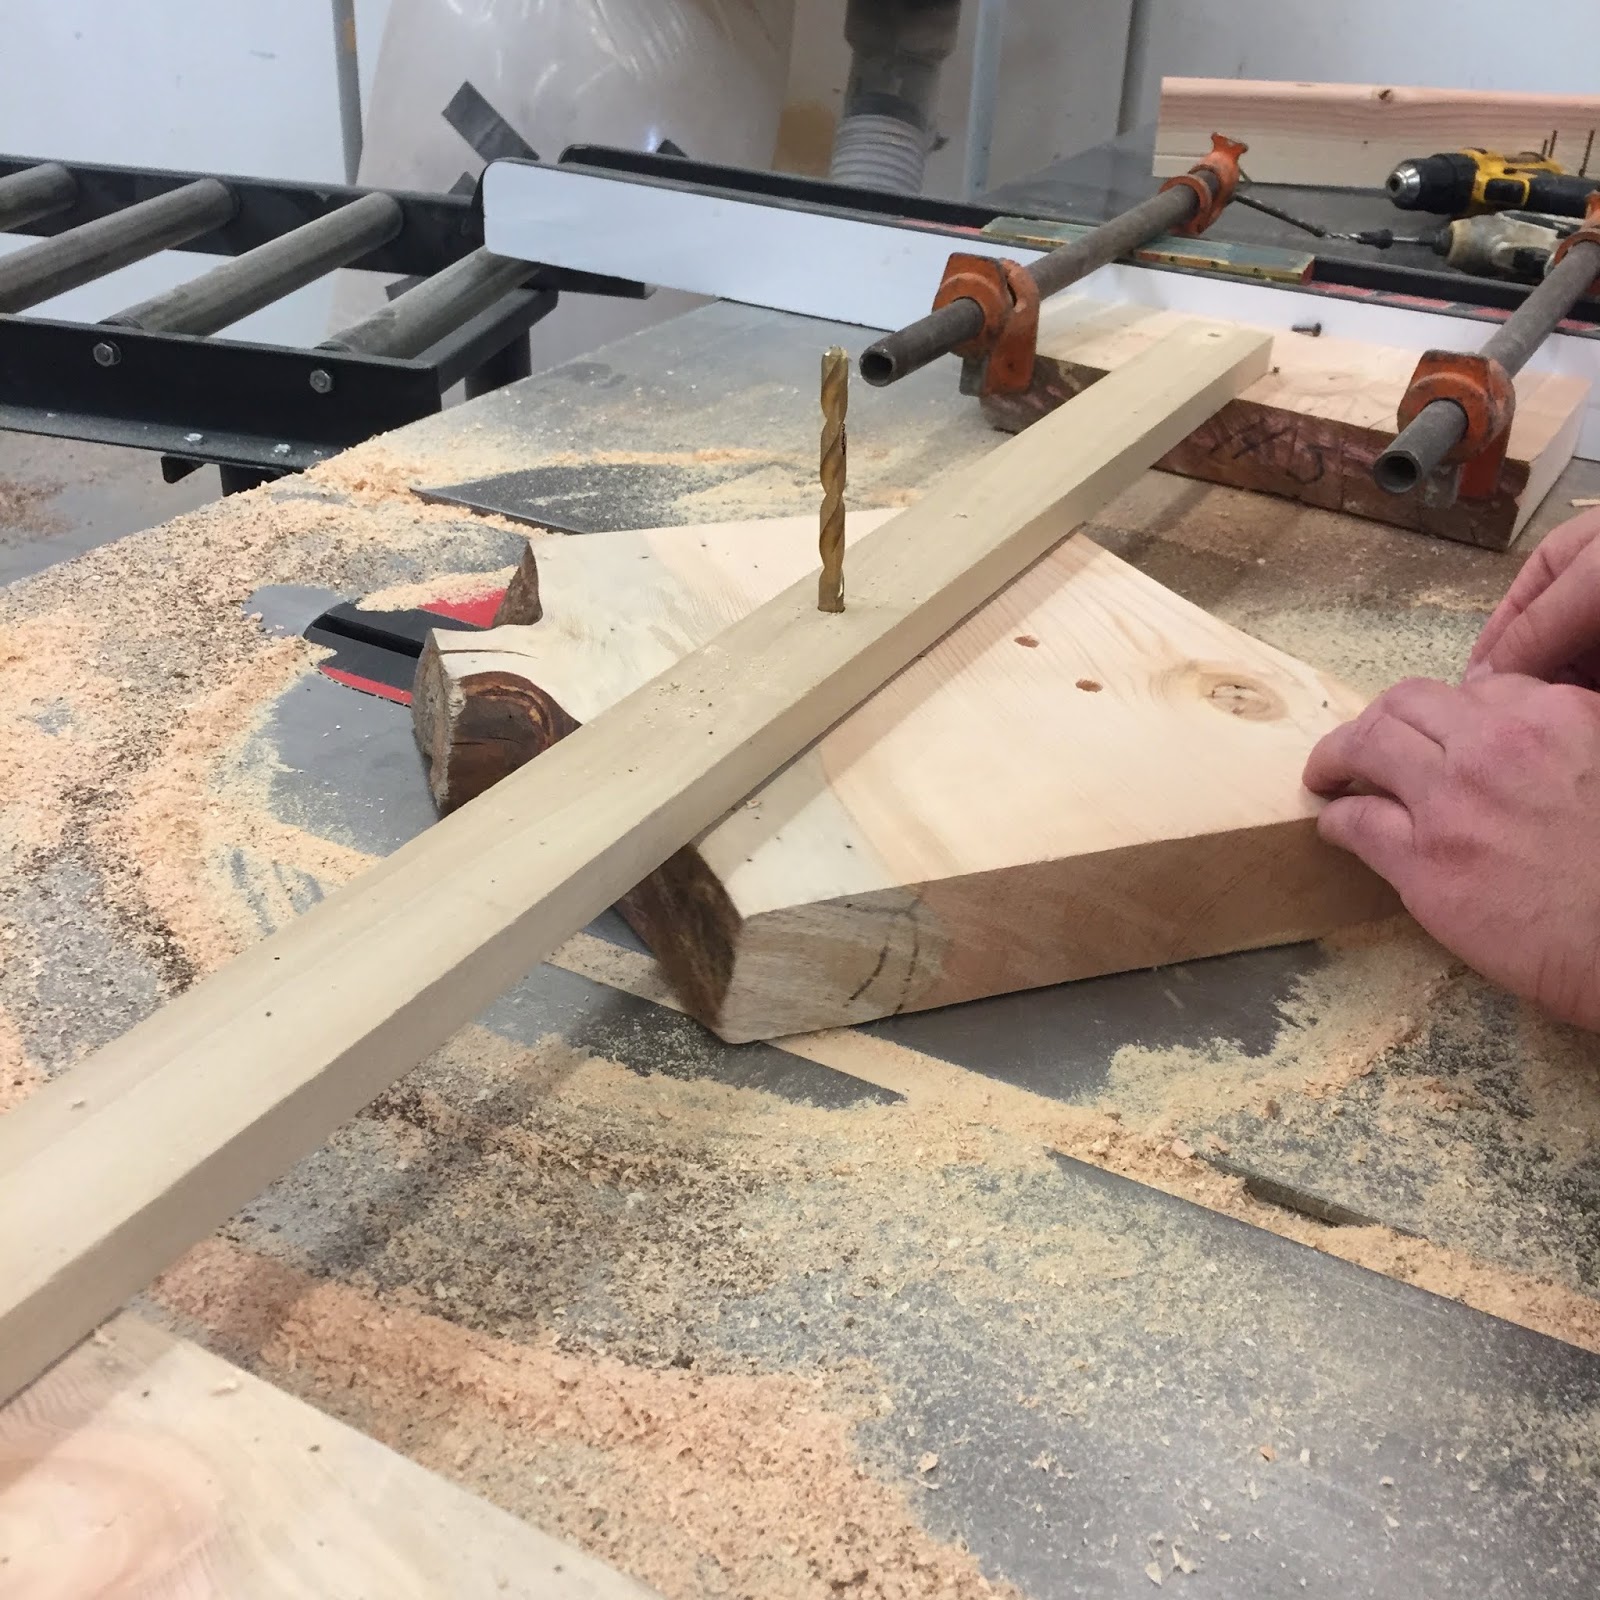
My first use of these was a solid test - a recent commission had me gluing up a cube, where all the corners were mitered, so that no end grain could show. It had to be perfect, with crisp corners, so this was an excellent way to test these clamps.


 I almost never use the corners, but in this case... I definitely needed them.


The clamps worked flawlessly, and the box came out perfect. 


So what did I think about the clamps?... there were definitely some pros and cons. 

PROS

  • I appreciate the integrated wrench very much. It simplifies things, and it is TERRIFIC that it is reversible. Who ever added that to the design wins "tool designer of the year" award from me.
  • The strapping is beefier than the previous design, and again - with so many people using these clamps at my shop, I'm happy to see that they're going to hold up better than the last ones.  


CONS

  • They're over-packaged. I had to unpackaged 24 of these clamps, and it took quite a while, with a great deal of plastic and waste. I think they'd be better shipped in a simple plastic bag with a cardboard label stapled at the top. Our trash sites have enough plastic waste in them.

  • The spring that holds the lever in place seems weak. Many of my older clamps suffered from weak springs, too, and we had to toss a few out, over the years, when they wouldn't hold their tension. Right now, the springs work fine, but in a few years, I suspect a few of these will fail, too. 
  • I'm not sure they need to include the corners with the clamps. Sure, I used them for the project I mentioned above, but I can count on one hand how many times I've used them in 20 years. Maybe sell the corners separately, and save some money? I suspect no one uses them, but that's just a guess.
Finally... my biggest suggestion...
  • Sell these already looped and ready to use. Having to loop the end into 24 clamps took much longer than I thought it would. If the average woodworker is only buying a few of these, it might not matter, but to me - it was a pain to have to thread each clamp. 
Thanks to the great people of Pony/Jorgensen for hooking us up with such a fine product! The students and I appreciate it!


Finally - I didn't realize this, but there is quite an interesting story about this company's founder. It's fascinating, and worth a read... click here.