This new take on solar lighting combines innovation and re-purposing in an amazing way - I just love this video!
Wednesday, September 28, 2011
Friday, September 23, 2011
John's Handtool Class
As the chief-cook-and-bottle-washer of my woodworking school, I'm constantly striving to make it better. Sure, some of the things are easy to accomplish - add a tool here, rearrange a few things, add some new shop aids, like vices or tool supports. But introducing something really different is always a leap of faith. Will it work? Will the students accept change with open arms?
Yesterday marked the end of an experiment of which I am particularly proud - hiring a guest instructor to teach a new class. John Eugster's Hand Tool class ended yesterday with many praises for not only the content of the class, but for his enthusiasm for teaching, as well.
This class focused on dovetails - and for the sake of simplicity, everyone built the same wall cabinet, as shown below. This cabinet featured both full and half-blind dovetails; no small feat for new woodworkers!

It was genius that John started the class by having everyone practice dovetails on scrap wood, before starting their actual cuts on their cabinet members.

And by the end of that first session, everyone had a nice joint that they'd cut. I say it all the time, but woodworking is 95% practice. If you do it long enough, you'll get better; it's as simple as that.

By the fourth class session, most had their cabinet assembled, and were ready to start their drawer. What's even better, during each class, John added some great demos to the material he presented. At any given class, you might have found him sharing his knowledge on sharpening, using scratch stock to achieve a custom profile or tuning up a hand plane. You can read all the books in the world, but there is nothing like watching an expert do it right in front of you.
Here are a few cabinets that started to take form.

This one features a shelf with a stopped dado, so that the shelf line on the front edge of the cabinet is clean, without the interruption of a dado.

A very nice detail to attempt! Also, this cabinet was a little larger than the others, as it will eventually be used as a bathroom cabinet, holding rolls of bathroom tissue in the drawer. Smart!

Most of the people in the class had some woodworking skills under their belt, but this particular cabinet was made by someone that has been working in wood less than a year.

She sure looks like she knows what she's doing - and you know what? She's turning into an excellent woodworker!


This gentleman's wife is such an amazing artist, and he constructs many of the wooden items that she turns into amazing creations. There is a ton of creativity going on in their home, and he puts a great deal of attention to detail in his work. I find that to be a completely admirable quality in a woodworker. People who say "oh, that's good enough" make me want to scream. I want to see passion in someone's work, and it is evident here, in his work.

This isn't just a plug for my school - but for all art programs in small towns across the country. There is a certain sense of accomplishment that is gained by stepping out of your comfort zone and learning something new. It doesn't matter if it's a cooking class, a spinning class, or a woodworking class - I urge you to try something new. You'll meet some new people, learn a new skill, and certainly gain a little swagger in your step about what you've accomplished. How amazingly cool.

Tuesday, September 20, 2011
Feel like flying?
Ever wonder what the earth looks like from space?
This video was taken from the international space station. Check out the lightning about half-way through the video - way cool!
This video was taken from the international space station. Check out the lightning about half-way through the video - way cool!
Friday, September 16, 2011
Changing Jointer Blades
It used to take me hours to replace the blades in my Delta 8" jointer.

Luckily, I've gotten much better at it, and a spare set of blades really helps, too. I receive quite a few e-mails asking for tips, and so I thought I'd do another post about it. First, remove the cutterhead guard.

Use an allen wrench and remove the bolt, and lift the whole assembly off. There will be a spring inside there - try to remember how it fits inside, or you'll go crazy later, trying to get the guard back in place.

Here is why I needed to take the jointer apart - there is a great deal of rust that has built up on the bed surface,

as well as a pretty significant chip in the blades.

Start by loosening the four bolts that hold the blade bar in place. I used a 10 mm wrench for this.

Once they're loose, the blade just slips out. Before you rotate the cutterhead to remove the other two blades make sure you take out the two small height adjustment nuts that sit right next to each blade.

I usually pull them out with pliers.

If you lose them, or drop them inside the jointer, you're going to have a hell of a time finding them. Trust me on this.

When the parts are removed, you'll have an opening in the cutterhead that will probably be filled with sawdust and chips. Blow everything out of it.


It went from this

to this in minutes.

I am not a fanatic about my tools; so I don't freak out if they're not all clean and pretty. They are tools, you know? But in this case, cleaning the beds of the jointer made the wood glide over the table so much more easily. So it's worth making sure the tops are nice and clean.

This is really pristine, which will last about two minutes, in my shop.


Now it's time to replace the blades. The first time I did this, it probably took me three hours. Now I can do it in about three minutes, so it really does prove that practice makes perfect.
The most important thing to remember that the blades have to be the same height as the outfeed table. So that is what you're shooting for - and you'll need a good straightedge for this. I used a brand new combination square that has a nice keen edge on the blade. Here's what you need: a straight edge, needle nose pliers, a small block of wood, an allen wrench, your 10 mm wrench, and the jointer parts - the blade, nuts, and locking bar.


Start by rotating the cutterhead and slipping the nuts in place. Here is where the pliers help.
Then slip the locking bar in place. It's hard to see here, but that is what is shown in the photo below.

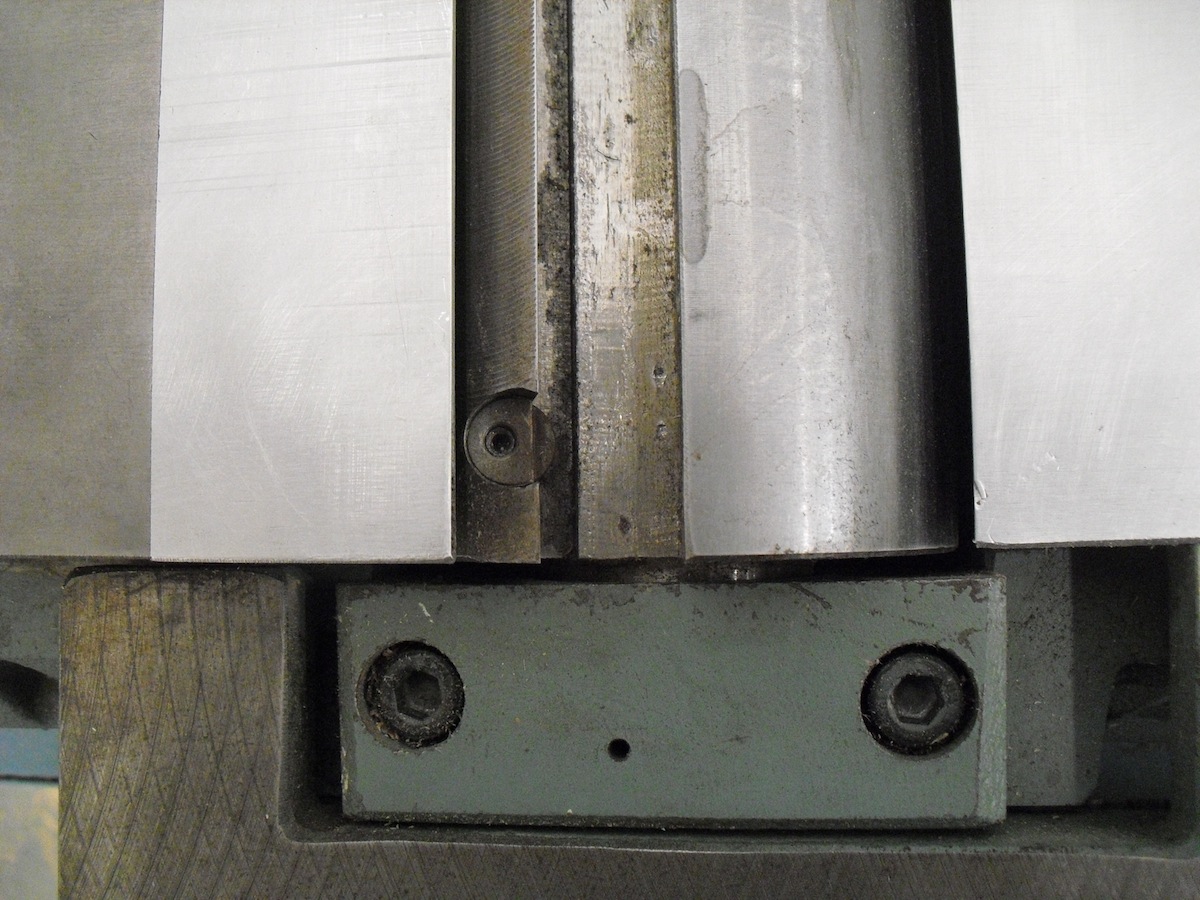
Now - carefully- slip the blade in place. It's sharp, be careful. And don't ding the sharp edge on anything!

The concept is that you want the blade height to be exactly flush with the outfeed table, as show in the image below.

Here is a little video of how to set the height set for the blade.
There are two things left to do after you get the blades in place. Double check your fence to ensure it is square to the table. A Wixey angle cube works wonders for this - zero it out on your flat bed,

and then flip it over to the fence. Adjust the fence until it is at 90˚ relationship to the table.

Last thing to do is re-install your cutterhead guard. This is a little tricky, but if you install the spring in place in the guard, and then flip the whole assembly over, it will fall into place rather easily. Make sure the spring engages properly.
To get some tension on the cutterhead, grab a pair of channel locks and twist a little tension into the spring, by grabbing the head of that large round cap. As you're twisting some tension into the spring, tighten that allen head bolt that holds it down. Now this is important - before you let go of anything - tighten the small set screw that is on the front of the jointer, right underneath the big bolt. That is the secret.

Tightening that keeps the spring from pulling everything loose, once you let go of it.
That's it, you're done. Go drink a beer, you deserve it.
Wednesday, September 14, 2011
Stella. Playing.
Did you ever have a friend who has a larger-than-life personality? Someone that just lights up the room when they walk in the door? Someone that makes you smile just thinking about them?
That is how I feel about Stella.
She always looks sad before a haircut.

And looks so happy after being groomed.

I guess we all feel that way after a haircut, don't we?

She's not the smartest pet in the world. In fact, when you throw a ball, half the time she can't even find it. She can't jump at all, so forget ever winning a dog-frisbee contest with her. She definitely rides the short bus, as my friends tell me.
But she just makes me smile. Here she is, after a recent play session. This is all about her gusto-for-life.
She has a weird way of playing, too. She takes a lot of aggression out on her toys.
Still, she's the best shop-dog/companion in the world. If I could just stop her from bringing pieces of scrap wood into my bed, I'd be happy!
Monday, September 12, 2011
Get out of the shop!
Wow, has it really been a week since I last posted here?
I know I always say this, but it's really been busy at my shop lately. John Eugster is teaching a hand tool class twice a week at the school, and I've been working like a maniac trying to get one of my commissions finished. Working forty hours in just three days wiped me out, and the project is still not finished!
My buddy Dan took one look at me and suggested I needed to step away from the shop for a couple of hours. (I'm pretty sure that was his kind way of saying that I looked like crap.) He had the perfect destination in mind, and five minutes later, we were pulling into a car show that was being held right around the corner from the shop.
Now I'm not a car fanatic. Oh, I love my little sports car, but honestly, if I looked at two trucks, I couldn't tell you their make. Chevy? Ford? Who knows. When I was in high school, I had a friend whose father owned a body shop. She could look at any car and know the year and make of it - and she never got it wrong. (Guys loved that, BTW!) How the hell do people do that?
The car show was a nice little break from my work, but the more interesting aspect of the show was the crowd. Oh don't get me wrong, the cars and trucks were great.


 This car wasn't really getting much attention,

probably because the owner put this sign in the window.

I think it just made people want to stay away. Douche!
But frankly - for me - human dynamic was even more interesting than the vehicles. I mean - who uses an antique doorknob as a shifter knob?

Or a piece of tin from a bait box as a plate on the engine firewall.
 Fuzzy dice were everywhere.

And the sense of humor that everyone put into their cars - fabulous!


I don't even know what this thing is - it looked like a beer keg/tap to me, but it may have been a souped up car stereo. It contained an amazing amount of chrome and detail.

I asked the woman who was wearing this patch if I could shoot a picture of it. With a patch like this, I think it's wise to ask first.

The fellow she was with said his patch was better - and suggested I shoot it, too.


I'm starting a new commission later this week, after a few things get squared away and delivered. Meanwhile, if you're cooped up, I highly recommend getting out and doing something fun for a few hours. It did the trick for me.
I know I always say this, but it's really been busy at my shop lately. John Eugster is teaching a hand tool class twice a week at the school, and I've been working like a maniac trying to get one of my commissions finished. Working forty hours in just three days wiped me out, and the project is still not finished!
My buddy Dan took one look at me and suggested I needed to step away from the shop for a couple of hours. (I'm pretty sure that was his kind way of saying that I looked like crap.) He had the perfect destination in mind, and five minutes later, we were pulling into a car show that was being held right around the corner from the shop.
Now I'm not a car fanatic. Oh, I love my little sports car, but honestly, if I looked at two trucks, I couldn't tell you their make. Chevy? Ford? Who knows. When I was in high school, I had a friend whose father owned a body shop. She could look at any car and know the year and make of it - and she never got it wrong. (Guys loved that, BTW!) How the hell do people do that?
The car show was a nice little break from my work, but the more interesting aspect of the show was the crowd. Oh don't get me wrong, the cars and trucks were great.


 This car wasn't really getting much attention,
probably because the owner put this sign in the window.

I think it just made people want to stay away. Douche!
But frankly - for me - human dynamic was even more interesting than the vehicles. I mean - who uses an antique doorknob as a shifter knob?

Or a piece of tin from a bait box as a plate on the engine firewall.
 Fuzzy dice were everywhere.
And the sense of humor that everyone put into their cars - fabulous!


I don't even know what this thing is - it looked like a beer keg/tap to me, but it may have been a souped up car stereo. It contained an amazing amount of chrome and detail.

I asked the woman who was wearing this patch if I could shoot a picture of it. With a patch like this, I think it's wise to ask first.

The fellow she was with said his patch was better - and suggested I shoot it, too.


I'm starting a new commission later this week, after a few things get squared away and delivered. Meanwhile, if you're cooped up, I highly recommend getting out and doing something fun for a few hours. It did the trick for me.
Subscribe to:
Comments (Atom)