Friday, November 30, 2012

Who plays Scrabble?


Damn, I wish I had a rec room in my house where I could put a few of these Scrabble sofas. Someone really came up with a fun idea with these. 


Of course, these pieces wouldn't be the same without the pillows - so I'm wondering how difficult it would be to find someone to make pillows like these.


Love Letter to Plywood


My buddy John sent a link to this video - damn! 

I loveLoveLOVE this video.

It is the kind of video I aspire to make someday - a geeky love-fest about something related to woodworking. This ten minute piece-of-genius will probably bore the heck out of you, if you're not into woodworking.

(That's a warning to my mom.) 

Otherwise - click on the title's white lettering to watch it on You-Yube. I recommend watching it full-screen, to really enjoy it!

(Thanks, John - this is way cool!)

Wednesday, November 28, 2012

Let's get organized...

There's not too much going on in the shop right now. I'm working on a few small commissions (two Air Force projects) and a couple of furniture repairs. As much as I don't enjoy repairing broken pieces, I do have to say I've gotten pretty damn good at it. 

My buddy Richard sent a picture of a cabinet he added to his shop - jeez, how do people stay so organized?  Look at his clamps!

Richard signed up for a cabinet class I offered last April, we all made small cabinets, mostly to learn the techniques for corner joints, and making drawers and doors. He added some wheels to his and turned it into a combination clamp cart and planing station. 


 I asked him if the planer make the whole thing a bit top heavy, but he said the clamps added quite a bit of ballast to the bottom, so it seems to work fine. By the way, the interior holds 6", 8", 12" and 18" clamps - with up to 13 on each row. The rack on the outside holds 15 - 24" clamps.

It's always nice when you can make your workshop more efficient - there are tons of plans and ideas out there for helping with that. But - the hard part is to adapt those plans to what fits in your workshop. I think Richard did a great job of turning this cabinet project into something both useful and attractive. I've never been to his shop, but I suspect it's pretty orderly and clean... like mine!  (Not!)


Monday, November 26, 2012

Thursday, November 22, 2012

Eye protection tip for today


Remember - observe all chainsaw safety rules, including use of protective eyewear. 


Imagine having to answer the question “Hey, what happened to your eye?”


Happy Thanksgiving to all!

Wednesday, November 21, 2012

Tool repairs? No problem!

Whenever someone offers to give me a tool, I usually take it. Even if I can't use it, someone I know probably can. 

So - when a buddy offered this compressor to me, I jumped at it, 


even though it a had an obvious problem. Parts of the manifold were missing. Ruh-roh.


That's what the internet and a credit card are for, right?  In no time, I'd ordered the manifold, and hoped that was all that was wrong with the compressor. 


Fast forward a few days - the part came in the mail, and it was time to put the tool on the bench and figure out how to take it apart. 


Luckily,  there were only two screws that were holding things up. This one, 


and this one. Once they were removed, you can swing the motor out of the way and remove the old manifold by unscrewing it. 

The new one even came with a replacement nipple. And you know how we feel about that!


Screwing the new one on took about thirty seconds.


All that was left was to reconnect the pressure hose - pretty simple, once I found a small hose clamp. (The new manifold came with a clamp, but it was the kind that needed a special crimping tool, so I chose not to use it.)


Most repairs aren't this simple - I was lucky this time. I don't think it took more than ten minutes to do this repair. I found the perfect cart for this compressor at the local swap meet; it makes it really easy to roll around the shop. 


 No compressor is complete without a hose, and I've been spoiled by a hose that my buddy Dan gave me last year. So I hunted down another. 


Once you use one of these, you'll never want to use any other kind. They don't kink, they coil smoothly, and they're lightweight. Seriously it's a hybrid polymer hose with zero memory, so it lies perfectly flat, wherever you're using it. 

Spoil yourself. 


Sunday, November 18, 2012

Guacamole, anyone?


Leave it to my friend Eric to send me one of the coolest videos I've ever seen! 

Enjoy!


Saturday, November 17, 2012

Turn, Turn, Turn

When the cooler weather hits, I tend to lose all motivation. So when I had a free afternoon today, I had to bribe myself to get back into the shop.
I wanted to finish those three small rolling pins that I started a few weeks ago, but it was chilly in the shop. 

Coffee and sweets help.


Remember I had roughed these out, and coated them with polyurethane, so that the moisture wouldn't leave the wood too quickly. 

I put one back in the lathe, and turned the cylinder down to the right diameter;


 it's easy to check the size with my caliper. 


The end was just a simple curved dome. 


One of the best things about working on the lathe is that you can sand and finish the piece, all while it's still mounted in the lathe. 


Sanding makes a ton of dust, 


I put a piece of cardboard under the wood, so I wouldn't splatter oil all over the lathe. 


These rolling pins probably aren't going to be used - so I applied a coat of wax to each one, too. The heat that is generated while the piece is spinning melts the wax and makes the piece of wood feel amazing. 


All that is left is to deal with the ends - 


I like to make a thin score with a dovetail saw while the piece is spinning slowly in the lathe. I just want to get the cut started; I am careful to not go all the way through. 


With this end scored,


 the band saw finishes the removal of the scrap. Now some people would just slice the end off without scoring it, but I've never had good luck doing that. I like to rotate the piece while cutting it, to get a nice, clean slice. 


 Once the scrap ends are removed, 


I polished the rolling pin end with a pad sander, and then oiled it.  The grain was amazing. 


And here they are - three rolling pins, finished in about two hours. 


These might seem a little inefficient  - rolling pins that are only a foot long. But - it's more about remembering the tree that this wood came from. 

That mighty oak that was probably a few hundred years old; I love the idea that the tree will be remembered with these. 


Wednesday, November 14, 2012

Major Fun!

How many people out there can say they've won a "Major Fun" Award?

Let me step back a minute - and introduce a buddy of mine, John Forte. This might sound like a gushing review of John and his work, but honestly, he's just a talented dude I know, and I felt like writing about him. 

No, I'm not the president of the John Forte Fan club. 

 I met John a little over a year ago, when he called my shop and asked if I could work on a small woodworking project for his company, Game Creations LLC. After he stopped in to speak to me about it - I realized three things. 

First, he's a really bright, charismatic guy. The kind of guy you want to have a beer with; you know he's got a lot of good stories to share. (He told me a couple of doozies last night, and we weren't even drinking.)

Second - with a little woodworking knowledge and some tool training, he wouldn't need to hire me to do his woodworking. He could do it himself. 

And third - he's one of the many really interesting people I've met here in Las Vegas. 

I mean that - I could start a new blog and feature all of the cool people I've met here; I don't think I'd run out of people to write about. I mean, I've met magicians and authors, madams and animal trainers, poker stars and gold barons, acrobats and now... a game designer. His story is a fascinating one. 

Like many great ideas - John's first game came to him slowly, while he was on a cross country motorcycle trip with his wife. The 6,700 mile trip gave him a lot of time to think and create, and by the time he was back home - he began designing the game pieces, and working out the details of the game.  


As he related to me - he was truly a rookie at this point in game designing. Through hours of hard work and some luck (he happened to have a neighbors who owned one of the largest game store chains in the country) - John refined the game, and jumped into the gaming world.

It took a while - his first deal to license a game fell through, but his diligence paid off, and the next thing he knew - he had two companies negotiating for the same game!

Now - why am I writing about him in this woodworking blog? 

John has an interesting technique for designing a game, one that involves making game piece prototypes that he experiments with, until everything is refined and just where he wants them. This mostly means cutting dozens of small wooden parts for his games in development. 


In the beginning, he hired me to cut some of his game pieces, but now that he's taken a few woodworking classes, he's making his own pieces and parts. Here he is with the first thing he ever made - and a shellshocked look of "I can't believe I made this!" on his face. 


John's game prototypes take up a lot of space in his office, with game pieces and parts that require organization. When I asked him if I could do a blog post about him and his work, he wrote this:


How someone can have the patience to take a total beginner, make them feel like a craftsman in 6 weeks is amazing – Jamie's energy is contagious. Enough so that I signed up for the intermediate class and am currently enrolled in a bookcase class – I’m actually making a roll-a-bout mail slotted type case that’ll hold 54 prototypes with 4 drawers for various game pieces. When I asked her if my design was something I could do she said without hesitation  “absolutely”. That’s what I call confidence!


Here's a sketch of what John' is building in the Bookcase class - it might not look like much, scribbled on a piece of paper, but for what he needs - it's perfect. 


For the time being, John's games can be bought through Fat Brain's website and various local game stores. In the short time that he's been involved in the game world, John has won some major awards, including the Mensa Select 2012 award for his game, Mine Shift. 

Scramblitz, a pattern game with a flip side, has also won some awards - The Major Fun award, Tilliwigs Top Fun award and Parents Choice award. (Say that three times fast.) 

CrazyCakes has just come out, so it'll be interesting to see what sort of awards it will attract. Another game due to come out in a few months is iTrax, through a company called Learning Resources. 

All of John's games are throughly tested by his executive testing committee (i.e. - his daughter) and meet her full approval. 


So - what's in store for Game Creations in 2013? John has a lot of irons in the fire, and some interesting ideas he's bouncing around, including possibly opening a local  game store, and of course - designing more games. He's met other game inventors who have 10, 20, 40, or 100 games currently licensed and being produced, so that's something he's thinking about shooting for - and knowing him, I don't have any doubt he could accomplish that. 

FOr now, John's games can be bought through Fat Brain's website, or www.mindware.com and various local game stores. In the short time that he's been involved in the game world, John has won some major awards, including the Mensa Select 2012 award for his game, Mine Shift.

By the way, John mentioned that if anyone has any questions about the game business, or how to go about it, he'd be happy to share what he knows. Not too many people are that generous with their knowledge, which once again, that shows the type of quality person he is. 

OK, I'll jump off the "I'm a fan of John's work" soapbox and head to the woodshop, but I just thought the kind of work he does deserves a little recognition.  If you feel like chatting him up about games, or finding out more about him and his games, he can be reached at his website - www.gamecreationsllc.com. 


Monday, November 12, 2012

Bathroom vanities

This is the time of the year when the phone starts ringing off the hook - and everyone wants to know if their project can be completed by Christmas. Yes, it gets a little crazy, and for the most part, I usually manage to pull it off. 

Someone called the other day with a really interesting project - he is a concrete countertop maker here, and is making a bathroom vanity top. So he needs a vanity cabinet built for underneath his top. 

Although this isn't the exact countertop he's making, look at this image he sent to me - wow!  This sink is awesome - but I wonder if it would get old, after using it for awhile.


It seems like floating vanities are the rage right now, so I have to do a bit of research about building one. The one he wants won't have any base or toe kick, but instead, will hang off the wall like the one shown below. 


In my research over the weekend, I came across this vanity - damn, some people are SO creative! I love this one for a guest bathroom. What a terrific idea!


I'll be "one with sketchbook" all morning, trying to come up with some ideas!

Wednesday, November 07, 2012

My old friend - PEG

My sister and her husband live out in the middle of nowhere. 

Some people say that, but they have stores or gas stations right down the block, so it's not they're totally out in the boonies. But my sis is. In fact, their house is so far up in the mountains, they have a view above the clouds.


The house is amazing,


 and yes, that's a bed in their yard. It was our grandparent's brass bed, maybe close to a hundred years old. 


 Living on land like this brings you much closer to nature, especially if you hike the land, like they do. 

So imagine their disappointment when they lost a massive oak tree recently - it was huge, and luckily, nowhere close enough to their home to do any damage. Still, it's sad to lose a magnificent tree like that. 

Years ago, I used to make a ton of hanging rolling pins from logs. See, people tend to plant trees when their kids are born - and later on, when they lose that tree, they tend to feel a little sentimental about it. 

That's where I'd step in - and make a rolling pin or two for them, as keepsakes for the family. One woman brought me a truck full of logs, and asked if I'd make as many rolling pins as I could out of the pieces. I lost count when I hit around two dozen. 

So when I heard that my sister lost her oak tree, I asked if she wanted a rolling pin. Or two. She sent me some logs, already split, with the sap wood removed. These were very green, and starting to check (crack) a bit from losing moisture so rapidly. 


I squared them up a bit on the jointer, and then drew some lines from corner to corner, to (roughly) find the center. Across the center, I put a few shallow notches with the bandsaw, so that the spur center on the lathe could more easily grip the block of wood.


Instead of starting with a square form on the lathe, it's easier to start with something that has lost its corners. So I tiled the blade on the tablesaw and cut each one of these blanks into an octagon.


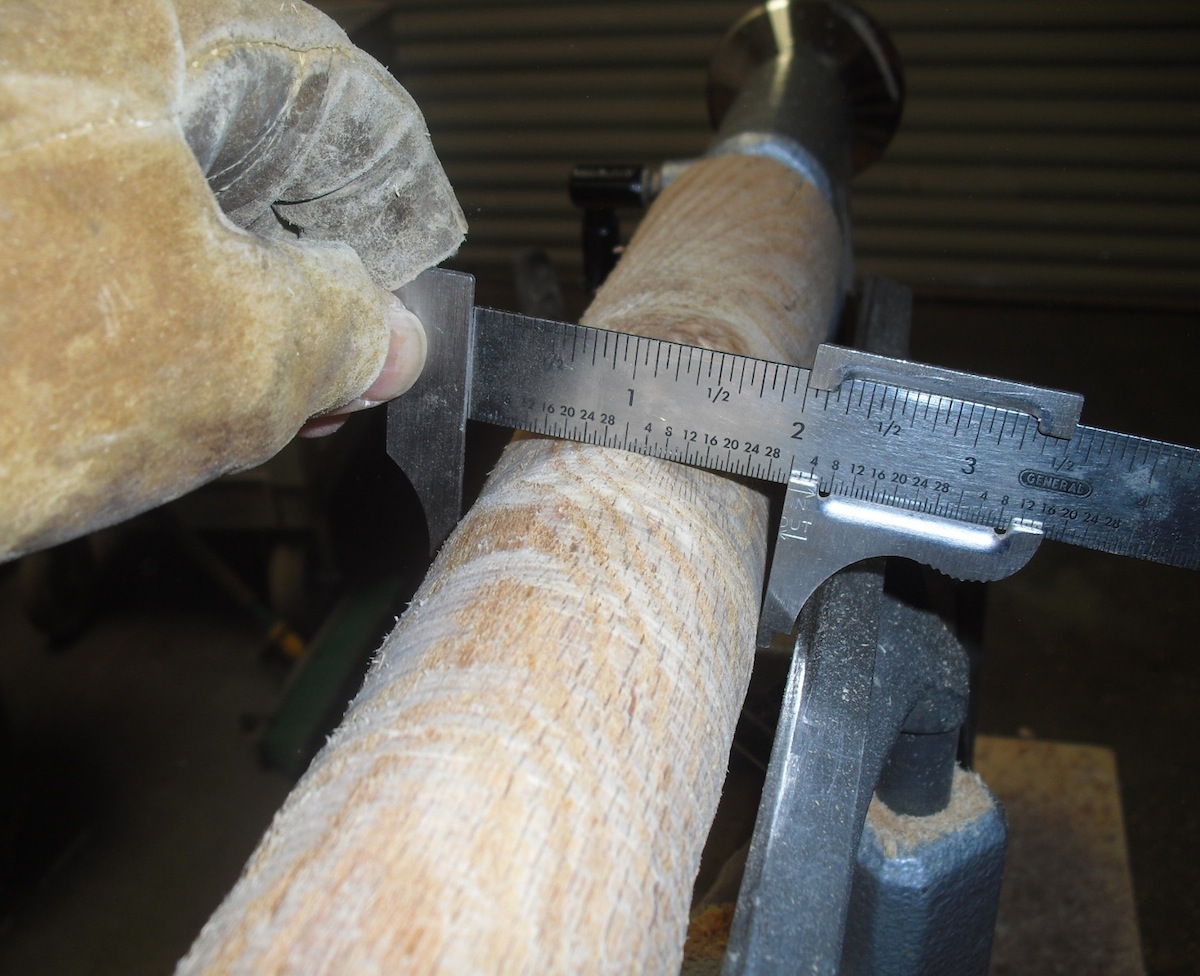
I mounted each blank in the lathe, 


and turned it to a rough 2 inch cylinder. 


Back in the old days, after I had roughed these into shape, it was time to soak them in some PEG, a solution that keeps the wood from losing moisture too quickly, and reduces checking. 

PEG stands for Polyethylene Glycol, and it works like a charm.

It looks like wax, you dissolve it in hot water. It lasts forever. If the water evaporates, you just add more. The ratio of PEG to water will determine how long you have to soak the blanks. In my case, I would soak them for around a month. I had a small plastic tote and just kept logs in it all the time, constantly rotating fresh ones in, and taking older ones out. 

You can read more about PEG here

and here

and here.

And here.


It's amazing stuff, but unfortunately, I didn't have any in my shop. So I did the next best thing - a poor man's version of it. 

The basic concept is that you need to slow down the evaporation of moisture leaving the wood. In college, when we would carve logs, we would have a gallon of cheap polyurethane handy, and every time we carved a section of a log, we would coat the fresh wood with the polyurethane. Wax works, too. Anything you can do to seal the wood will work.

So I looked for something in my shop that might work - but in truth, I don't use too many surface finishes like this. 

I found a can of wipe-on poly, 


but it had mostly turned to gel in the bottom of the can. 


No biggie. 


I cut the can in half, and slathered the gel onto the raw wood.


Over the course of the next few days, I added a couple more coats to these pieces, to seal them even better. 

I'll probably give these a little time to dry slowly - maybe a couple of weeks -  and try to keep them from getting too warm, where they might want to crack apart as the moisture escapes. 


Hopefully, I'll be able to make a few small mementoes out of these - stay tuned!