My sister and her husband live out in the middle of nowhere.
Some people say that, but they have stores or gas stations right down the block, so it's not they're totally out in the boonies. But my sis is. In fact, their house is so far up in the mountains, they have a view above the clouds.
The house is amazing,
and yes, that's a bed in their yard. It was our grandparent's brass bed, maybe close to a hundred years old.
Living on land like this brings you much closer to nature, especially if you hike the land, like they do.
So imagine their disappointment when they lost a massive oak tree recently - it was huge, and luckily, nowhere close enough to their home to do any damage. Still, it's sad to lose a magnificent tree like that.
Years ago, I used to make a ton of hanging rolling pins from logs. See, people tend to plant trees when their kids are born - and later on, when they lose that tree, they tend to feel a little sentimental about it.
That's where I'd step in - and make a rolling pin or two for them, as keepsakes for the family. One woman brought me a truck full of logs, and asked if I'd make as many rolling pins as I could out of the pieces. I lost count when I hit around two dozen.
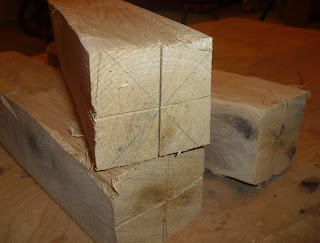
So when I heard that my sister lost her oak tree, I asked if she wanted a rolling pin. Or two. She sent me some logs, already split, with the sap wood removed. These were very green, and starting to check (crack) a bit from losing moisture so rapidly.
I squared them up a bit on the jointer, and then drew some lines from corner to corner, to (roughly) find the center. Across the center, I put a few shallow notches with the bandsaw, so that the spur center on the lathe could more easily grip the block of wood.
Instead of starting with a square form on the lathe, it's easier to start with something that has lost its corners. So I tiled the blade on the tablesaw and cut each one of these blanks into an octagon.
I mounted each blank in the lathe,
and turned it to a rough 2 inch cylinder.
Back in the old days, after I had roughed these into shape, it was time to soak them in some PEG, a solution that keeps the wood from losing moisture too quickly, and reduces checking.
PEG stands for Polyethylene Glycol, and it works like a charm.
It looks like wax, you dissolve it in hot water. It lasts forever. If the water evaporates, you just add more. The ratio of PEG to water will determine how long you have to soak the blanks. In my case, I would soak them for around a month. I had a small plastic tote and just kept logs in it all the time, constantly rotating fresh ones in, and taking older ones out.
You can read more about PEG here
and here
and here.
And here.
It's amazing stuff, but unfortunately, I didn't have any in my shop. So I did the next best thing - a poor man's version of it.
The basic concept is that you need to slow down the evaporation of moisture leaving the wood. In college, when we would carve logs, we would have a gallon of cheap polyurethane handy, and every time we carved a section of a log, we would coat the fresh wood with the polyurethane. Wax works, too. Anything you can do to seal the wood will work.
So I looked for something in my shop that might work - but in truth, I don't use too many surface finishes like this.
I found a can of wipe-on poly,
but it had mostly turned to gel in the bottom of the can.
No biggie.
I cut the can in half, and slathered the gel onto the raw wood.
I'll probably give these a little time to dry slowly - maybe a couple of weeks - and try to keep them from getting too warm, where they might want to crack apart as the moisture escapes.
Hopefully, I'll be able to make a few small mementoes out of these - stay tuned!


No comments:
Post a Comment