Thursday, May 30, 2013

Fun with old tools.... let's rebuild a Makita 2040 planer

This old Makita 2040 planer is my pride and joy. 

Oh, she's not so pretty anymore, but damn - she does a hell of a job planing wood. When I graduated from college and hung up my shingle - this was the first big expense for me - nearly 16" of planing power. 


There have been literally miles of wood that have passed through this machine. Over time, I tired of sweeping up the piles of sawdust that it made. And I certainly didn't want to buy the dust hood that they made for this - I couldn't afford it. So I made my own out of some HVAC duct parts. It has served me well. 


But this machine has been sitting in the corner of my studio for a long time. My 24" Bridgewood planer seems to be the planer of choice, so this smaller one tends to get ignored. The last time we used it, I realized the infeed and outfeed rollers had deteriorated so much, the foam on them was simply falling apart. 

Time to pull this apart and give it a little TLC. There are two screws that hold the top in place. 


Loosen each one and rotate those little tabs to the side -


 and the top plate lifts off - exposing the blades 


Two screws also hold the side cover in place - honestly, this planer is very easy to disassemble.  


You're looking at twenty five years of grease and sawdust on that chain.


Here's what needs to be taken out - that orange-colored roller seen from below. . 


I took a few pictures of the chain, especially this spring, so that reassembly would be easy. 


I've learned that lesson the hard way!


 I tried slipping the chain off around the gears but it just wouldn't come out. So the only way to remove the it was by taking out the master link.


While I was reading about this repair, someone online suggested placing a board under the roller, and then lowering the planer head down to the board. That's to support the rollers when they're removed. 


All that's left are four screws holding each roller in place. Of course, three of them came out really easily, but the fourth - stuck and rusted in place. So I pulled out my manual impact driver - if you don't own one of these - you have no idea how helpful one can be!  When you place its tip in a frozen screw and hit the back of the driver with a hammer, it delivers a strong twisting force to the screw - releasing it. It's perfect for working on old machinery. 


All four screws were removed and the rollers were basically free. As I lowered the planer table, each roller dropped down with the piece of wood blocking.


I'm not sure I've ever seen something so funky. Both rollers were misshapen and corroded with years of sawdust embedded in the rubber. 
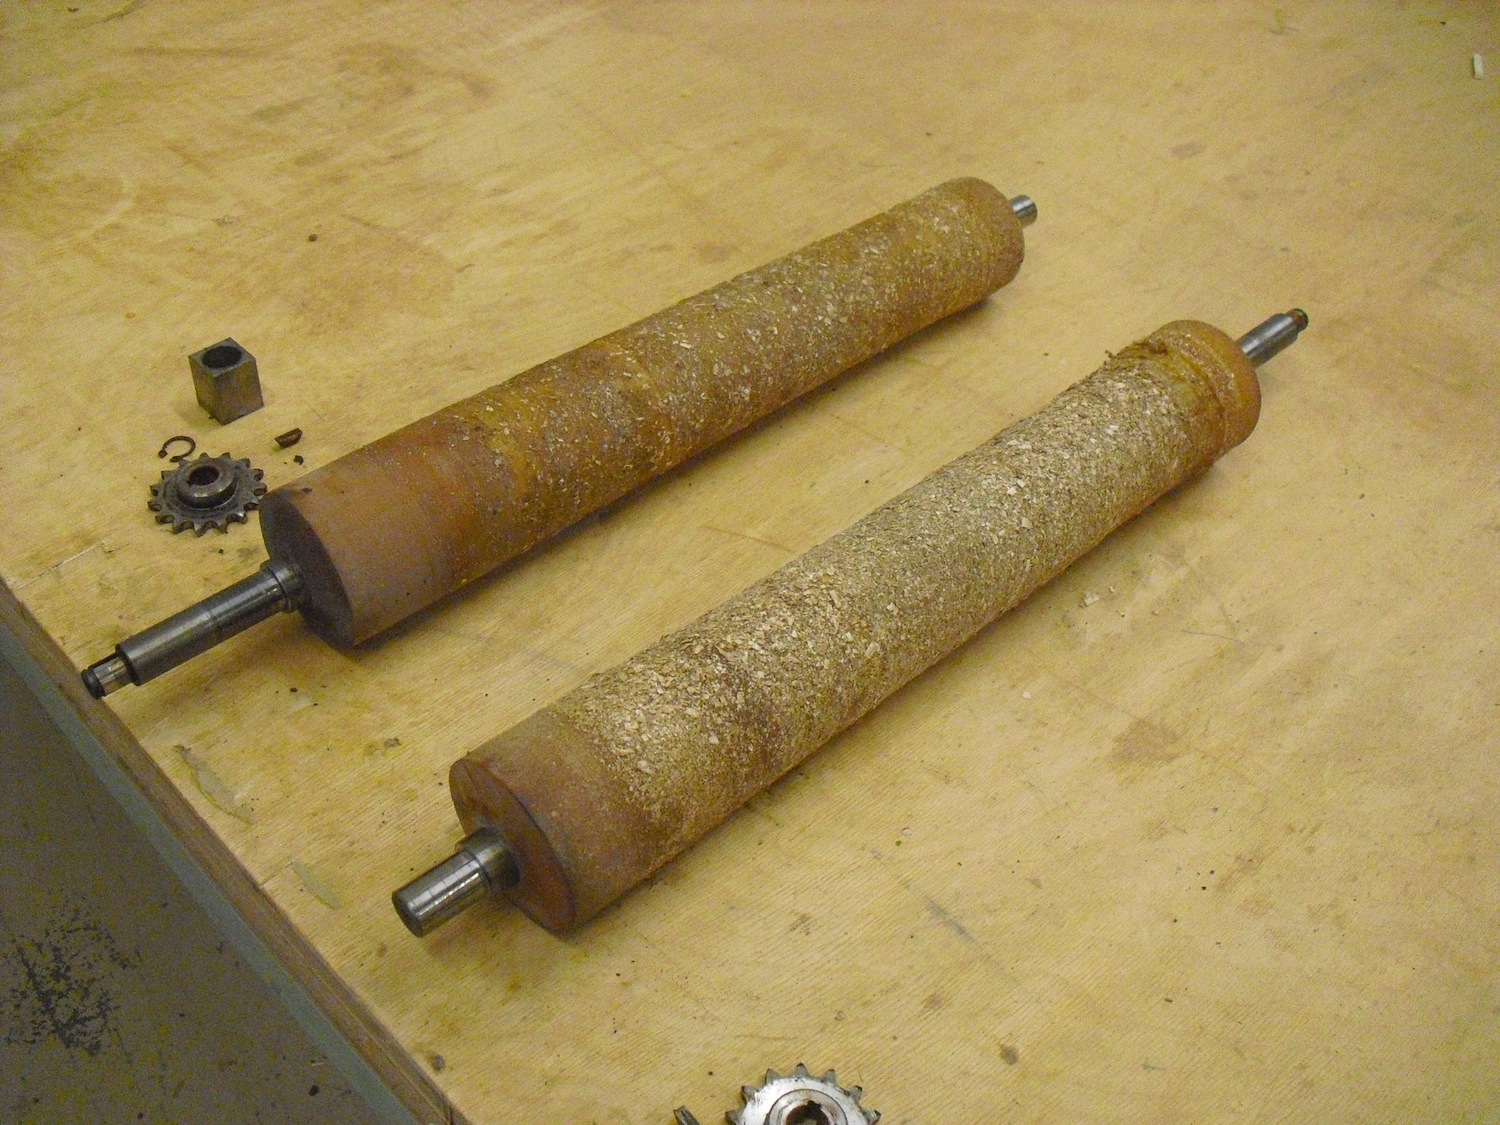


I gave them a call - and honestly - the fellow I spoke with was great - he even suggested that since shipping the two rollers was going to be expensive, I could bring them with me to the AWFS wood show coming up here in Vegas in July. He was planning on attending the show, so he could bring my rollers back home in his trailer, thus saving me the shipping. 


As I thought about it - I decided the AWFS show was too far away - I didn't want to wait months to get these rollers back into my shop.


So - I packed the rollers up and shipped them to Oregon today. The next time you see them here - you won't even recognize them!

Next step - changing the blades. Stay tuned!


Tuesday, May 28, 2013

A really great Tablesaw refresher lesson

Here is a terrific five-minute refresher on using a tablesaw. Everything contained in this video is stuff we discuss on the first night of the Basic Woodworking class. 


Monday, May 27, 2013

Remembering the ones we love on Memorial Day

Happy Memorial Day - to all service members both here and abroad - thank you for your service. I always think of my dad on this day - I sure do miss Jimmy!


Thursday, May 23, 2013

Thanks Ed!


In terms of some of the things I run into in the shop, this isn't really that big of a problem. But I'm starting to be overrun by blades in the shop. 

I'm a big fan of Forrest blades, so I have several of them - there are always a few sharp ones in reserve, in case one gets damaged. But - it seems like I always end up with a ton of blades. 


 This blade holder was full,  


and so was this one.


Rip blades, combo blades, plywood blades, melamine blades, you name it, I probably have one. Or two. Or six. 


I wanted to drop off some blades to the sharpener, and I usually put them on a blade holder, but every one of them was full. Time to make one!


I grabbed a piece of plywood and set up the plunge router, to rout a handle slot. This 1-2-3 block helped me set the edge guide very quickly.  


I cut the slot in three passes, each one deeper than the one before. 


Sweet!


This was one of those 15 minute projects, but I still wanted to make it nice. So I placed the blade on the plywood and marked the area where the center hole would be drilled. 


I double-checked the depth with the washer and bolt. 


I wanted to round the corners and shape the plywood a bit, so I grabbed a compass. 

Whenever I grab a compass in my shop - or anyone grabs one - I think of my buddy Ed Tognetti. Years ago, I taught a Roll-Top Desk class; it ran 12 weeks and everyone completed a full sized tamboured desk. In the course of that class, we needed compasses for designing the upper part of the desk. At the next session, Ed showed up with a compass for everyone in the class. 

He passed away shortly after that, and I swear - every time I look at a compass in my shop, I think of him and miss him. 


I rounded the corners a bit, 


and then started loading the blades on to the holder. I put a sheet of cardboard between each blade, to protect the teeth.


The last thing I added was a piece of plywood with my card attached to it. 


If anyone needs a specialty blade - I've got one for you! Seriously, I am trying to find a home for some of these - free of charge. I don't use most of these, but I can't bear to throw them out. (No, I'm not giving away my Forrest blades, but I've got a lot of other brands.)


Before hanging it in the shop, I left a little note on the back of the holder.


Tuesday, May 21, 2013

A nifty little finish for you to make...

Two months ago, at our Sin City Woodworkers meeting, a new fellow brought an amazing table.  The top was a walnut burl, and he'd taken great care to flatten, sand and finish it. Just about everyone in the room had to touch the burl top - it was so gorgeous, we could barely keep our hands off of it. 

The finish on it was amazing - smooth and soft, without any sheen. When quizzed about what he used on the wood -  he explained that he's used a mixture of beeswax, oil and turpentine. 

Of course - a lively discussion ensued about custom blends of finishes - almost every woodworker I know makes his own custom blend. I've never loved the one I've mixed up - it uses turpentine and it's too smelly for my taste. 

Later - one of the members sent me a link to this video. That's one of the great things about this woodworking group - there's always a woodworking tip to be shared, or a technique to be demonstrated. Awesome. 


Saturday, May 18, 2013

Where do boxes come from?


This is a terrific video, forwarded to me by no less that four of my woodworking buddies here in town. The woodworking community here is growing every single week - at our last Sin City Woodworkers meeting, we had close to forty people in attendance! 

One of the best parts of that is the diversity of the group - we have carvers and furniture makers, toy makers and turners. Have a question about dovetails or dust collectors? No problem, someone is there to answer it for you.


Though this video is on the long side, I think it will keep you captivated. 

By the way, have you heard of this  Kickstarter campaign for a fellow making wooden pinhole cameras? 


Yes, the woodworking community here in Las Vegas is growing and evolving, but I love how the Internet allows us to become one larger global community. 


Wednesday, May 15, 2013

Can you imagine working the same job for 76 years?

Holy crap, this makes my back hurt. 

Here's a clip of a fellow who had been doing the same job for 76 years. It's a charming short video, and obviously - there is one important factor here. He loves what he does, so his "job" doesn't feel like work. 

But - can you just imagine doing a job that long? I mean - I love working with wood, and I often feel invigorated after spending a full day at the shop. But - if I worked with wood for 76 years, that means I'd still be doing it when I'm 90. 

Ummm.... no. 

Let's hope I'm retired by then! 

Sunday, May 12, 2013

It's OK to change direction in mid-stream...


When I said it was time to wrap up a few things around the shop, I wasn't kidding! Remember those four drawer fronts I've been working on for-fucking-ever?  The ones with the inset pulls 


and the carved areas?


To tell you the truth - once I started carving them - ugh.... I wasn't all that about them.

In fact, I really didn't like what was happening at all. You have no idea how tough it is to be working on a piece that you're not "feeling."


One of the best things about owning  every tool under the sun is that at least one of them will do what I want it to do - in this case - I used a router with a straight bit to eliminate the carved area.  Took it right out!


See, I wasn't satisfied with the carved area - it just didn't pull the piece together for me. I had been planning on using a little MilkPaint in the carvings, for some contrast. But instead -  I came up with a scathingly brilliant idea. 

(Ode to Hayley Mills...)

Why not inlay the area with a contrasting wood? There were a couple of details to consider - the grain of the wood had to run in the same direction as the drawer fronts. So I glued together a piece, and then cut and thickness-sanded the pieces to the correct dimension. 


They already look great - much more like what I envisioned. 


I needed to put a small chamfer, but the wood was so thin - it was a dicey operation. A router table and a scrap piece of wood to act as a hold-down was all I needed. 


Here's the routed edge. 


Before and after pieces. 


It's funny how I really hated working on this piece before, when I was carving it. Now that I was doing something that I really felt, this was coming together beautifully. 


Normally when you glue two pieces together, they will slip and slide around a bit, usually ending up mis-aligned.  But this hold down clamp secured the two pieces nicely. 


One side was applied almost flush- just a hair over the edge, so I would get a good glue joint. 


Here's an edge waiting to be cleaned-up.


One or two passes with a plane evened things up.


I trimmed the other edge flush on the tablesaw. 


Don't these look a hell of a lot nicer?


Last thing to do was chamfer the two long-grain edges.


Ready for sanding - and knobs. Knobs will be the next design decision... but this time, I feel much more equipped to make the right decision!


One last thing - Happy Mother's Day, mom! I miss you and wish we were hanging out together. And Happy Mother's Day to all the moms out there.