Well, the world didn't come to an end, so there's no use in putting off the sanding any longer. Time to attack the sanding. I had a few days to think about the best way to sand those curved areas, and came up with what I think is... a brilliant idea.
But first - I asked if anyone could guess how I cut those curves, and got a few guesses. Very close, but no cigar. My buddy Dan let me borrow his sliding compound miter saw, so I loaded an 8" blade in it. Then, I positioned the saw on the rails, and locked it into place, so that the cut was centered over the board. I checked the depth, because I didn't want to cut all the way through the board. But since I was using a smaller blade, it was more a problem of not cutting deep enough. So I added a sheet of 1/2" plywood under my Cherry blank, to raise it up a bit. That allowed me to cut about halfway through the blank.
Then - all that was required to cut those curved slots was to lower the blade, make a cut, slide the wood over, and do it again. Each 3" section required about 25 cuts, since I was using a thin kerf blade. So by the time I'd cut all six slots, my muscles were burning and bulging. Arnold Schwarzenegger has nothing on me. (Except a love child.) By the time I'd finished this part of the project, I'm fairly sure I could have arm-wrestled him and won.
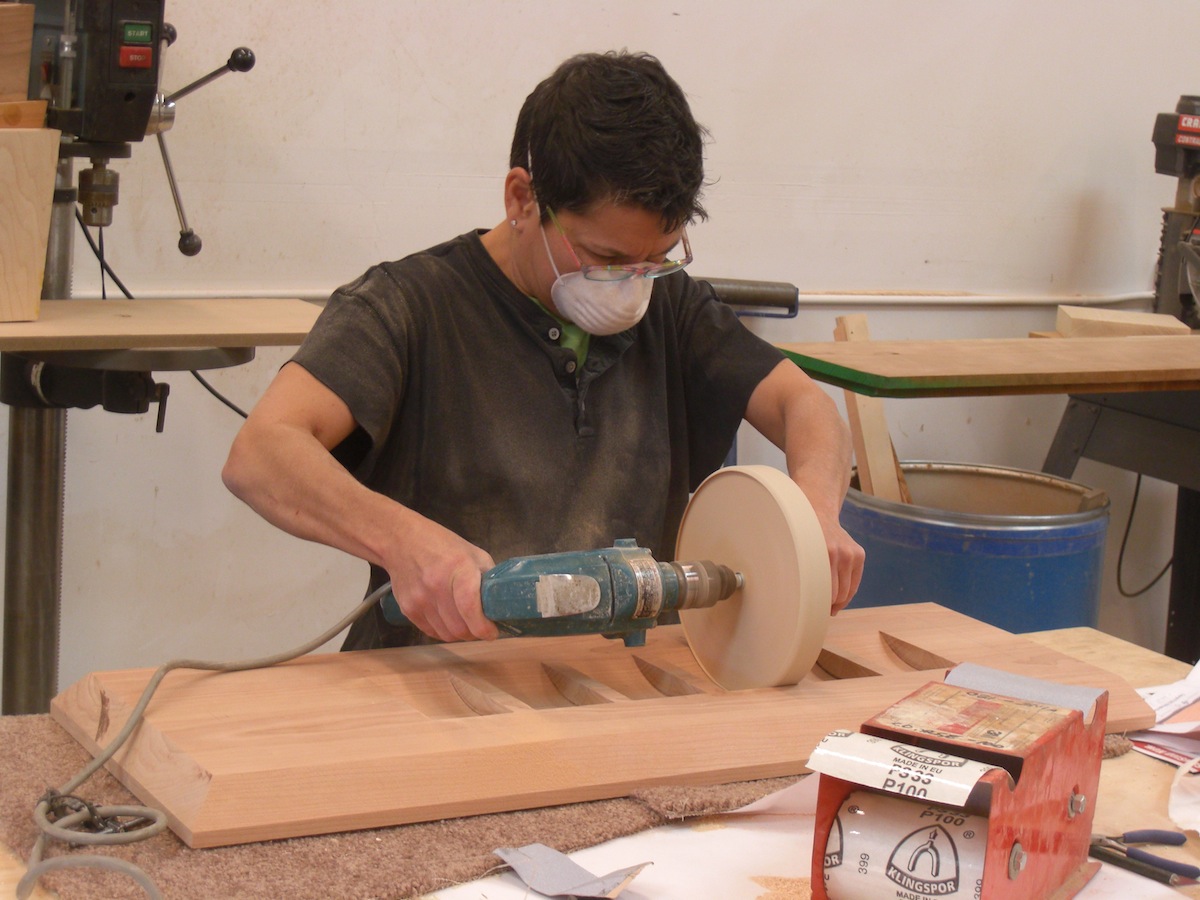
Those curves have an 8" diameter, so I grabbed a piece of scrap one-inch thick plywood.

With a plunge router, and my trusty Router Buddy, I cut an 8" disc of wood.

The center hole was small, so I had to re-drill it with a larger bit, so that I could mount it on my drill.

What's that line about necessity being the mother of invention? I needed a handle on the left side of the disc, so by buddy Dan grabbed a socket and we screwed the whole thing together with a long bolt. Here it is, mounted on the drill - a perfect solution for sanding those curves. I covered the whole disc in 100 grit sandpaper, put on a mask, and got to work.

After about ten minutes of sanding, I noticed two distinct things - this disc sanding system worked like a charm! And that I might have to buy some new shirts, since it's possible that I was going to bust out the seams in my old ones. This method of sanding was a great upper body work-out!
Truth is, I could only sand for about four or five minutes, then rest and whine about it, and then start sanding again. (Thanks for taking the pics, Denny!) After all the slots were sanded with the 100 grit paper, I moved up to a finer grit of paper.

Since I'd covered the end of that disc with sandpaper, too, I could sand both the curved areas and the ends of these curves, where the end grain was a little burnt.

This system worked perfectly.


Half the battle of being a good woodworker is being a good problem solver. A dilemma like this sanding issue is a perfect example of that. Implementing what you've come up with is another important part. Yes, you have to tap into the "McGuyver" side of your brain, seeking solutions that aren't found in books. There's a bit of mania in it; but it makes you a better technician in the long run.

Next step? Making the two end supports that will hold the crankshaft. Stay tuned, and pass the Tiger Balm.
1 comment:
Looks great, Jamie! It's always fun to see your unique projects and how you solve dilemmas that crop up.
Post a Comment