Stove openings are generally 30" wide, and the area that I want to tile is roughly 20" tall . I plan on taking the tile lower than the counter height, for a little more protection to the wall.
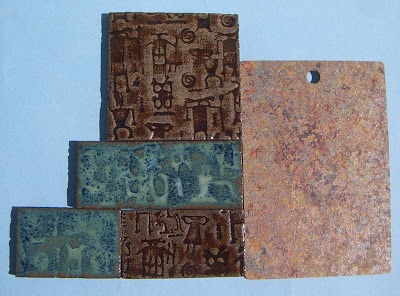
So the first step (at least the way I do things!) is to decide which glaze to use. Here's a sample of the plastic laminate used on the countertop, it's mostly browns/beige with some very pale blue highlights.


I'm a big fan of modular tiles, where they all fit together and I have a little bit of leeway about the layout. Here's a sample of a wall piece, notice the four panels it it.

Each panel measures roughtly 9" x 10". Maybe it's boring, but I never get tired of using tiles that are 1,2,3,4, and 5 inches square. After the tiles are glazed and fired, I can lay them out in whatever pattern I choose. Here are a few examples.


After taking some dimensions, I decide that instead of using a modular system based on squares, I'm going to utilize a combination of a brick layout. I played around with the dimensions and decided to use two different sized tiles, that would allow me to add that variation into the design scheme. Since I was firing the kiln, added in some test tiles, to try and decide which glaze to use.
I felt like the countertop was crying out for a dark brown glaze, so here were my first sample pieces.

But I didn't love the way the colors looked with each other. While I was trying to decide what to do, I rolled out the slabs, added some texture, and bisque fired them.
Something I learned about making backsplashes - a while ago, I made about 5' of backsplash tile for a bathroom sink. Because I didn't want to have to fight the shrinkage of the clay, I made a variety of widths of these tiles, and then, after they were fired, picked out the ones that best fit the space I was tiling. I usually make way more than I need anyway.
So I decided to use that same method with this backsplash. The only thing I was concerned about was the height of the tiles, and I decided to make the height in two sizes, so that I could modularly fit the tiles all together. I'm so anal.
Back to choosing the glaze... I have maybe 25 or 30 different colors in my glaze pallette, some of which fire effortlessly, and others which give me nightmares. The ones that really seem to give me headaches are glazes with cobalt in them. They tend to blister, and can ruin perfectly wonderful pieces.
But - remember that the plastic laminate has some blue in it, so using a blue glaze might be perfect. For the non potters - cobalt in a glaze will give you the blue color. Only I was worried that I might have some blistering.
I belong to an online ceramic community, and there was a recent discussion about a glaze I'd never used, called Floating Blue. One potter said it was his favorite because it was so stable and dependable. Then, Ron Roy, one of the authors of Mastering Cone 6 Glazes, wrote into the ceramic board, saying that he'd reformulated the recipe for Floating Blue, to make it even MORE stable. Sweet. I trust any recipe that Ron shares, he's a glaze genius.
After mixing up a 100 gram batch of it, I painted a few tiles and stuck them into my next kiln load. Yow-zah! I think I'm in love. And despite the cobalt in the glaze, I didn't have any blistering at all.
See what I mean about the two different heights for the tiles?
 I tested the glaze in several different thicknesses, and actually liked it a little thicker than normal, so that the texture on the tile was obscured. That meant three coats.
If you double click on the picture above, you'll see what I mean.

So all of my design problems had finally been solved - glaze choice, tile size, and layout. Time to start glazing.

The BM means Black Mountain clay. I use two different clay bodies, and they look quite similar when they're in this bisqued state. So I've learned to label them.


There were a total of 170 tiles. That means 510 coats to apply.

As I type this, the kiln is cooling. I'll be able to open it tomorrow, and you know what we potters say.... opening a kiln is like Christmas morning.
2 comments:
Nice! I like the texture on the tiles included in the furniture... did you use some sort of textured board/slab to press that in?
Rodney,
I used a large rubber texture mat/stamp for the texture in these tiles.
The stamp is about 4" x 6" and isn't mounted, to a piece of wood, it's just a flexible rubber sheet. It's a really easy way to add texture to my tile.
Post a Comment