Tuesday, April 10, 2012

I'm not afraid of that!

It has been suggested that in order to be considered a master at anything, it requires 10,000 hours of practice. When I began the hardware installation on this piece, that thought was rolling around in my head.

Most woodworkers have an
Achilles' heel in their woodworking skills. You wouldn't believe how many people have trouble with finishing, or with cutting simple joinery. Or design.

For me, for years, it was hardware installation.

Now I know that it sounds pretty cut and dried - lay it out, drill some holes, install a hinge, or a lid support, or whatever. But - being a perfectionist, it isn't always that simple. One pre-drilled hole placed ever so slightly off its mark can screw up everything. It can pull a lid off to one side, make a door hang crooked, or worse. All you do is increase your headaches.

With that in mind, I cut this box apart, separating the lid from the bottom.


There was a little touch-up with a handplane required - and planing this African Mahogany wasn't too enjoyable. The grain is gnarly and swirly, and sanding the surface often produces a fuzzy effect.

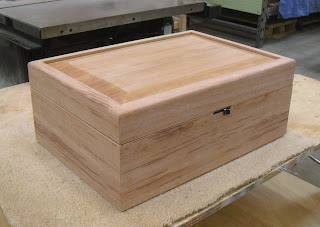
Still, once the planing was done, it looked pretty impressive.


I'd purchase a casket lid lock to install, but since I'd never put one in before, I decided to practice it first, on a piece of scrap.


It ended up being a relatively simple procedure.


The only (slight) problem was that the lock was only 3/4" wide, while the box side was a little thicker, and I didn't like the look of that gap along the back. More on that later.


When you have an many people using your tools as I do, things are bound to get misplaced. So when I went to use the plunge router, the depth adjustment rod was missing. I swear, I heard it fall when I was picking up the router. But I never could find it. And I was tired of wasting time looking for it, so I did the next best thing - I used a pencil.


This is woodworking-on-the-fly, no doubt.


When you have to rout a skinny edge of a board, it is easiest to clamp a piece of wood to the edge, so that you have a larger area on which to balance your router. Here you can see the groove I routed for the lock, as well as the board still clamped in place.

(The blue tape is holding down a little edge that was chipping off - I simply glued it down.)


And - I ain't afraid of no stinkin' hardware! Here the lock is installed - perfect! Remember what I said about having a hardware aversion?

not. any. more.

I kick ass on hardware.


As John Eugster likes to say - dutchmans are his friends. So I pieced in a small piece of wood behind the lock to fill in that gap. If I hadn't just told you about it, you wouldn't even know it is there.


And that is what we call expertise, baby!


I can make one holy-hell-of-a-mess when achieving that level, though. My shop looked like a bomb went off in it by the time I was finished.


The top of the lid lock required a little finesse, too.


Yes, that is a little smear of blood on the front of the chest. That was a very sharp chisel I was using. (Thanks, Eric, for sharpening everything!)


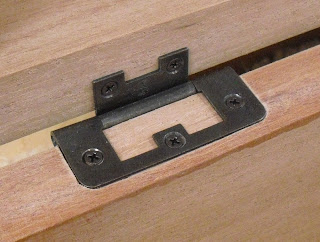
The last step was installing the hinges, and even though they are no-mortise hinges, they were a little too thick to use without setting them in a mortise. So I screwed them into place,


and then outlined around them with a knife.


Once that mortise was scribed, I removed the hinge and used the plunge router again, to route out a very flat bottomed mortise for the hinge.


All of this only took a few hours, and this attention to detail makes all the difference in the world.


Like I said - I'm not afraid of any stinkin' hardware.

At least not anymore.


Next step - making some interior boxes to hold the cremains, and apply a finish. Stay tuned...

Oh, by the way - I did a little math, trying to figure out how many hours I've put into woodworking. I think a very conservative guess for the number of hours a week I've put in over the years is twenty. For many years I put in three times that but for some - I did nothing at all. So twenty seems a fair estimate.

Twenty hours a week, at fifty weeks per year is a thousand hours. And I've been doing this steadily for forty odd years.

40,000 hours? Are you kidding me?


Friday, April 06, 2012

Pet Casket - Part One

Sometimes you find a delicious piece of wood and just hang on to it, waiting for the right project. This piece of mahogany fits into that category.


Along came the perfect project - a small casket to hold the cremains of two beloved pets, as well as some of their toys, tags, and collars. On one hand, it's a shame that this will eventually be buried up in the ground. But there is something vaguely rewarding about the perpetuity of this.

I usually do my resawing on the tablesaw, but this board was too wide. So - of course, I called my buddy Dan, and borrowed his bandsaw. In a perfect world, I would own a Laguna bandsaw. But it's not, so I don't.


Because I'm so used to fighting my bandsaw when I resaw, I scored the board on the tablesaw. Scoring it gives the bandsaw blade a nice channel to follow.


I even scored one end of the board, so that I could start the cut more easily.


Damn that's a nice bandsaw, even if it rocks a bit. It is more steady than it looked in this video.


Once the boards are cut open, I let them acclimate in the shop. It's best to store them on edge, to get some air circulating around them.


The top and bottom panels were bookmatched from a single piece.


And finally, the wood is ready.


I squared everything up - the wood and the tablesaw.


People say that good miters are tough to accomplish, but there really are only three things you need to have - a perpendicular miter gauge,


a 45 degree angle on your blade,


and a stop block to ensure that your pieces come out the proper length. Follow those three rules and you can't screw it up.


I decided to make a raised top panel for this casket, so I tilted the blade to around 12 degrees and cut all four edges.


Always do a dry- fit, to make sure everything is perfect. Always.


Then - assemble your weapons - get your strap clamps ready


and lay out your boards.


I used some blocks on the corners, so that the clamps wouldn't dent the sharp edges.


Next stop? Cut the box open and install the hardware. This is where the fun begins...

Monday, April 02, 2012

More helpful videos from Fine Woodworking

A day late, but still a great video!


Thanks to Julie up north for sending this! You rock!

Here's a link to Julie's site.

Check it out, her site is
great.

Saturday, March 31, 2012

My new least favorite chore

If I had to pick one thing about woodworking that I like the least, I usually say it is sanding. But - ever since I purchased the double whammy of Festool sanders, even sanding doesn't bother me too much any more. Cleaning up a piece of wood with their 5" Rotex sander isn't work - it's more like a zen moment in the shop. It's almost spiritual.


Nope - for me, my new least favorite chore is finishing. I've been all over the map recently with some of the projects I've been making - danish oil (as usual), sprayed lacquer, hand rubbed polyurethane, and even Sam Maloof's special recipe for wood. The thing is - I'm actually pretty good at it, but it is simply boring.


Case in point - a fellow wandered into my shop a while ago, with a warped door that he hoped I could repair. Someone had already tried to repair the door and it was is horrible shape - warped, with dried glue everywhere. Fix it?


Umm....I'm a woodworker, not a genie.


The door had a gorgeous hand carved raised panel in it, and luckily, making a new door frame wasn't difficult. But matching the stain is what I was worried about.


The existing panel had a good deal of distressing on it, so once the replacement door frame was assembled, I had an opportunity to take out a little aggression on the piece.


Distressing wood is one of the easier things you'll do in the woodshop. There really isn't a right or wrong way, and it's usually pretty fun, too.


A little more sanding and the door was ready to stain.


I knew that using this stain full strength would give me results that were too dark, so I set up a simple line blend test for thinning it down. It's similar to what you do it you're making ceramic glaze - you mix up a small batch and keep testing it until you get the desired effect.

I started with a small cup of mineral spirits, about two ounces, and added a teaspoon of the stain. Then, after applying a bit of that on a piece of wood, I added another teaspoon of the stain. After four different ratios, here's what I had.

The dark piece on the left is one of the original door components. That is what I was attempting to match.

And I think this batch of stain matched the best.


And here we go - a pretty decent stain match.


After the stain dried, I applied a couple of coats of a very thinned down polyurethane. I didn't want a great deal of finish on the wood, as the existing pieces had long since lost their sheen. I was aiming for just enough finish to add some protection, yet still match the existing cabinetry.

And even though I say I hate finishing, I have to admit - this was one of the easier stain matching experiences I've had.