Saturday, March 31, 2012

My new least favorite chore

If I had to pick one thing about woodworking that I like the least, I usually say it is sanding. But - ever since I purchased the double whammy of Festool sanders, even sanding doesn't bother me too much any more. Cleaning up a piece of wood with their 5" Rotex sander isn't work - it's more like a zen moment in the shop. It's almost spiritual.


Nope - for me, my new least favorite chore is finishing. I've been all over the map recently with some of the projects I've been making - danish oil (as usual), sprayed lacquer, hand rubbed polyurethane, and even Sam Maloof's special recipe for wood. The thing is - I'm actually pretty good at it, but it is simply boring.


Case in point - a fellow wandered into my shop a while ago, with a warped door that he hoped I could repair. Someone had already tried to repair the door and it was is horrible shape - warped, with dried glue everywhere. Fix it?


Umm....I'm a woodworker, not a genie.


The door had a gorgeous hand carved raised panel in it, and luckily, making a new door frame wasn't difficult. But matching the stain is what I was worried about.


The existing panel had a good deal of distressing on it, so once the replacement door frame was assembled, I had an opportunity to take out a little aggression on the piece.


Distressing wood is one of the easier things you'll do in the woodshop. There really isn't a right or wrong way, and it's usually pretty fun, too.


A little more sanding and the door was ready to stain.


I knew that using this stain full strength would give me results that were too dark, so I set up a simple line blend test for thinning it down. It's similar to what you do it you're making ceramic glaze - you mix up a small batch and keep testing it until you get the desired effect.

I started with a small cup of mineral spirits, about two ounces, and added a teaspoon of the stain. Then, after applying a bit of that on a piece of wood, I added another teaspoon of the stain. After four different ratios, here's what I had.

The dark piece on the left is one of the original door components. That is what I was attempting to match.

And I think this batch of stain matched the best.


And here we go - a pretty decent stain match.


After the stain dried, I applied a couple of coats of a very thinned down polyurethane. I didn't want a great deal of finish on the wood, as the existing pieces had long since lost their sheen. I was aiming for just enough finish to add some protection, yet still match the existing cabinetry.

And even though I say I hate finishing, I have to admit - this was one of the easier stain matching experiences I've had.

Wednesday, March 28, 2012

Wednesday, March 21, 2012

Major cuppage


With as many balls as I am juggling right now, it is amazing that this piece was ever completed! Some people think that the lives of furniture makers is serene, and that life in the woodshop is all zen. That couldn't be further from reality. Truth is - there are so many things to do, that actual woodworking takes a back seat to repairs, administrative crap, and cleaning.

This Ash dining table is a 2nd generation design.

Remember my first one looked like this, and I wasn't happy with it. Oh, there was nothing wrong with it, it just didn't fit into my dining room the way I'd envisioned it.


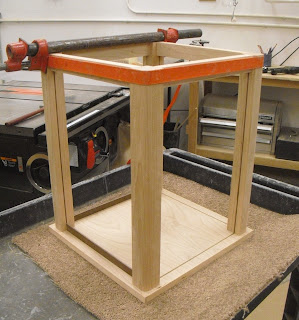
That is why Plan B works so well! The new base was much more what I had in mind, although I had to borrow some long Bessey clamps from Eddie in order to assemble it.

Those clamps are really expensive - way out of my budget range!


The assembly of the base went well. But since the table top had been sitting in my dining room for two months, there was a problem with it.


There has been a big debate about table top assembly and the proper way to glue wood together, in relation to the annual rings of each board. In the past, the common concept was that the annual rings should be alternated on each piece, thus minimizing the amount of cup that a table top might experience.

But lately, some woodworkers have opined that that isn't the case - that the top should be laid up with the appearance of the top in mind, to hell with the annual rings.

Now in the past, I've always paid attention to the rings, and always alternated them. But after reading so many opinions, I decided to glue this top up with the gorgeousness of the grain as my top priority.

Umm.... it cupped.

Both halves.

Bad.

So - to anyone who says - to hell with the rings - you're wrong.

Flat
Out
Wrong

R O N G

Major cuppage.


Now this tabletop was comprised of two halves, both measuring about two feet wide and seven feet long. The weight alone was one reason I did it in halves, but the other is that it is just too hard to assemble when using one solid top. The amount of movement can be fierce, and I didn't feel like taking on that battle.

So a little creative clamping allowed me to pull the top flat while attaching the top to the base. Those cauls (above) were clamped to the top, pulling it flat, while I used table top clips from underneath, pulling it flat.


How do you keep that seam from opening up, you ask? I've done many tables with a center seam, and they've never experienced a gap. The easy way is to clamp the halves together


and use these Brass Table Keepers on the underside, to keep the two sides perfectly aligned.


Now this is much more what I had in mind!


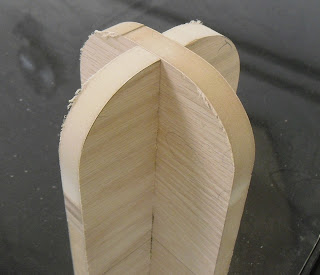
Bookmatched legs, using Craig Vandall Stevens' five sided leg. Or - in this case, I made it a six-sided leg.


Next step? Side benches and two arm chairs.

Tuesday, March 20, 2012

Krenov-Style Wooden Planes


John Eugster was a guest instructor for a short session at my school, where he taught a class in Making a Wooden HandPlane. John had made a Krenov inspired plane for his own shop a while back, and really enjoyed it.


In fact, he presented it to a Sin City Woodworkers meeting a couple of months ago, you can read about that here. His plane was gorgeous, and received good publicity on some woodworking blogs. His obvious love for hand tool work was exhibited in this class, as he shared the finer points of plane making, adjustments, and sharpening.

Lupe's plane had an extremely comfortable shape, making it very pleasant to use. Her white oak and purpleheart composition was gorgeous!


Everyone in the class had ordered plane blades from Ron Hock, out of San Diego. If you're unfamiliar with his products, you should definitely check out his website.


Jay decided to go with a bit more heft and made a beefy scrub plane. He still had a bit more shaping and sanding to do, but you can tell from this photo that this plane is going to be a real workhorse in his tool arsenal!


Bobbie's Lacewood plane with a Maple sole was sculpted into a gorgeous profile.


I can't believe what I made!


Larry couldn't resist throwing a board in a vise and giving his plane a try, even though it still needed a little work with sanding and finishing.


As they say - the proof is in the shavings!


Nice work, everyone!

Friday, March 16, 2012

No time for playing around...


A little over a year ago, one of the Thunderbird pilots came to my shop, requesting a case for his helmet. He needed it in a hurry - he was moving to Italy! Why do the Air Force guys always need their projects done yesterday? Here's a link to that old post, in case you missed it.


So a couple of weeks ago, a hottie in a uniform (pilot) wandered in the shop, needing another helmet case, only this one was for a general. Of course - again, no time to spare. Luckily, I had some Cherry in the shop, and quickly cut the parts. This case was going to be a little different - there needed to be a display area to hold some commemorative coins.


I cut the Cherry posts and rails, dadoing and tenoning them for assembly, as well as for holding the glass panels.


It actually went together pretty quickly, since I'd already built a case like this before. I made a few changes that really helped the design. Like what? Instead of bottom rails to hold the glass,


I just cut some stopped dados in the base. Much simpler and cleaner, although cutting stopped slots on a tablesaw is a cardiac workout. There is always the chance you might bring the blade up too high and cut through the base.


The helmet that was going in this case was being airbrushed, so I didn't have it in the shop. I only had a couple of minutes to measure it, and then off it when to the paint shop. Instead, I borrowed my buddy, Eddie's helmet to use for making the helmet stand.


Someone once suggested I buy a mannequin bust to rest the helmet upon, but I think that would look really cheesy. So - wood it is. (No pun intended)

Meanwhile, all Stella wanted to do was play.


To make the helmet bust, I started with a couple of scrap pieces of wood, and drew a line at their mid point. That dado is going to be cut halfway up one board, and halfway down the other, so that they intersect in the middle.


Here's how I cut it.


Is it time yet? (She's not smiling anymore.)


Once the dados are cut, I rounded the corners.


Honestly, I forgot to shoot photos when I built the small platform that holds the medallions. But you can see it here, mounted in the middle of the box.


Now she's pleading with me.


But I'm working on a deadline and don't have time to play!


Finally, time for the final wax and assembly.


I used glass retainer clips to hold the top piece of glass in place. But they interfered with the lid sitting flush on the case,


so I had to recess them.


Much better.


I'd forgotten that they fellow who ordered this requested that the lid be hinged, so that the helmet could be removed.


I couldn't find the right hinges anywhere here in town. But luckily - my friend Lupe bailed me out. She had a spare pair of Lee Valley hinges at her shop, and ran home to get them.

(I was in such a hurry to finish this piece that I forgot to shoot a picture with the lid open.)


Ok, now it's play time!