Monday, April 25, 2022

Can we brag about one of our students?

 We teach a lot of great classes at the school, but what's even better - we meet some of the best people in Las Vegas. James is one of them. 


When we met James a few months ago at one of Jeff's Pen Turning classes, we had a special fondness for him. It's not just his sweet personality, but the story behind him. How he found his way to the school, and how he planned on turning a class (and his passion!) into something spectacular.

See, just 2 weeks after James turned 7 years old, he was diagnosed with grade 4 Glioblastoma Brain Cancer and given 8-14 months to live. 

Shortly after, James family received the news that he would be granted his Wish of meeting Santa at his summer home in Florida! 


Cancer is not only a physical battle, but a mental one too and the Florida vacation was just what James needed to continue the fight.

Here he is…7 years later, not only surviving but thriving. 

This past weekend, James participated in a fundraiser was Walk for Wishes benefiting Make-A-Wish Southern Nevada. 


When they sent us an invitation to come to the fundraiser, we couldn't resist!


He found his passion (and meditation) in woodworking. 

When asked yesterday at Walk for Wishes what his wish would be now at 14 years old…he immediately said “a workshop”. 


He donated $7 from every pen sale directly to Make-A-Wish. 


Why $7? 


He was 7 years old when diagnosed, 7 years old when his Wish was granted and it’s been 7 years since that diagnosis! 


 I suspect that James has a bright future - not only health-wise, but with his creativity.


 In fact, he has superpowers! 


If you'd like to know more about James, here's a link to his website. It's not fully up and running yet, but you can sign up for his mailing list. 

He has plans to open up an Etsy store, and if he does - please consider buying a pen from him. It's a small gesture, but means a great deal to a young woodworker like him. 

We couldn't be more proud! 


Saturday, April 16, 2022

Sure, I can fix that!

Repairs? Sure, I can fix that!

I can't remember another time when there have been more repairs coming into the shop. Chairs, tables, cabinets - you name it, it's probably sitting in my shop. 


Maybe it's Spring cleaning, when people look around their homes and decide to tackle furniture projects the they've been ignoring. During the last couple of weeks, it's been almost overwhelming, especially when these repairs add to the growing list of other pieces I'm building. 

A friend asked me why I bother with repairs.... so here's a story about why I do them.

Years ago, when my family moved from Los Angeles to Ohio, an aunt of mine purchased a small roll-top desk for me. 


But it was missing the drawers. 

We tried find someone to make drawers for the desk... it was nearly impossible. These weren't anything special - just some simple boxes to fit into the drawer openings on the desk. (We had the drawer faces, we just needed the drawer boxes.)

Finally, an employee at a local lumberyard agreed to make them. And even though he had a good heart, the drawers he made were really crude - plywood boxes, the sides were nailed together, and the bottoms stapled in place. All in all - just about the WORST drawer construction ever. 

I remember how hard it was to find someone to do this simple project, and it stuck with me. 

So that's why I do repairs - people need simple woodworking stuff done. 

Like the fellow who brought his son's baseball bat into the shop this week.


He'd chipped the end off, and the wasn't allowed to use the bat until it was fixed. 


I cut the end off, 


taped it to protect the finish, 


and routed a curve back into the end on the router table. 


It burned a little, 


but was easily sanded. All in all, about a 5-minute repair! I didn't even charge him for the repair, it was so simple, and he's a good customer of mine. 


Honestly, I don't even remember half of the repairs I do - they come and go so quickly. 

But this one is a challenge!


 The fellow that brought in these table legs hates their style. He wanted me to turn the lower section into a squared off, taper - and I had to stop and think this one over!

Challenge accepted!

There wasn't any way to simply cut that lower part into a taper. So I decided to make a new lower leg, and attach the two pieces together.

Luckily, the leg still had markings on the end from previous lathe work at the factory where it was made. 


So I put it on the lathe, and cut a tenon on the end, first using a parting tool to cut a clean edge. 


Once I had a clean cut, I made a 1" tenon for attaching the lower leg. 


The size was critical; the digital caliper showed me how close I was. It's just 1/64" too big. 


After I shaved it down just a hair more, I cut the leg apart. 


  I also cut a 1" hole in a piece of scrap, to test it. 


Perfect! 


I still have to make the four tapered legs next, and attach the two. 


Honestly, I don't mind these small jobs - they keep my woodworking skills sharp.

What are you working on?


Wednesday, April 06, 2022

Make your own push sticks!


Since we have three SawStops in the shop, we go through a ton of pushsticks. For anyone who doesn't know what that is - it's a device that you use to push wood when making a cut that's too narrow for your hand to travel safely past the blade. The "width" of a safe cut is completely subjective - I make 3" or 4" cuts all the time without a push stick, but some people won't even make a 6" cut without one. It's all about practice, competency, and what your level of safety entails. 

Of course, I jumped down a rabbit hole when I was starting this post, curious to see some other designs for push sticks. And I found some ridiculous and/or cute ones, 


and then there are these dick sticks... boys will be boys. 


And these... 


For the life of me, I just don't "get" who would buy a push stick. It's a completely disposable item, designed to be cut into, and then thrown away, when it doesn't have enough meat on it (no pun intended) to safely hold your wood anymore. 

So - we make our own. And since there's always a ton of material around the shop, when we make them, we go big. 

It starts with a piece of plywood around the size of a sheet of paper.  These pieces happened to be about one square foot, but honestly anything will work. 


I like to use 1/2" material - anything thinner doesn't seem beefy enough, and thicker seems like overkill. A taper jig makes quick work of cutting them into a better shape - 


we cut one from one side, 


and then flip the piece over to one off of the other side. 


We could probably get a third stick out of that piece in the middle, but I didn't bother this time. 


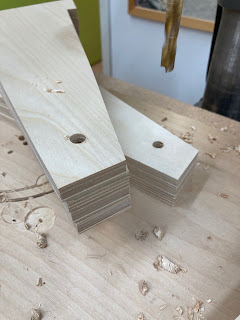
So now we have a ton of these pieces, 


and when ganged together, it's easy to cut a notch in them.  


About a half inch is perfect, so I use a set-up block to adjust the blade to the correct height. 


A few cuts widens the notch, 


although I could put a dado blade in the saw and make one wide cut.


 Whatever... you can do it either way... but you need the notch about an inch wide. 

Please don't pull out a tape measure and measure an inch... if you don't know what an inch looks like, I don't know how to help you.


Having a bandsaw with a wide (resaw) blade makes this next step pretty easy. I added a "fence" to the tabletop, 


and set the distance at about the depth of that notch.


One quick cut gets rid of that piece that needs to be removed. 


Finally, just for comfort, I clip the corner of these blanks, so that it just feels better in the palm of your hand.


 I hit them on the belt sander, to round them out a bit, 


and then drill some holes so that we can hang them on the pegboard near each saw. 


Boom! We just made around 30 push sticks in about 10 minutes.


 Please - if you're a woodworker - don't buy these! 

Make your own!


I'm tempted to laser them with some cool design on them, or our logo.... but the truth is - there's never enough time to do fun stuff like that! 

These went into use the same day we made them!