Monday, April 24, 2023

Wait a minute, Mr. Postman...

In my last blogpost about Alphonse Mattia's passing, I mentioned how influential his work has been on some of my designs. I didn't realize it at the time, but this mailbox project has some of his design thumbprints on it... funny how things work out that way. 

___________

There's nothing like a good old design challenge to keep me on my toes. So when a favorite client of mine visited my shop and showed me her mail slot collection... well... game on!

She explained that she wanted a unique way to display these. 

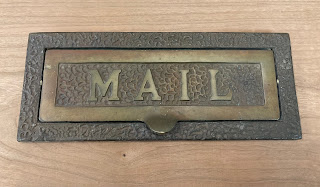
These four slots were roughly the same size - I'm assuming that back in the day when they were routinely installed, the rectangular slot was a uniform size. 


These were similar in size, but the threaded mounting holes were in different locations, 


with different center-to-center spacing.


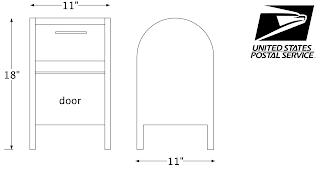
My first thought - and only thought, frankly, was to mount them on a miniature mailbox - one I would need to construct.


 My drafting program allows me come up with a scaled drawing, and it was easier to cut the parts using a CNC, so headed to a buddy's shop, armed with a thumb drive with the artwork on it.  


The left and right sides of the mailbox were perfectly machined. 


My next decision was whether I would bend the curved area with layers of thin plywood, or create a tambour (like a roll top desk employs) - and I chose to make a tambour. 


I've made dozens of those! When I dry fit the piece together, the tambour was a little proud of the surface, so a hand plane and a random orbit sander brought them down to their correct thickness. 


Since I didn't want gaps between each slat, I beveled each one of them to tighten them up. 


The slots for each brass insert were a bit of a challenge, since they were all slightly different in size. 


Those slots were cut with a router, and I made a template for.each one, so that the cuts were smooth and perfect. 


It was starting to come together nicely, and finishing the parts before assembly was my plan.  


I envisioned a mailbox that looked aged and worn, and MilkPaint is my go-to finish when I need to add color to wood. This color - Federal Blue - was a perfect match for the USPS blue box we're all familiar with.


My last component to make was the door, and spent some time considering how I wanted it to work. I even called my sister - who is an amazing artist - to get her opinion. 


I finally decided on a hinged door with a slot for letters, and some lasered artwork on the door.  


And here's the finished piece!


Friday, April 21, 2023

Alphonse Mattia 1947-2023


 We lost another great furniture designer/maker/educator this month - Alphonse Mattia died on April 10 after a strug­gle with lymphoma


 I am, along with many of his students, family members, colleagues and friends, so sad to hear of his passing. 

He's in my top five of all time furniture designers, and it's crushing to think his artistic voice is silenced. Although after reading his obituary on the Furniture Society's website, perhaps he'll be reincarnated as a tree and come back to make furniture again. 

His work is whimsical and fun, like these shelves


 and this mirror, 


and these cabinets.


But don't let that whimsey fool you. His body of work is as serious as it is well crafted.

His valets and butlers remain some of my favorite pieces of his work.


This "architect" butler is seared in my brain, and inspires me every time I begin designing something. 


Seriously, we've lost a legend.


Wednesday, April 19, 2023

So, people, leave pity city. Let's get it done," ... is probably not the right way to motivate people!


There is a pretty cringeworthy video/story that has been making the rounds lately, and it's hard to have a lot of sympathy for the CEO of MillerKnoll, maker of fine furniture (and a current furniture conglomerate) for decades.

But before you watch that video, watch this one, about their history. It's impressive. 


Miller/Knoll has long been a leader in the world of furniture, but their CEO, Andi Owen, created a shitstorm during a recent Zoom call to her employees. When told that they would have to forego their bonuses, the employees pressed her for more information and for advice on surviving financially, withotut their expected bonuses. 

Her clueless reply? 

"Don't ask about 'what are we going to do if we don't get a bonus?' Get the damn $26 million," Owen replies, referencing a financial target that they were short of delivering. 

And worse yet -

Owen closes the meeting by sharing some advice she heard from a previous manager:"I had an old boss who said to me one time, 'You can visit pity city, but you can't live there.' So, people, leave pity city. Let's get it done,"  

She ended the meeting by saying, "Thank you. Have a great day," raising her hands in a victory gesture and mouthing the word "boom."


Now I've never been the CEO of 11,000+ employees, but I'm assuming this isn't the way to rally them into better performance.


Saturday, April 15, 2023

Another piece, and my Watco process

A few years ago, I was commissioned to build a rack to hold 15 rifles. 


Now I don't know much about rifles, but a friend of mine took a look at this photo and was able to identify several of these weapons. They're all pretty special and definitely valuable!


Fast forward - a couple years later,  I was asked to build a matching case - this time to hold ten rifles. 


Luckily, I still had the template for routing the slots for the barrels,

 so the second gun rack matched the first one perfectly. 


It's amazing to me how the piece comes to life once it's oiled! 

Which reminds me - someone dropped me a line the other day, asking me about my Watco application. With the exception of some Mohawk spray stains, Watco is just about the only finish I use on my work.


It's pretty simple - I usually sand a project with 180 grit paper while I'm building it. Then I apply Watco Danish Oil, flooding the surface for good penetration..


I wet sand the wood with 220 paper for about ten minutes, slightly breaking the edges of the wood. The wet sanding eliminates any imperfections, like saw marks or glue drips that I might have missed along the way.

Wipe completely dry, and repeat the next day, the second time sanding with 320 grit paper. 

Wipe COMPLETELY dry - and repeat a third time a day later, with 400 paper. 

You can't apply all of these coats in one day - the oil needs time to dry a bit between coats.


Also - it's really important to wipe the piece well, since any oil residue will crust up, making the wood feel rough and unsanded.

That's it - three coats over three days.  Make sure you dispose of your oily rags carefully, as they're very flammable. 


Sunday, April 02, 2023

Check out my Sapele Pen Display Case

It's been a minute, right? 

Among the many pieces I've been building lately - this is one of my favorites, although it didn't come without a few struggles and second-guesses. 

A few years ago, one of my students offered to help me with some legal work. When I found out that he'd started turning pens on the lathe, it dawned on me that a perfect thank-you gift would be a pen display case to hold some of his creations.

You know, it really does take a village - another student told me about an amazing store here in Las Vegas. I would have never known about this place, but it's been an absolute life-saver when building display cases. 

 Ralph Jones Display sells a huge assortment of padded inserts, perfect for the inside of cabinets that I've built. In this case, I'm using their padded ring mats, which work perfectly for displaying pens.

This Sapele case has an upper area which will be under glass, and a lower drawer for holding more pens. 


Once the case was built, the hardware became the next battle. 


These no-mortise Lee Valley hinges with a gunmetal finish are my favorite hinge to use on cabinets like this. 


But I was having a hard time finding a matching knob. I love these simple knurled brass knobs, but they were bright brass. 


A little research on metal patinization led me to some patinas that would turn the bright brass darker.  

And of course - again - it takes a village. The metal worker a few doors from my shop had a variety of patinas for me to test.  These solutions work quickly, 


and offer a variety of colors.  


The Dark Pewter was the winner, after a little experimentation. 


This sample piece of brass darkened after one dip in the solution. 


A quick dip turned the knobs a perfect color! 


Here's the finished display case - but my battle wasn't finished. 


Just as I assembled everything, I noticed a small crack in the glass. Luckily, I had another piece of glass.


 I haven't decided if I'll install a small chain or lid support or not. It won't be easy to install, so I might just make a fancy lid prop, like the one shown below.  


That wraps up another project, but I have a few big projects lined up, so it's going to be a busy summer! 

To be continued....