A forum for discussing woodworking, specifically furniture making. Feel free to post comments and questions about your current projects, tools, studio set-up, or whatever is on your mind.
This blog is moderated by Jamie Yocono, owner of Wood It Is! Custom Cabinetry in Las Vegas, NV. Her website is wooditis.com. If you need to speak to an actual human... call 702-672-8981!
Now...let's talk wood!
What's not to love about the Wood Identification Service that the USDA Forest Service offers? You sent them a sample of wood, with a self-addressed, stamped envelope, and a few weeks later, they tell you what type of wood you sent in.
I've done it twice already - it's a fabulous and enlightening service!The first wood I couldn't identify was Alicastrum Brosicum, better know as a wood from a Breadnut tree. If you read Mutiny On the Bounty, then you'll be familiar with that wood. You can read about what I built with it here.
The second wood sample I sent in turned out to be Eucalyptus diversicolor, you can read about how I came to own those boards here and here.
I haven't built anything with these beautiful boards, but I have a few things in mind for them.
Yesterday, when I went to the mailbox, I found the answer to my third wood mystery. Remember back in December when I blogged about this sushi platter?
I'd found one board in my shop, bought at an auction, and the color was amazing. When I cut and planed it, it had an aroma that I'd never experienced. And when I inlaid this tile and oiled the wood, the colors just POPPED. Amazing color, like none I've ever seen before. And for the life of me, I couldn't figure out what it was.
A friend of mine walked in and watched me working on this, and fell in love with the piece. He bought it on the spot.
Since I'd used every single sliver of the board to make this platter, I had nothing left to send in for identification. My buddy requested one thing - if I ever found another board of it, that I would make a similar sushi board, so that he could have a set of two.
So...a few months ago, I was digging in the lumber rack and found another board tucked away. It wasn't very big, maybe five feet long and about eight inches wide, looking very dusty. It didn't look that special.
But once I cut and planed it, I recognized that same brilliant color and grain appearance. And that smell. I sliced it up, so that I could re-assemble it with it's vertical grain showing,
which was more attractive, in my opinion. It left a funky orange dust all over my equipment, and it's distinctive (and probably toxic) odor in the air.
You know I saved a piece to send in for identification this time, right?
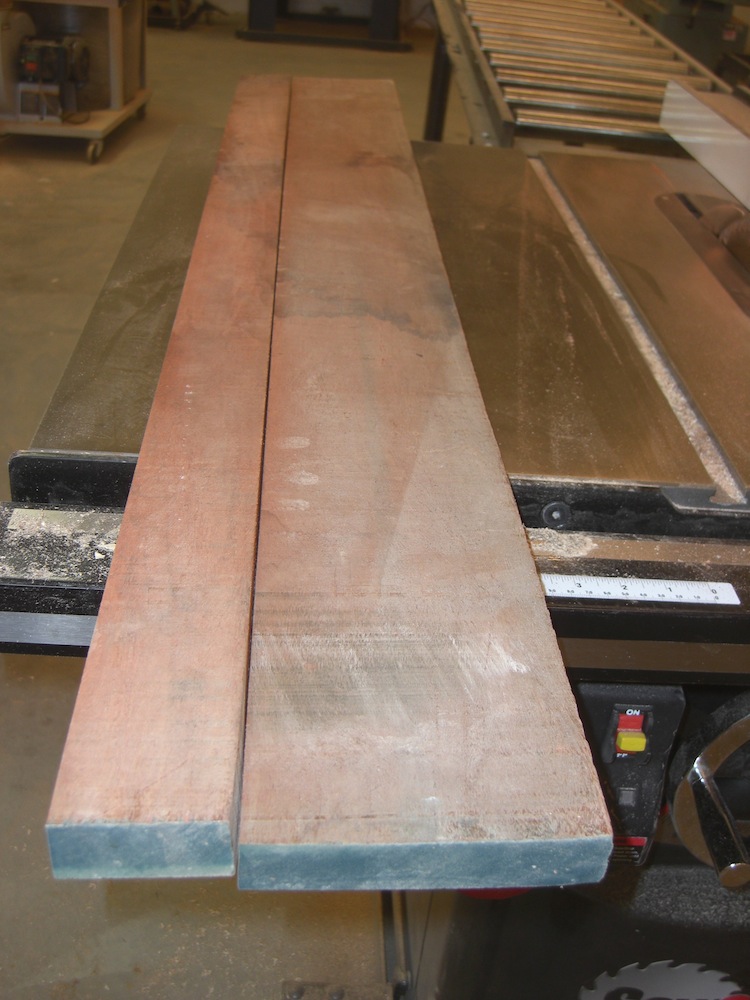
Here are boards ready for gluing back together. Yesterday, I received the long-awaited answer - the wood is Santos Mahogany.
Notice what it says about the wood having a "spicy scent" - that's an understatement! In fact, every time I've worked with this, it's given me a sore throat the next day. Scary.
Now if I can just find the perfect tile for this piece...
It's funny how life evolves. Oh, this isn't a big revelation. If all of us looked in our rear view mirrors, at our lives just two years back, we'd all probably see a much different life than we see right now. Stuff happens.
It was just two short years ago that I was fretting about starting the woodworking school here in town. Should I do it? Would it fly? What tools to buy? How to lay out the woodshop?
With the help and advice from many friends and family, luckily - I figured it all out. It's been a ton of work, but you know me - I like work. It grounds me. It gives me structure and keeps me sane.
With the addition of UNLV classes at my shop, things have ratcheted up a notch. There are more people working, building some amazing pieces.
The vibe of creativity is... well, all I ever wanted.
Open Shop on Saturdays is the best - an opportunity for people to work on whatever they feel like making. Some people just come in to hang out and catch the vibe; that's fine too.
When I had a chance to buy another SawStop, I jumped at the opportunity. See, with the shop holding more classes, there are more students than ever. Which means sometimes, someone has to wait to use the tablesaw. There's nothing that interrupts your flow of creativity than the distraction of waiting to use a tool, so I knew I needed to make the purchase.
Roughly assembled and set into a mobile base.
The fence parts still need to be bolted onto the front, and this saw needs a thorough tuneup.
A polished top - so the wood will glide across it.
Here I'm checking the blade, to ensure it's at 90˚ to the tabletop. The digital cube is zeroed out here
and then the blade adjusted so that it's perfectly plumb.
(Have I mentioned how much I love the cube?)
Next - the miter gauge needs some TLC. The protractor is aligned with the blade, and zeroed out.
Then one arm is rotated over to the miter gauge, which is adjusted until it reads 90.
It's really quite easy, and just adding these two quick adjustments will make your work much more accurate.
This contractor's style SawStop runs on a household (110) circuit, and is probably the type of saw most hobbyist woodworkers would want to purchase. How does it stack up against the larger Industrial Cabinet Saw that they make?
The biggest difference I've noticed is the weight and quality of the saw. Obviously, the larger cabinet saw has much more beef behind it, and the saw just feels more stable and hefty. The contractors saw feels a little more flimsy - from the fence to the sound of the motor starting up, everything is just feels like it has a little less power. Oh, I'm not talking about the quality of the cuts - this saw performs very well in that area. I'm talking more about the heft and feel of the machine.... like the difference between riding in a Humvee versus a Hyundai.
It's sort of like when the Supreme Court Justice Potter Stewart made the comment about his threshold test for pornography - he couldn't put his finger on it, but he famously commented "I know it when I see it."
If you've operated both SawStop saws, you'll know the difference. Still, the contractors saw would be a very nice addition to anyone's home workshop.
Finally, since buying a second saw feels like a nice accomplishment, I'd like to share this video. Speaking of accomplishments, this young boy has an inspirational speech for any other kids just learning to ride a bike by themselves for the first time. How cool.
Do you have a weak stomach? Can't take seeing gore? Then stop reading right now.
Tablesaw injuries scare the hell out of me. Luckily, I've never had a serious one. Although owning a SawStop gives me a level of comfort, I still don't completely rely upon it. I love everything about working with wood, and accept the danger that comes along with it. But I keep my guard up, both literally and figuratively.
A long time ago, I remember reading that the shaper is considered to be the most dangerous tool in a woodshop. I'm sure that's true, based on the numbers, but more people own a tablesaw than they do a shaper. So - to me, a tablesaw is the tool to be respected.
This story might be the most stomach-turning thing I've ever read. Ever. Seriously. If you can't take seeing blood and tissue, DO NOT look at the images. I couldn't get the images out of my head after looking at them. In fact, I only could look at the first four pictures, then had to look away.
OK, admittedly, I don't have a high tolerance for looking at blood-and-guts. I can't even watch those TV shows where they show actual operations. I'm not nuts about any of the CSI shows, and I certainly don't want to hear about the details of your last hernia operation or liposuction. My brain just doesn't need those images inside of it.
I bought another SawStop today. My classes have been growing in size, and with more students, there is often a line to use the saw. So it made sense to buy another one, even though I have a perfectly nice Delta Unisaw at my shop at home, that I could have moved over to the school.
It's the best investment I can make to keep my woodworking classes safe. Sure, it's only as safe as the person using it, but I do feel better about people using the saw without me supervising them.
A few months back, I realized I had a ton of frequent flier miles piling up, and decided to spend some of them on this Dremel kit.
I've never had much of a need for a tool like this; I work on much bigger pieces, so this tools almost seems like a toy to me.
But recently, a client stopped in my shop to ask if I could make a small sculpture for his wife. The original sculpture he'd seen looked like this,
but since his marriage is an inter-racial one, he wanted a sculpture to reflect that.
Let's face it, I'm not a great carver, nor will I ever be. But I'm a decent one. I get by with a few chisels, a sharp knife, and now - this Dremel set. It came with some amazing bits,
like this grinder,
or these sanding drums,
these wire brushes,
even this polishing compound
and some buffing pads. This tool made short work of that carving, especially in some of the very tight curved areas.
I sent these pictures to my client, and he was so excited. That's truly one of the best parts about my job - giving people something that they can't find elsewhere. Sweet.
Meanwhile, some projects are starting to pile up around the shop - here are a few nearing completion. In another week or two, they'll be sitting in someone's home, so I thought I'd get a few pictures while I still could.
Here's a very nicely made foyer table/desk. All it needs are the drawer faces and the top installed, and it will be ready to stain.
This dresser is nearly done - again, drawer faces are all it needs.
This small nightstand is the first piece of furniture ever built by this student - and she's doing a lovely job.
I'm teaching an Intermediate Woodworking class right now, and we're working on compound miters. I cut this piece during my demo, and like it so much, I am going to turn it into a small lamp for my bedroom.
Finally, here is a lovely Hickory and Walnut table, with some pretty amazing details like through mortise-and-tenon joints, and a top with breadboard ends. It's gorgeous and sturdy, and I can just picture this in a cabin somewhere, aging gracefully. Nice job, Dan!
Well, the world didn't come to an end, so there's no use in putting off the sanding any longer. Time to attack the sanding. I had a few days to think about the best way to sand those curved areas, and came up with what I think is... a brilliant idea.
But first - I asked if anyone could guess how I cut those curves, and got a few guesses. Very close, but no cigar. My buddy Dan let me borrow his sliding compound miter saw, so I loaded an 8" blade in it. Then, I positioned the saw on the rails, and locked it into place, so that the cut was centered over the board. I checked the depth, because I didn't want to cut all the way through the board. But since I was using a smaller blade, it was more a problem of not cutting deep enough. So I added a sheet of 1/2" plywood under my Cherry blank, to raise it up a bit. That allowed me to cut about halfway through the blank.
Then - all that was required to cut those curved slots was to lower the blade, make a cut, slide the wood over, and do it again. Each 3" section required about 25 cuts, since I was using a thin kerf blade. So by the time I'd cut all six slots, my muscles were burning and bulging. Arnold Schwarzenegger has nothing on me. (Except a love child.) By the time I'd finished this part of the project, I'm fairly sure I could have arm-wrestled him and won.
Those curves have an 8" diameter, so I grabbed a piece of scrap one-inch thick plywood.
With a plunge router, and my trusty Router Buddy, I cut an 8" disc of wood.
The center hole was small, so I had to re-drill it with a larger bit, so that I could mount it on my drill.
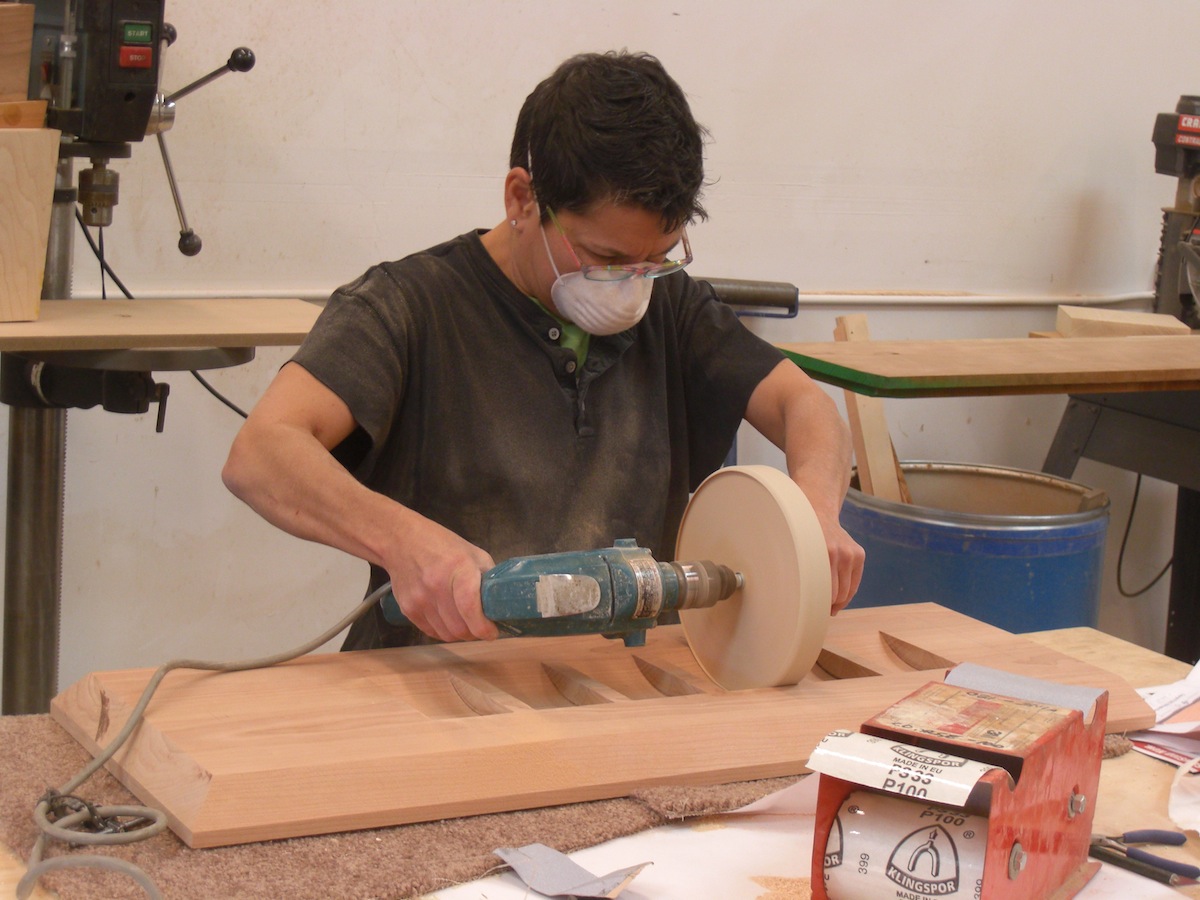
What's that line about necessity being the mother of invention? I needed a handle on the left side of the disc, so by buddy Dan grabbed a socket and we screwed the whole thing together with a long bolt. Here it is, mounted on the drill - a perfect solution for sanding those curves. I covered the whole disc in 100 grit sandpaper, put on a mask, and got to work.
After about ten minutes of sanding, I noticed two distinct things - this disc sanding system worked like a charm! And that I might have to buy some new shirts, since it's possible that I was going to bust out the seams in my old ones. This method of sanding was a great upper body work-out!
Truth is, I could only sand for about four or five minutes, then rest and whine about it, and then start sanding again. (Thanks for taking the pics, Denny!) After all the slots were sanded with the 100 grit paper, I moved up to a finer grit of paper.
Since I'd covered the end of that disc with sandpaper, too, I could sand both the curved areas and the ends of these curves, where the end grain was a little burnt.
This system worked perfectly.
Half the battle of being a good woodworker is being a good problem solver. A dilemma like this sanding issue is a perfect example of that. Implementing what you've come up with is another important part. Yes, you have to tap into the "McGuyver" side of your brain, seeking solutions that aren't found in books. There's a bit of mania in it; but it makes you a better technician in the long run.
Next step? Making the two end supports that will hold the crankshaft. Stay tuned, and pass the Tiger Balm.
You know I get some of the coolest commissions in Las Vegas, right?
Here's another awesome one I'm working on right now - it's on my bench and I'm enjoying every minute of it.Let's start with a Ferrari crankshaft - that's 30 1/2" and about 80 pounds of utter seductive steel.
This shaft is from a V-12 engine, so there are six sets of two counterweights.
I'm not sure why, but I've always loved the stark graphic techie-sexiness of machined parts.
The task at hand is to build a wooden base to display this piece - and to make it a little more interesting, my client wants the counterweights to rest in curved slots in the wood. Proper spacing of those slots was critical, so I laid them out on a sheet of paper. Here, I'm using some 1-2-3 blocks to help determine the exact locations of the counterweights.
Here is the exact spacing, so that I can cut the slots.
I transferred these lines onto the piece of wood I'd laminated for this piece - a gorgeous piece of 8/4 Cherry. (That's 2" thick, for non-woodworkers.)
The diameter of the counterweights is around 7", so I knew I would want to machine a groove that would be close to that. But how would I do it? Router with a jig? Carve it by hand? Then came the light-bulb-over-my-head moment. Lets see who can guess how I did it. Here is the piece, with it's six curved slots, perfect for holding the crankshaft. Any guesses yet?
These are about 3" wide, with a gap of 3/4" in between each one.
There is a fair amount of sanding to do, and frankly, it's one of my least favorite things to do. Festool has a very cool new sander that I've been drooling over, but I'm not sure it's worth buying for this one piece.
But until I start the sanding, I still had some work to do - mostly profiling the edge of the wood block. I'm a sucker for a nice chamfer, so I tilted my tablesaw blade and cut a bevel on each edge.
Next step - making some supports to hold the piece, and then final sanding and finishing. Just in case the world really does come to an end, I put off the sanding for a couple of days.