A forum for discussing woodworking, specifically furniture making. Feel free to post comments and questions about your current projects, tools, studio set-up, or whatever is on your mind.
This blog is moderated by Jamie Yocono, owner of Wood It Is! Custom Cabinetry in Las Vegas, NV. Her website is wooditis.com. If you need to speak to an actual human... call 702-672-8981!
Now...let's talk wood!
Back in December, I was doing some repair work to an old dining room table when I had a small accident. The finger is better (still pretty ugly, though!) and the table is finally close to being finished. With repair work, you never know what you're getting into - sometimes you'll find parts that you didn't realize were broken, or joints that need disassembled and completely rebuilt. Even worse, sometimes the wooden pieces are too warped or cracked to use again, so new pieces have to be built from scratch. Finally, getting it all to match is difficult - in short, that's why I don't take on a lot of repair work!
Here is the table with it's new top, awaiting some final coats of polyurethane.
Poly isn't my finish of choice, but for tables, it's really the best protection.I added some extension slides so that the table will hold three new leaves that I also made.
Wooden extensions like this are quirky - prone to humidity fluctuations, so I had to wait until the weather calmed down a bit. We had a rainy spell a few weeks ago, and if I had installed these then, they would have absorbed some ambient moisture and probably been difficult to open. Another thing about these slides - the manufacturer lubes them up with a greasy substance to keep them traveling smoothly. That makes them messy to handle, and if you get the lube on your hands and transfer it onto the raw wood, the finish will not absorb correctly. So the slides are one of the last parts to be attached to the table.
Here is one of the leaves, ready for drilling.
I put four wooden pins on each leaf, to align them,
and used a doweling jig to drill the holes perfectly plumb.
A simple wooden height gauge cut on the table saw ensures that all the pins are set at the same height.
Nothing glamorous going on in the woodshop, just a whole lot o' drilling.
If you know me, you know I barely use a tape measure in my shop for most tasks. Here, a series of 1-2-3 set-up blocks helps me space the holes the perfect distance from the end of each leaf.
Ready for some final tinting and poly coats.
A test fit in the table, and a big sigh of relief that this job is nearly complete!
I've been taking film classes and working on my video production skills - gotta love being a Mac user and using iMovie. Here's a little video on drilling all the leaf pin holes. (As usual, I work better to loud and fast music, so if that bothers you, turn the volume down.) The video is mostly for wood geeks, but have a look.
Sometimes watching how something is built is much easier than having it explained to you. Here's a lovely, folding bookstand, somewhat complicated to build. Check out this nicely produced video to see how it's made.
It's about to get a little crazy in the shop, with lots of classes starting and projects being completed. So I thought it best to do a little maintenance around the place. Sending blades to be sharpened is the first place I start.
You know you basically have no life when the highlight of your week is having your three favorite sawblades sharpened and ready to re-install.
Sharp jointer and planer blade are icing on the cake.
I've gotten pretty quick at installing the planer blades.
Keeping the manual and knife press gauge handy helps!
This diagram tells me just about everything I need to know about installing the blades at the correct height.
And all I need to do this blade replacement are two very important things - a cup of coffee and a wrench. The coffee isn't essential, but really helps.
Install the springs that go under the blade,
slide in the gib, that holds the blade in place,
and slide the blade into place. Remember, it's very sharp. Then put the height gauge over the blade and press down.... GENTLY!
You don't want to ding your blade, do you?
Here is a short video to show you how simple it is.
Time for another cup o' joe.... good luck replacing your blades!
It snowed here in Vegas this week, not necessarily a good way to start the year, in my opinion. Everyone has a picture of snow in their yard, or wherever they happened to be when it was coming down. Here are my two obligatory shots - from the back yard - my raised bed garden, which sure looks different with a layer of white on it.
And the grill, which of course, didn't have it's cover on. I think it blew away in the windstorm, and is probably laying in someone's yard down the street. The wind here was brutal.
The next morning, I was stuck in a snowstorm on the freeway, on my way to jury duty. Everyone was driving like they'd never seen snow in their lives, and probably hadn't. The traffic was cluster-fucking-unbelievable; I was late to the courthouse, which didn't make a good impression on my new buddy, the courthouse clerk.
Stella, on the other hand, had a marvelous time in the snow. She played for a few hours, and I just couldn't find it in my heart to make her come inside. I mean, how often will she ever get the chance to play in snow? Here she is, in all her messy, muddy glory. You can bet she went straight into the bathtub after we took this photo.
Finally, later in the evenings, long after my woodworking duties are done, I've been playing with clay again. Here are a few new layered glaze experiments. I'm quite pleased with what has been coming out of the kiln, now that is a good way to start the year!
This may be one of the coolest projects I've built in a long time. Oh wait, there was this, and this, and this. Or this... which is hanging in a Saudi palace!
OK, but this has to be in the top one or two.
One of the Thunderbird pilots stopped by my shop last month, asking if I could build a display case for his flight helmet. Hell yes!
This is one bad-ass helmet, the back has their patch on it, which I didn't notice at first. I was too busy looking at the air hose hanging from it, and all the details, like the visor or the memory foam padding inside.
Each one of the pilots has a nickname and a number; his is Aktion.
I came up with a few simple sketches, and we agreed on everything, so I started working. The only real pressure was that he was transferring overseas, so this case had to be built pretty quickly. I started by laminating the top and bottoms. My first idea had a solid top and bottom, which was changed about midway through the construction.
I kept envisioning a "cage" of glass around the helmet, so I started machining the rails that would hold the glass
and the corner posts, into which the rails would be attached.
When assembled, it started to take form.
Right around then, I spoke with my new pilot buddy and he asked if I was going to use a mirror on the back panel, to show off the artwork. Umm... yup! Believe it or not, this town doesn't have very many convenient glass shops. So finding mirror cut to size was my next challenge. Luckily, a friend gave me the name of a mom and pop business that was near my shop, and I had the mirror the next day.
Here the corner posts are attached to the base, and you can see the back area, where the mirror will be held.
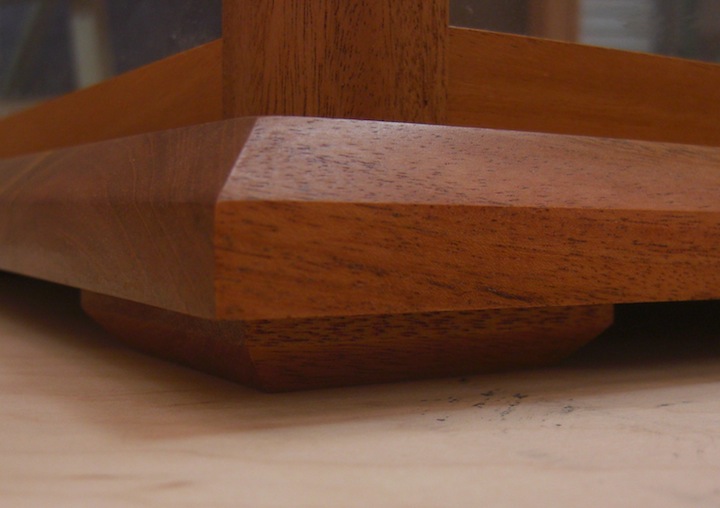
I love the angular details of everything, crisp and contemporary. But the base seemed a little heavy to me,
so I made some feet to elevate it a bit.
At first I was tempted to have them positioned slightly on the outside of the base, but after I played around with their location, I decided I really liked them tucked back, out of sight.
They're just barely noticeable, but elevate the piece perfectly.
Next was the top, and right around here, I said to myself - what the hell are you thinking? You need glass in the top!
Remember, I originally planned on a solid wooden lid. So I cut a few pieces of wood and experimented with dimensions, overhangs, and joinery. By now, I had put so much work into this piece, I was earning about $8 an hour. But at least it was fun!
On a side note, a lot of my woodworking buddies and I lament the bidding process. Sometimes you really blow it and underestimate how long it will take you to make something. But sometimes you overestimate your time. My feeling is that it all works out in the end.
Or if it doesn't, at least you'll know next time what to charge, if you have to build something similar. I keep pretty good records of everything (thanks, mom!), so I can look in my files and know how look it took me to build a sideboard in 1995, or a bed in 2001. Accurate record keeping is really your friend when you're in this line of work.
I knew right away that I wouldn't use a mitered corner/ Even with a spline, it's too weak. But these pieces helped determine the sizes of the parts.
In the end, I chose one of my old favorites - a half lap joint, which is strong and visually attractive.
Here the parts are cut, and double-checked to make sure they're the proper size.
The key to a good half lap is four clamps that match. These ensure that the piece is glued perfectly flat, and with enough clamping pressure to eliminate any gaps around the joint.
Once it was dry, I rabbeted the back for a piece of glass. Of course, the rabbet bit gives you rounded corners,
so I had to chisel them square. I'm down to working for $6 an hour by now.
Then I grabbed my favorite bit (a chamfer bit)
and added some detail around the top and bottom edges of the frame. Once again, the bearing on the bit leaves you with rounded corners, so I had to do some hand work to make the corners look proper. Woodworkers will know what I'm talking about, but most people would never notice this detail. It's the little things like this that raise your work to a higher level of professionalism.
Finally, I marked the screw holes for the corner posts, and drilled them.
And roughly assembled everything.
By now, all my buddies were stopping by asking if I was done with that damn box yet! Tom just laughed and shook his head with understanding; he's gotten himself into a few jobs like this, so he gets it!
And finally, the finished case.
This has been a labor of love, like so many other pieces I've been building for members of the military.
Sure, I could have cut some corners, could have put it together much more simply, and with cheaper materials. That wouldn't be my style. What's that proverb about any job worth doing, is worth doing well?