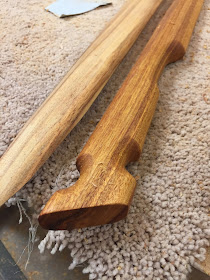
There's no better feeling than when a customer gives me carte blanche to create something. Oh sure, I had a basic of idea what he wanted made, but how I accomplished it was up to me.
Sweet.
When this Canarywood timber was delivered,
my main goal was to create two of these wooden swords, used in martial art training.
Along with the swords, I needed to make a walking stick, several pairs of wooden batons, and some miscellaneous pieces.
I parted out the board, cutting it into various rough pieces, but I started making the swords... Job One.
There were some semi circle notches that I had to drill,
and some curves to cut into the handle.
But the tricky part was the the dual compound bevel, which tapered down into a point.
As I cut one side of the bevel, I saved the cutoff and taped it back onto the part, so that I could easily taper the other side.
It's always easiest to work with flat, square sides, so taping the part back in place was helpful.
I wound up with two rough swords, with matching bevels and tapers. A good start.
Honestly, it took me longer to think about how to accomplish those tapers, than it did to cut them!
As the afternoon progressed, I pulled out a variety of routers, grinders, sanders and chisels to accomplish the final shaping.
And - I love it when a plan works out according to plan, as these two new swords were PERFECT!
PERFECT!
Making the batons was simple, and although I thought I might turn them on the lathe, I actual accomplished these "dowels" with a router.
Watco Danish Oil makes Canarywood colors POP!
The swords might be my favorite part, but as I wound up this project, I had some small odds and ends of wood that I couldn't bear to waste.
So I came up with these bottle openers - a favorite project of mine!
These openers don't take much wood, but the WOW factor is pretty cool....
and they make wonderful gifts!
I am working on another wonderful project ... a cabinet for a priceless heirloom, and another carte blanche commission.
I'm so lucky that I get to build some of the coolest things!
Stay tuned!


Hi there Jamie!
ReplyDeleteI am always intrigued about the process of using the tools to achieve a result. Using a table saw is an elegant way to tackle the problem. A rookie like myself would have used spokeshaves and a rasp to form the shape as I would have probably been concerned about the safety of extending the table saw blade so much to achieve a taper. A bandsaw could have done the job, but not as neatly (i.e. tilting the table and just sighting the line for the taper).
From your blog, I can see that you did not use a tapering jig for this job.
It seems that the angle was determined by the bevel gauge - i.e. you set the bevel to the angle of the sword model, and mirrored that angle on the table saw blade. I can see making the first cut without the taper.
Question: Did you start adding wedges on one side (the one against the fence) and then making light cuts until you achieved the desired taper? Was there any calculation for the taper, or was it only by the sightlines (i.e. drawing a straight line and sighting it by looking at it in relation to the blade?
Would you be so kind to elaborate a little bit more? Would love to learn more about your solution.