Friday, October 28, 2011

Woodworking at Biltmore

One of the things I really miss about woodworking back east is the availability of good wood. The lumberyards I used to purchase from back in Amish country stocked everything from all the domestic hardwoods in dimensioned sizes to obscure domestic species, like elm or sassafras. You haven't really experienced the joy of woodworking until you've worked with sassafras, enjoying its aroma.

Here? You're lucky to find decent boards of the domestics - maple, walnut, and cherry. Much of it is twisted and split, probably from the dry conditions here in the desert. It's odd to me that alder is so popular here - it's boring and dull, but some people just love it. It reminds me of Basswood, now who would build a kitchen out of that?

As my friend John says - people here often have champagne budgets and beer taste.

A few weeks ago, I slipped in a short vacation to Asheville, North Carolina to visit family, and had a chance to visit Biltmore. We toured the house, which was quite amazing. As a woodworker, it was hard to ignore all the work that went into the home and the furnishings.

After the tour, I headed over the woodshop, to see where the magic happens.


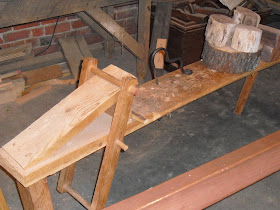
The woodshop isn't much bigger than a small garage, but it contained an impressive number of tools.


Ahh.... I miss seeing logs like this!


The interior had the standard tools you'd expect to find -


including this lathe


the bandsaw


this drillpress and mortiser


and these handtools.


The display of hand planes was quite nice, and you could tell that these weren't just for display. There were shavings on the ground, and some nicely milled boards on the bench.


Since there were a few craftspeople working in some of the shops, I'd hoped that there might be a woodworker on site, but... no such luck.


If you closed your eyes to blot out all the people taking photos with their iPhones or digital cameras, you could almost transport yourself back to an era where woodshops looked like this.


On a good note, I may have some sassafras arriving in Las Vegas any day now. I've arranged to buy some, the shipping details are still being worked out. I'm not sure what I'll make, but I'm sure I'll wind up doing something special with it. If you detect a lovely sarsaparilla smell coming from my dust bags, you'll know what I've been doing.

Monday, October 24, 2011

Designing on the fly

If I had a better memory, then I would remember where I saw my new favorite quote. I was reading a few blogs last week, when I came across this line - creativity is just a series of decisions. I forget who said it - but damn, I love that!

Speaking of decisions - I am building a base for a dining room table, and although my clients give me a rough idea of they want, there are still a multitude of design decisions to make.

Here's a rough full-sized sketch on a piece of cardboard of what I am building.


I prepped the African mahogany to size, planing it and cutting it to length and width. Then I cut the tenons on the top and bottom.


But before I can go much further, I need to make a plywood template of the curve that will be cut in each piece. That's where a beam compass like this comes in really handy.


It is a simple device - two ends that clip on to any scrap piece of wood.


In this case, I'm using a scrap piece of 3/4" MDF.


Clamp the centerpoint onto one end,


and the pencil point to the other.


I know that the diameter is roughly 18", so I set the beam compass to half that, or about 9".


The plywood is cut to the exact size of my mahogany panels.


Here, the semi circle is drawn on the plywood.


I have a spare router base with a piece of plywood attached to it. This allows me to use the router as a giant compass. The curves you cut by hand, with a jig saw or a bandsaw, will never achieve the perfection of one cut with a router and compass. Trust me, I've tried it many times.


Here is a quick video on using this compass set-up, to cut a pattern. Then, I'll use the pattern to rout all the parts. Sound complicated? Just watch the video - it's easy!


Here is the pattern, trimmed up a little bit, so that it mimics the shape I want to wood to be cut into.


Use a straight bit in your router, with a template guide bushing.


In just a few minutes, I've cut all of these parts the same exact shape.


This will give you an idea of what the table base will look like, but there is a small detail that is bugging me. Remember what I said about
creativity being a series of decisions? I have a few decisions to make.


This bottom transition area really bothers me - it looks clunky and doesn't fit in with the rest of the piece.


Thinking on the fly is a must when you get to this stage of the game. I made a few sketches, and came up with a curve that I think works better. Making a pattern of it was easy - I just cut up a piece of that larger template, and made a small pattern to use. Here is it, clamped to the leg base.


Since the wood is nearly 2" thick, it had to be routed in several passes.


And I needed to pull out the big gun - a 3" straight bit for my router. Actually, it was easier to use two routers - one with a short bit, and one with a long one.


I started routing the piece with the short bit, and then once some of the wood was removed, I switched to the longer one. Again - on my last cut - I moved the pattern back just a teeny bit, and made one full pass, every so slightly trimming the wood to the final shape.


Routing makes a ton of dust, make sure you wear a mask and sweep up the floor afterwards, or you'll just keep kicking those particles into the air.


And finally, the finished shape. One I can live with. I'm still going to tweak that area right above where the curve starts, rounding it over to eliminate that sharp corner.


Here is one of the ends; it just needs a little sanding and it will be ready to assemble. Later, I'll connect both ends with two stretchers. Hopefully, my clients will be sitting at their table in time for Thanksgiving!


I hope this post illustrates the fact that designing on the fly is a necessary part of the craft. You can come up with all the plans you want on paper, but until you see them machined on the wood, it's hard to know if they work or not. Each step of the process allows you to see more, and if you spot something that looks wrong, you can correct it.

That's what I love about wood - the forgiving nature of it.

Thursday, October 20, 2011

Mad Gluing Skills

Did I ever tell you that I have mad gluing skills? Seriously, I could win a competition, if one was ever held for glue spreading. Sort of like those grocery-bagger competitions, only much cooler.

On a slightly unrelated note - the G key on my laptop is broken, so typing this blog post about Glue is a little tough. Anyone know how to fix a stiff key on the keyboard? I may have spilled something (not glue) on it.


I talk to a lot of woodworkers - ones who stop by my shop, friends, peers, members of the Sin City woodworking group, and everyone has a different technique for spreading glue. Some use their fingers, some use rollers, or special glue applicators. Me?

Give me a simple popsicle stick and I'm off to the races.


The warm weather here in Las Vegas might have played a part in honing my skills - in the summer, glue skins over in seconds. Speed is important if you want to get something glued together before the glue dries.

It all starts, however, with the proper glue color. This is really important for beginners, who often don't prep their wood adequately. If the two (or three or four or whatever) pieces of wood don't have flat edges that mate together nicely, you'll end up with a glue line that shows up in between each wood. Glue lines can ruin the look of a nice piece of furniture, so running the wood over the jointer to achieve flat surfaces is important.

That said - you can have flat surfaces and some people still can't avoid a glue line. Maybe it is poor clamp placement, or just a technical mistake, like not tightening the clamps enough.

Practice. Get better. It's not rocket science.

But - if you can't avoid the dreaded glue line when you laminate a panel together, at least choose a glue that will disappear on your panel. In my shop, we use two colors - a yellow glue, and a brown glue. For your gluing pleasure, as I like to tell my students.


They're both Titebond adhesives; the brown one is tinted.


If you're working with darker woods, by all means, lessen the chance for problems and grab the bottle of the dark glue.


Remember - work fast. When spreading glue on multiple pieces, leave the boards flat so the glue doesn't run off them until you're ready to put all of the pieces together. When all the glue is spread, then flip all the boards over and push them together in your clamps.

Make sure your first and your last clamp are very close to the ends of the board - maybe within the last inch or so. This will ensure good clamping pressure all the way to the end of your glueline - so that you won't end up with a gap on the ends. That's a huge rookie mistake.

Notice that I alternated the clamps - some on top, some on the bottom? That equalizes the pressure on your panel and ensures a flatter glue-up. Placement is important too - I put a clamp every 6-8", so there are no gaps in the pressure.

Tighten the top clamps first, so the wood is pressed downward against the flat surface. See - gluing wood together is like squeezing a watermelon seed between your fingers - they both want to pop out with a little pressure. So tightening those top clamps presses the wood flat against whatever the boards are touching - in this case, it's my cart.

Becoming a better woodworker takes practice. People tend to forget that, so they think that if they've done something once or twice, they'll be fine. It's not true - to develop some proficiency with anything - repetition helps. Trust me on this.

Saturday, October 15, 2011

Fish use tools

Wow! This is amazing.


The video below clearly shows an orange-dotted tuskfish using a rock to help open a small clam. First he digs it out of the sand, then swims along, looking for a rock to use for opening it.

Pretty amazing, considering the fish hasn't much to work with - hand wise, or tool wise.


Tuesday, October 11, 2011

Fine Woodworking on David Letterman

One of my buddies sent this clip to me - and even though I don't know who this actor is - this is still pretty great. Who has time to watch TV?


Sunday, October 09, 2011

Secret pleasures

One of my favorite ways to relax is to pour a glass of wine and whip something up in the kitchen. There is something comforting about all that chopping, measuring, mixing, and blending. I know that is some people's idea of hell, but it really relaxes me and puts me in a great mood - and the side benefit is having great food throughout the week.

Truth be told, after I get home from teaching at night, I'll rinse off all the sawdust and settle in for a night of baking - anything from donuts to pizza, or harvest something from the garden (by flashlight!) and roast some veggies. Heaven!

I'm a huge fan of Chopped
, Restaurant Impossible and Good Eats. But - I often think I could come up with better recipes than some of the chefs on the Food Network. Here's a perfect example.

(Happy Birthday, mom!)


Thursday, October 06, 2011

Cutting wide boards on a radial arm saw

The first session of my Adirondack chair was held this week - one of my favorite classes to teach! Here is the mini version that I use it as a teaching aide - it is built to scale, one quarter of a normal sized chair.


These chairs are incredibly comfortable, and easy to build. They're so gorgeous, students in the past have built them out of nicer woods and used them inside their homes. One student even built one and donated it to a fundraiser at a local hospital - her chair was one of the highest selling pieces in the auction.

But - there's always a "but" - right? ...they do take a lot of wood to build. I've got stacks and stacks of wood everywhere in the school, in just about every corner of the shop.


I love how these boards were labeled - perhaps they should have looked at this page first.


Not to sound like one of those oldsters who say "back when I was young..." but when I was in high school, there was an abundant supply of mahogany. Gorgeous mahogany - in wide boards, with gorgeous grain - all readily available. For a long time, you couldn't find any nice mahogany boards like those. Everything that was available was just lacking in certain properties - wider boards just disappeared, and when you did find them, the grain and color was ... blech.

Until recently.

Look at this beautiful piece of African mahogany, straight from the lumberyard.


You almost never find boards this wide - they're unbelievable! And the color is so amazing; I almost hate to cut into these pieces!


How do you crosscut a board that wide? If you're lucky enough to have a monster of a radial arm saw, then you put a sharp blade in it. Like this one.


This one just came back from the my sharpener. They put a dip on the teeth, to protect the tips after they're sharpened. It is sort of rubbery and wax-like, and it peels off, to reveal the razor sharp carbide teeth.


Mount the blade on the arbor


and tighten everything up. Of course, don't forget the blade guard!


This saw just eats wood - and makes quick work of crosscutting these wide boards.


When we get a little further ahead with our Adirondack chairs, I'll post some pictures.