You know one of the things I really miss about living back east? (Besides the people, I mean...)
A nice, lazy rainy day. You just can't beat a good thunderstorm, one that rolls in slowly, and sticks around a while.
It's monsoon season here in Vegas, and storms pop up without much notice. Unfortunately, they disappear just as quickly. Today, when I was working in the woodshop, I caught that faint whiff of rain in the air.
You know that smell, right?
I threw down the sander and grabbed my camera. The storm was just blowing in, with the sky changing color in seconds.
Just a few minutes later, the sky opened up and all hell broke loose.
Yes, the shop flooded a little bit, and the roof was leaking in a couple of places. Still - totally worth it!
Sunday, July 10, 2011
Plan B
This blog post is my Plan B.
If you've noticed that I've been MIA for a little longer than normal, you're correct. I've had a ten-day break between my classes, and have been trying to take full advantage of the time, by catching up on things around the shop. When you have a woodshop - there is always something that needs to be done, whether it's cleaning, or rearranging, or repairing something. As Roseanne Roseannadanna said - it's always something.

But to be honest about things, like I said - this blog post is my Plan B.
Plan A, my original post about repairing my oscillating spindle sander, was rendered useless when I accidentally ruined all the photos I was taking of the repair.
Note to self: when you resize photos: make sure you pay attention to whether you're resizing them in pixels or inches, or you'll ruin them! My images wound up being the size of a pin head. In the end, it turns out I was the real pinhead in this whole ordeal.
Good thing there was an alternative plan in place - although not one I was prepared to blog about just yet!
A buddy of mine donated this small shaper/router to my shop, and it's one of the smoothest little machines in my shop.

Powerful, accurate, easy to use - I like this machine much better than my router table setup. So when it quit working, the I pulled out my trusty multimeter and checked the switch.
Repairing tools used to mystify me, but as they say back in Ohio - "Not no more!" Figuring out what the problem is really just means going down a list of possibilities. And in this case, I checked to make sure it was getting power from the outlet. It was. So I pulled open the cover and took a deeper look.
Since the meter told me I was getting full power from the wall, so the next step was to check out the switch.

Checking the continuity of a switch sounds difficult, but it's not. And it's usually the culprit.
If you don't know to test for continuity - there are some good videos on YouTube that will explain it much better than I can. Check out this one; I love this fellow's accent.
This page is a good one to read, it you're tying to diagnose an electrical problem.
Here is the culprit - and the new one, after my trip to the local Delta repair store.

Putting the machine back together was a little difficult.

My hands are pretty small - how do people with big mitts-for-hands get their fingers in there to connect all those wires?
Here is it, all buttoned up and working perfectly.

But the bigger question of the day was - why is my electrical toolbox the heaviest one I own? My buddy Dave contends that if he has four identical tool boxes side by side, all he has to do it pick them up and he can tell what's inside. The electric box weighs far more than a box with woodworking tools. I could barely lift my box up onto the bench, and when I needed that one small nut and washer that I misplaced from the tool, I had to search through all the parts containers I had.
For some reason, I seem to keep the electrical toolbox a little more organized than the other toolboxes I have, like my plumbing one, or my sprinkler one.


Years ago, I used to get a magazine called Restaurant Hospitality, and in it, there was a column called Fridge Raid, where various chefs would show you the inside of their refrigerator at home. Some were hideously crammed with items, others were neat and organized, with various Tupperware containers of everything from abalone to zucchini. That was a great column; peeking into someone's toolboxes strikes me as a similar way of learning more about a person.
My electrical box has to be organized, or I wouldn't be able to find a damn thing!


 Even my screw tips are sorted and organized!

Now if I could only learn to manage my blog photos as well as my tools!
If you've noticed that I've been MIA for a little longer than normal, you're correct. I've had a ten-day break between my classes, and have been trying to take full advantage of the time, by catching up on things around the shop. When you have a woodshop - there is always something that needs to be done, whether it's cleaning, or rearranging, or repairing something. As Roseanne Roseannadanna said - it's always something.

But to be honest about things, like I said - this blog post is my Plan B.
Plan A, my original post about repairing my oscillating spindle sander, was rendered useless when I accidentally ruined all the photos I was taking of the repair.
Note to self: when you resize photos: make sure you pay attention to whether you're resizing them in pixels or inches, or you'll ruin them! My images wound up being the size of a pin head. In the end, it turns out I was the real pinhead in this whole ordeal.
Good thing there was an alternative plan in place - although not one I was prepared to blog about just yet!
A buddy of mine donated this small shaper/router to my shop, and it's one of the smoothest little machines in my shop.

Powerful, accurate, easy to use - I like this machine much better than my router table setup. So when it quit working, the I pulled out my trusty multimeter and checked the switch.
Repairing tools used to mystify me, but as they say back in Ohio - "Not no more!" Figuring out what the problem is really just means going down a list of possibilities. And in this case, I checked to make sure it was getting power from the outlet. It was. So I pulled open the cover and took a deeper look.
Since the meter told me I was getting full power from the wall, so the next step was to check out the switch.

Checking the continuity of a switch sounds difficult, but it's not. And it's usually the culprit.
If you don't know to test for continuity - there are some good videos on YouTube that will explain it much better than I can. Check out this one; I love this fellow's accent.
This page is a good one to read, it you're tying to diagnose an electrical problem.
Here is the culprit - and the new one, after my trip to the local Delta repair store.

Putting the machine back together was a little difficult.

My hands are pretty small - how do people with big mitts-for-hands get their fingers in there to connect all those wires?
Here is it, all buttoned up and working perfectly.

But the bigger question of the day was - why is my electrical toolbox the heaviest one I own? My buddy Dave contends that if he has four identical tool boxes side by side, all he has to do it pick them up and he can tell what's inside. The electric box weighs far more than a box with woodworking tools. I could barely lift my box up onto the bench, and when I needed that one small nut and washer that I misplaced from the tool, I had to search through all the parts containers I had.
For some reason, I seem to keep the electrical toolbox a little more organized than the other toolboxes I have, like my plumbing one, or my sprinkler one.


Years ago, I used to get a magazine called Restaurant Hospitality, and in it, there was a column called Fridge Raid, where various chefs would show you the inside of their refrigerator at home. Some were hideously crammed with items, others were neat and organized, with various Tupperware containers of everything from abalone to zucchini. That was a great column; peeking into someone's toolboxes strikes me as a similar way of learning more about a person.
My electrical box has to be organized, or I wouldn't be able to find a damn thing!


 Even my screw tips are sorted and organized!
Now if I could only learn to manage my blog photos as well as my tools!
Friday, July 01, 2011
Two dogs dining
My friends send me some of the most clever things online! Annette - from one dog lover to another - thanks for the laughs! (Double click on the video to make it appear full sized on your computer screen. Otherwise, half of the frame will be cut-off.)
Tuesday, June 28, 2011
Sharing the (tool) love
A Delta Q3 variable speed scroll saw was recently donated to my shop, hopefully to be used by someone in need of it.

The people who work in my shop like to try out different tools, so I thought it would be a good idea to keep it around the shop for a while, to see if anyone wanted to use it for their projects. A few people tried it out, for some simple marquetry experiments, but they moved on. It's a shame; it's a very nice tool that was sort of going to waste.
Now, I have to say, this tool came to me used. I have no idea how many hours were spent on it, or what the previous owner cut with it. And since I generally work on on a larger scale, I didn't have much need for this saw. But let me tell you - the Delta Q3 variable speed scroll saw is one pretty nice machine. Not one I would have purchased for my work, but very nicely designed.
First of all it is extremely sturdy. You can tell just by putting your hands on the table and flipping on the power. Negligible vibration, solid power. It has a large table that can accommodate nice sized pieces, with enough room for you to guide the work while cutting. The fellow who donated this saw to my shop included a mobile base with it. That's a really nice feature if you have a small space and need the mobility.
It is also extremely easy to use. Changing the blade is simple. Even my mother could do it. (No offense, Mom!) The blade is held in place with a clamp. All you do is open the clamp, remove the blade, insert another blade and tighten the adjustment screw. Look! No hands!! Well, a little use of the hands is good.
An artist/friend of mine, who works with copper, has been trying to figure out a better way to cut shapes in metal without having to use a jeweler’s saw or snips. The copper she uses is about 1/8” thick. And she likes to work large. So working with a jeweler’s saw isn’t really cutting it for her. She also tried a jigsaw but the couldn’t hold the metal firmly enough while maintaining cutting. When I saw the Delta Q3 in action, I immediately thought of her. It would be perfect for cutting metal! Yes, the Delta Q3 Variable Speed Scroll Saw can cut metal. All you have to do is change the blade to a metal cutting blade and I think this tool will do the trick. And with the large table, she can easily maneuver the metal and obtain the shapes she wants.
Now, the drop. My friend lives in New Mexico. About eight hours away. So we've decided to meet half-way between New Mexico and Las Vegas, in Flagstaff. It will be a long day, but getting this tool to a good owner is important.
Oh - by the way, my friend is the artist who did all of the cool paintings in my shop - like this giant tape measure

and this

and these.

Here is some math for you to ponder: 8 hour drive round-trip + a nice meal with a friend + a $300 tool donation = +/- $500.
Seeing the countryside + listening to my iPod + seeing my friend = Priceless.
Sunday, June 26, 2011
Solving the shelf pin hole dilemma
If you build furniture, sooner or later, you're going to drill shelf pin holes. It's just a given. Pin holes are one of the most common elements in furniture making - allowing for adjustable shelves.
Now there are a lot of systems out there for laying out these holes. Some people use a scrap of pegboard, because the holes are already spaced one inch apart. You cut a piece of pegboard, lay it on top of the piece of wood, and drill away.
But - I'm not a fan of that method. I've tried it. Pegboard is usually made of tempered masonite, but after the drill bit hits the side of the pegboard a few times, it makes it enlarges that hole. So your layout becomes sloppy, with the holes not lining up properly.
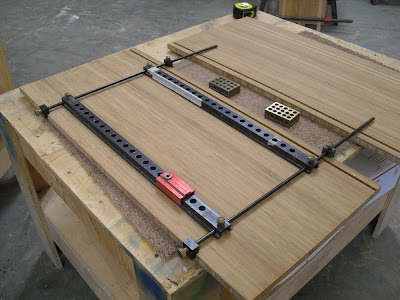
A better system is this Veritas shelf drilling system, one that I've used for years.

It's an adjustable system that clamps to your boards, and allows you to drill perfectly spaced, perpendicular holes in them.

Setup is simple, quick and accurate. If you have longer boards to drill, you simply drill the lower holes, and then move the jig up on your wood, indexing the pin holes so that the spacing remains the same all the way up the board.
This system comes with everything you need, but over the years, I found that I needed different lengths of rods that this device uses to hold the brackets together. My buddy Dave came to the rescue, and had some extra rods made for me, in various lengths. Sweet.
Sure, it's a little pricey. But make a bookcase or two without it and you'll gladly spend the money. When I teach a class where we make bookcases, this device helps everyone look like expert woodworkers!
I set up the jig using some 1-2-3 blocks, ensuring that the jig is perfectly adjusted to fit my bookcase sides.

Here are the sides, with the jig spaced 5" up from the bottom edge.

The jig is also spaced 2" in from the edge.

See - no measuring. You can't screw up that way!
The real key is this bushing carrier - the red device sitting on the drilling bracket.

This carrier slips firmly over each hole you want to drill, and has a 1/4" bushing in it, which allows you to drill perfectly perpendicular into the wood. The drill bit has stop collar on it, so you can't drill too deeply and pop out the side of your wood. But - as with all things wood - you always want to test that first.
Here I drilled a piece of scrap that is the same thickness as my cabinet wood.

Insert a shelf pin and check to see if the depth is right.

Perfect.
So everything is set up and ready to drill.
In this piece, I'm drilling holes for three shelves. I don't like the appearance of holes going all the way up the board. So I'll just drill a bank of four holes for each shelf.
I usually put some masking tape and mark the holes I'll be drilling.

It only took a couple of minutes to set this up and drill all the holes, and it sure helps with accuracy. Make sure you use a brad point drill bit, which cuts from the outside, for a very clean hole.


Click here to watch a short video of me using this jig.
Seriously, I could probably teach Stella how to set this up. Well, if I could get her to put her tennis ball down for a few minutes.

Now there are a lot of systems out there for laying out these holes. Some people use a scrap of pegboard, because the holes are already spaced one inch apart. You cut a piece of pegboard, lay it on top of the piece of wood, and drill away.
But - I'm not a fan of that method. I've tried it. Pegboard is usually made of tempered masonite, but after the drill bit hits the side of the pegboard a few times, it makes it enlarges that hole. So your layout becomes sloppy, with the holes not lining up properly.
A better system is this Veritas shelf drilling system, one that I've used for years.

It's an adjustable system that clamps to your boards, and allows you to drill perfectly spaced, perpendicular holes in them.

Setup is simple, quick and accurate. If you have longer boards to drill, you simply drill the lower holes, and then move the jig up on your wood, indexing the pin holes so that the spacing remains the same all the way up the board.
This system comes with everything you need, but over the years, I found that I needed different lengths of rods that this device uses to hold the brackets together. My buddy Dave came to the rescue, and had some extra rods made for me, in various lengths. Sweet.
Sure, it's a little pricey. But make a bookcase or two without it and you'll gladly spend the money. When I teach a class where we make bookcases, this device helps everyone look like expert woodworkers!
I set up the jig using some 1-2-3 blocks, ensuring that the jig is perfectly adjusted to fit my bookcase sides.

Here are the sides, with the jig spaced 5" up from the bottom edge.

The jig is also spaced 2" in from the edge.

See - no measuring. You can't screw up that way!
The real key is this bushing carrier - the red device sitting on the drilling bracket.

This carrier slips firmly over each hole you want to drill, and has a 1/4" bushing in it, which allows you to drill perfectly perpendicular into the wood. The drill bit has stop collar on it, so you can't drill too deeply and pop out the side of your wood. But - as with all things wood - you always want to test that first.
Here I drilled a piece of scrap that is the same thickness as my cabinet wood.

Insert a shelf pin and check to see if the depth is right.

Perfect.
So everything is set up and ready to drill.

In this piece, I'm drilling holes for three shelves. I don't like the appearance of holes going all the way up the board. So I'll just drill a bank of four holes for each shelf.
I usually put some masking tape and mark the holes I'll be drilling.

It only took a couple of minutes to set this up and drill all the holes, and it sure helps with accuracy. Make sure you use a brad point drill bit, which cuts from the outside, for a very clean hole.


Click here to watch a short video of me using this jig.
Seriously, I could probably teach Stella how to set this up. Well, if I could get her to put her tennis ball down for a few minutes.

Wednesday, June 22, 2011
My informal zucchini test
To hell with Naked Gardening Day, the real time to strip off your clothes is when you're standing over a hot grill. Today marks the start of some really hot weather here, and of course, there were zucchini issues in my yard. They were crying out to be grilled, and the thought of standing over a 700˚ cook top wasn't enticing.
But great food IS enticing!
Slice 'em, drizzle with olive oil and salt, and slap them on the heat.
Here is a highly-scientific experiment; I put a tape measure by two zucchini one morning, and luckily, I remembered to check them 24 hours later.
This one started out as this (about 6 3/4")

and the next day, measured about 8 1/2" - wow - who knew?

The second one started out at about 5 1/2"

and wound up like this.

8 1/4".
Crazy! I suspected they were growing quickly, but I was very surprised at these results.
I've been roasting them in the oven


and sprinkling them with a little feta.

Or making quiche
 after quiche,

after quiche.


But I have to say - I think grilling is the best.

It brings out that husky, charred (carcinogenic?) flavor.

When added to a cold pasta salad, it's ... well, a slice of heaven.

Hope your garden is treating you well!

But great food IS enticing!
Slice 'em, drizzle with olive oil and salt, and slap them on the heat.
Here is a highly-scientific experiment; I put a tape measure by two zucchini one morning, and luckily, I remembered to check them 24 hours later.
This one started out as this (about 6 3/4")

and the next day, measured about 8 1/2" - wow - who knew?

The second one started out at about 5 1/2"

and wound up like this.

8 1/4".
Crazy! I suspected they were growing quickly, but I was very surprised at these results.
I've been roasting them in the oven


and sprinkling them with a little feta.

Or making quiche
 after quiche,
after quiche.


But I have to say - I think grilling is the best.

It brings out that husky, charred (carcinogenic?) flavor.

When added to a cold pasta salad, it's ... well, a slice of heaven.

Hope your garden is treating you well!

Monday, June 20, 2011
Thoughts on sanding - Milwaukee vs. Festool sanders
Ahh.. sanding. The necessary evil of woodworking. Some people love it, actually enjoying the zen quality of it's repetition. Me? No, I've been doing it too long. It's boring and tedious and time consuming. There, I said it.
It's been a little over a year since I splurged on some Festool gear.
Without a doubt, the 5" Rotex sander is one of the more effective tools I use.

When there is a board that has severe chip-out, or snipe on the front edge of it, there's no better tool for the job. We're talking major wood removal here.
Combined with the integrated vacuum, this sander handles the wood very effectively. And cleanly. Seriously, if you have asthma, or breathing problems, this system is the one you want to use.
That's not to say that the Rotex is perfect. It's not. In fact, right about the time I start to apply a finish, I'm reminded of it's shortcomings - mostly - swirls in the wood that weren't visible before the finish was applied. Yes, the Rotex leaves some hella swirls, despite what Festool says. Their recommendation? Turn the suction on the vacuum down, so that the sanding disc isn't pressed against the wood so firmly. For me, that hasn't worked.
That's when I pull out my other Festool sander - the finish sander, to try and eliminate the swirls.

That's not foolproof, either. My sander can't seem to stay flat, despite replacing the pad on it a couple of times. You can actually see a curve in the bottom pad, if you hold the sander up to a straight edge. #$%!
So I tend to pull out a cabinet scraper and slightly shave the swirl marks from the wood. It's effective, but I sure do wish I didn't have to do it.
You'd think that if you spent $1200 on a few sanders and a great vacuum, that you'd have a pretty good tool, right? Let me tell you about another tool that does nearly as good, for MUCH less.
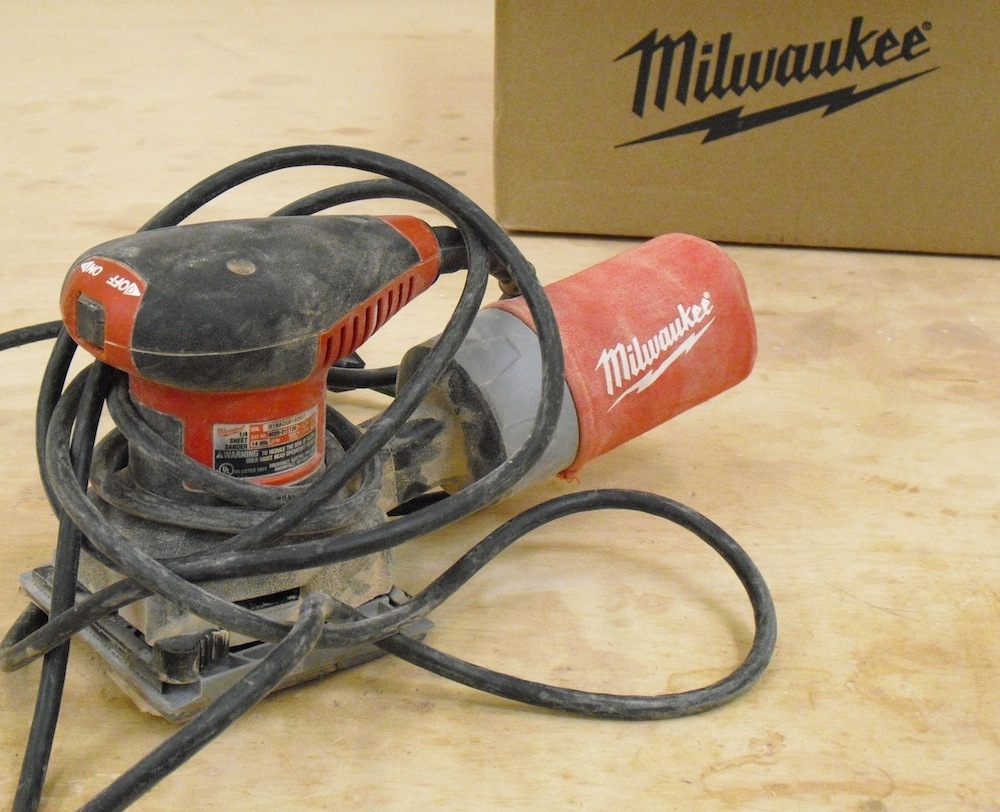
Over the years, I've probably owned just about ever pad sander there is out there. I stuck with Makita for a long time, but gradually, a Milwaukee sander became my favorite. It's combination of weight, center of gravity, balance and power seemed to feel the best to me. Don't get me wrong - when put side by side, next to the Festool, the Festool feels better. But it's also a gazillion times more expensive.
This Milwaukee sander is a workhorse in my school,

but the pads really take some abuse.

Luckily, parts are very easy to get, and Milwaukee ships quickly, and with very reasonable shipping charges.

One of my pet peeves is buying a $2 part and paying $15 for it to be shipped to me. In this case, I picked up new pads and platens (which I probably didn't even need to buy!) for five sanders, all for about $30, including shipping.

It's very easy to switch out the pads.

And these stay very flat over time. Now, you're not going to get the same sort of dust collection with these dust bags that you'll get using a vacuum. But they're for what they cost, and what they do, this is a hell of a sander.

All tuned up, cleaned, and ready for duty.

It's been a little over a year since I splurged on some Festool gear.
Without a doubt, the 5" Rotex sander is one of the more effective tools I use.

When there is a board that has severe chip-out, or snipe on the front edge of it, there's no better tool for the job. We're talking major wood removal here.
Combined with the integrated vacuum, this sander handles the wood very effectively. And cleanly. Seriously, if you have asthma, or breathing problems, this system is the one you want to use.
That's not to say that the Rotex is perfect. It's not. In fact, right about the time I start to apply a finish, I'm reminded of it's shortcomings - mostly - swirls in the wood that weren't visible before the finish was applied. Yes, the Rotex leaves some hella swirls, despite what Festool says. Their recommendation? Turn the suction on the vacuum down, so that the sanding disc isn't pressed against the wood so firmly. For me, that hasn't worked.
That's when I pull out my other Festool sander - the finish sander, to try and eliminate the swirls.

That's not foolproof, either. My sander can't seem to stay flat, despite replacing the pad on it a couple of times. You can actually see a curve in the bottom pad, if you hold the sander up to a straight edge. #$%!
So I tend to pull out a cabinet scraper and slightly shave the swirl marks from the wood. It's effective, but I sure do wish I didn't have to do it.
You'd think that if you spent $1200 on a few sanders and a great vacuum, that you'd have a pretty good tool, right? Let me tell you about another tool that does nearly as good, for MUCH less.
Over the years, I've probably owned just about ever pad sander there is out there. I stuck with Makita for a long time, but gradually, a Milwaukee sander became my favorite. It's combination of weight, center of gravity, balance and power seemed to feel the best to me. Don't get me wrong - when put side by side, next to the Festool, the Festool feels better. But it's also a gazillion times more expensive.
This Milwaukee sander is a workhorse in my school,

but the pads really take some abuse.

Luckily, parts are very easy to get, and Milwaukee ships quickly, and with very reasonable shipping charges.
One of my pet peeves is buying a $2 part and paying $15 for it to be shipped to me. In this case, I picked up new pads and platens (which I probably didn't even need to buy!) for five sanders, all for about $30, including shipping.

It's very easy to switch out the pads.

And these stay very flat over time. Now, you're not going to get the same sort of dust collection with these dust bags that you'll get using a vacuum. But they're for what they cost, and what they do, this is a hell of a sander.

All tuned up, cleaned, and ready for duty.

Subscribe to:
Posts (Atom)