Monday, August 29, 2011

Nice piece of Ash


As we woodworkers say - nice piece of Ash!

One of my online friends asked about the size of this bed, and mentioned that it looked low. Since most chairs that we use are roughly 18" high, I made this bed so that once the mattress was added, the overall height would be right there. If you've ever had a bed that is too low, you know how difficult that can be to get up in the morning!


And if you have a bed too high - well, the "kids" have trouble jumping up. Yes, I admit it - I let the kids sleep with me. With a face like this, how could I not?


I was hoping for a very zen feel for this bed, and I think I accomplished it. Warm wood tones always look best next to cooler colors, like blues and greens, so these sage sheets and blanket were an easy choice for me. A few years ago, I picked up some organic cotton bedding at West Elm, so I was thrilled when I found this set on sale here in town. If you're unfamiliar with West Elm, check this out.


Monday, August 22, 2011

Inventing is cool


If you're an artist, a designer, an inventor or an innovator - you learn to think on the fly. Remember way back when I invented these drill bits, because I couldn't find one that I needed?


I use these bits when making plaster molds, like this one. See the "hole" with the rounded bottom?


Slumping slabs of clay into that mold allows me to make sushi platters like this.


Inventing is cool.

I love the simplicity of this invention!


Making a bed - finished!

Classes ended last week, and I've been trying to find a solid block of time to devote to finishing this bed. Working in spurts of 15 or 30 minutes doesn't amount to very much progress - but that is all the time I had to spare while classes were in session. Today, I installed the rest of the hardware and finished things up.

Using that same jig that I made for the side rails, I routed the bed posts to hold the hanger hardware. Had I planned it a little better, I wouldn't have nailed the jig together. I should have used screws, so that it would be easier to disassemble.

Here, I've clamped the template to one of the bed posts.


It was simple to rout out the area for the hanger bracket.


But the router bit leaves rounded corners. The bracket won't fit until I square off the corners with a chisel.


A couple of cuts and the hangers drop right in place.


Since the side rails have a little bracket that clips into the post hardware, I have to rout a recess for those clips.

Here, I marked the area that needs to be recessed.

There was a guest in the shop, watching me work on this, and he mentioned that most woodworkers would probably just rout out that area straight across, not bothering to make two separate sections. He said it was the "purist" in me that separated the areas. I'm not sure that's it - I'm just too anal about things like this!

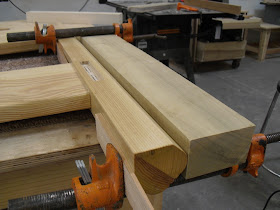
I clamped a scrap block of wood to the corner post, to give the router a larger surface on which to slide.


An edge guide on the router makes this cut a breeze.


Line up the bit with the pencil mark.

Then set the depth of the cut.


One pass with the router gives you the perfect recess.


Double checking the recess, to make sure it's long enough.


Perfect!


I pre-drilled the holes, and double-checked the plate, to make sure I had it right side up!


Hardwoods like Ash are prone to splitting, so I pre-drilled and lubed the holes with a little paste wax. That makes the screws go in much easier.


So that's it - it took longer to write this post than it took to rout out the areas for installing this hardware.

We're almost finished.
Let's assemble this bad boy!


Time to attach a ledger board around the perimeter, to hold the mattress deck.


Add the deck - first piece


second one,


here is the third one...


and finally - the last one.

I plan on going back and drilling a couple of finger holes in the plywood, to make it easier to remove the panels. I'm also thinking of making a simple center post to add some support under the center of this bed. It will attach to the deck, and keep the bed from sagging in the middle.


Time to celebrate. All that's left is to apply a couple of coats of oil. (Thanks for the beers, Ned!)


Friday, August 19, 2011

Finishing the Ferrari Crankshaft Base


Ludwig Mies van der Rohe. Ever heard of him?

He's known for two concepts that kept buzzing around in my head when I was completing this next project
- "God is in the details" and "less is more." Both sentiments couldn't fit more aptly with regard to this piece.

T
his commission has been in my shop for WAY too long, I blogged about making the curved recesses here, and sanding those curves here. But I was held up by having to wait for the bearing that would allow the crankshaft to spin on the base I'd made.

It finally arrived.


I'm not sure what I expected, but it wasn't a split bearing like this. How was I going to utilize these two halves to support the crankshaft?


After coming up with a few sketches, I had a plan.


I needed to cut a curve to match the diameter of the bearing, so I pulled out the trusty Router Buddy and cut a sample recess, to test the fit.


Perfect. I got lucky; it usually takes a couple of attempts.


Since the base is made of solid (and gorgeous!) Cherry, I cut the curve into a solid block of Cherry, and then split the block down the middle, giving me two matching halves.


Here is how the bearing will fit on the crankshaft end.


And here are the bearings in the blocks of wood that I've prepared.
.


But here is where my brain started messing with my plans - what sort of shape did I want to use for these end blocks?


I sketched something with slanted sides, but I just wasn't certain that those looked best. So I drew one with a straight side.


I still couldn't decide which I liked best.

Eventually, I made both styles out of scrap wood, and set them in place. It's so much easier to make decisions when you can see the choices right in front of you.


The decision was pretty clear, after seeing the two options. Slanted all the way.


A little more sanding and then the final attachment of those end supports.


When completed, I applied Watco Danish Oil to the piece, sanding it into the wood with 400 grit sandpaper. It's hard to describe how wonderful the wood felt after all these coats, but I think these pictures will give you an idea of it's character.


Sweating the details of a piece isn't uncommon; the little things like these two supports that can make or break the design.


This crankshaft freely rotates on the two bearings, it doesn't take much effort at all to spin it. I love doing off-the-wall projects like this!


Sunday, August 14, 2011

Scratch this off my Bucket List

Three words. Star. Trek. Convention.


You know it's serious when you walk in the room and the first thing you see is this sign:


If you live in Las Vegas and don't take full advantage of all the cool things that happen here, then shame on you. At least that's what I've been telling myself lately, because it seems like all I do is workWorkWORK.

So I made up my mind - get out and explore new things. Sort of like the opening line in Star Trek:


Space, the final frontier. These are the voyages of the Starship Enterprise.

My mission? Go to the Annual Star Trek convention and have a little fun. I invited a friend along, and we got into the spirit of the room by adding our own twist - Spock ears.


I think everyone should wear ears like these at least once in their life!

What I didn't realize if that there would be so many people in costumes, dressed as
Star Trek characters. Better yet - they were strolling around as if it was completely normal to be wearing those costumes!


This fellow needed a little assistance getting his boots on!


If you needed a costume - no problem! This vendor had full outfits for sale - at roughly $350 a piece. .


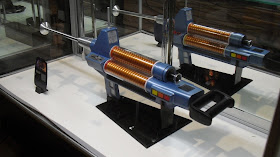
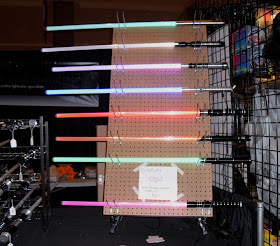
No matter what you were looking for, it was available. From very authentic phasers


to Christie's catalogs,


posters,

holiday ornaments,


even a Jean-Luc Picard action figure. (I think it's cool that I knew his name without looking it up.)


C'mon, who doesn't need a Star Trek corset?


I was blown away by the memorabilia - seriously, it was all SO compelling. Click on any of these images to bring them full screen. The sheer scope of Stat Trek mania was unbelievable.


These cast bronze plates were in a locked case. If ya gotta ask, you probably can't afford them.


There were even artists doing Borg caricatures. I'll admit, I was tempted.


And then I saw the line. The autograph line.


Hundreds of people waiting for autographs. Spock was sold out, as were a few other characters. Here is Data, one of my favorites.


and without make-up.


There were actors everywhere, from full cast members to bit players. I purchased this book from one of the actors, who autographed it. Turns out he lives here in town. The book is pretty compelling, I'm about three chapters into it and I can't put it down.


Finally, the grand ballroom. This cavern-of-a meeting-hall is bigger than my local Costco. With all the fans present, there was no problem filling this room! Amazing!


After scratching this off of my bucket list, my next stop is the Mob Museum. Another weekend, another adventure!