Monday, December 26, 2011
A decendent of Thomas Crapper?
Who knows what attracts us to the things we like? Not to get all esoteric on you, but it has been suggested that the attractions we have today were formed in our past lives.
There may be something to it - why would a child be able to pick up a violin and play like a master? Why do we have certain tendencies for the things we enjoy - like woodworking or rock climbing or whatever?
I don't know enough about it to understand it, but there has to be something to it.
Sunday, December 25, 2011
Getting what we want...
Hope you didn't get any "pink stuff" under your tree!
Merry Christmas, everyone. Hope your holiday is peaceful and full of love!
Merry Christmas, everyone. Hope your holiday is peaceful and full of love!
Thursday, December 22, 2011
You bring the hot dogs, I'll bring the saw...
Here it is, December 22, and I'm finally done with all of my commitments for the year. I can't tell you how happy that makes me, as this has been one busy-heck-of a-roller-coaster-ride.
Last night, at our monthly meeting of Sin City Woodworkers, we held our yearly holiday party. Patty at SawStop generously sent us a demo cartridge and expendable sawblade, so we installed them into one of the saws and made our own hot dog video.
Awesome.
(Double click on the video to bring it up full screen. That is the best way to watch this!)
You can read more about Sin City Woodworkers here, on our blog.
I've said it before, but one of the best ways to become a better woodworker is to hang out with other woodworkers. Our group has shared their talents for everything from carving to turning, hand tool skills to marquetry. And much more.
A few years ago, we were all strangers. But - by luck and hard work and perseverance, we're coming up on our three year anniversary. If you're feeling isolated and wishing your had someone to bounce some ideas around with - please consider starting your own local woodworking group. You won't be sorry.
Tuesday, December 20, 2011
Assembling the new SawStop
This should have been the Christmas card that I sent out this year.

Yup, there was another SawStop under my tree this year. Well, if I actually had a tree.
Earlier this year, I bought their Contractor saw. While it was a perfectly nice saw, I was slightly underwhelmed with the fence on it. For my shop, and my students, it seemed a little less durable than it should be. Do you have any idea how hard people can be with the tools at my shop?
The good news is - I had an opportunity to sell the smaller saw and upgrade to their Professional saw. Um... where do I send the check?
I jumped at the chance. A week later, I had a pallet full of parts.

This is maybe the 20th tablesaw I've put together, I used to tell my students in Ohio - buy a saw, I'll help you set it up. Good times.
Since it's the third SawStop I've assembled in the last three years, so it's getting to the point where I could put one together with one eye closed.

Obviously, the first thing to tackle was the mobile base. Unfortunately, I snapped a axle bolt in half when I was tightening it.

Is it weird that I have SawStop Tech Support on speed dial in my phone?

You have to hand it to them - they have their act together when it comes to directions and labeling of the parts. If you can read the directions and use a wrench, you can put this baby together without any difficulty.

It looks rather vulnerable when it is laying on it's back, but that is how it arrives.

Peel off all the packing to reveal a gorgeous machine.

Some people get excited over a new Mercedes. Me? I'll take a saw.

If I wasn't getting interrupted every ten minutes, I would have had this together in one afternoon.

Everyone kept stopping in to see the new addition.

I would say the hardest part of the assembly was attaching the cast iron wings. But - with a rolling cart, you can do it yourself.

The fence in one of the last things you attach, and their hardware pack is extremely
well designed.

The closer I came to finishing, the more trash built up in the shop. This saw comes with a ton of packing and padding.

And the only problem (besides the broken axle bolt) came at the end, when I had four bolts left over. Since the hardware packs are all labeled so well, I know the leftover bolts came from the fence assembly.
Note to self: lock the door and don't let people hang out (and distract you!) when you're assembling something like this!
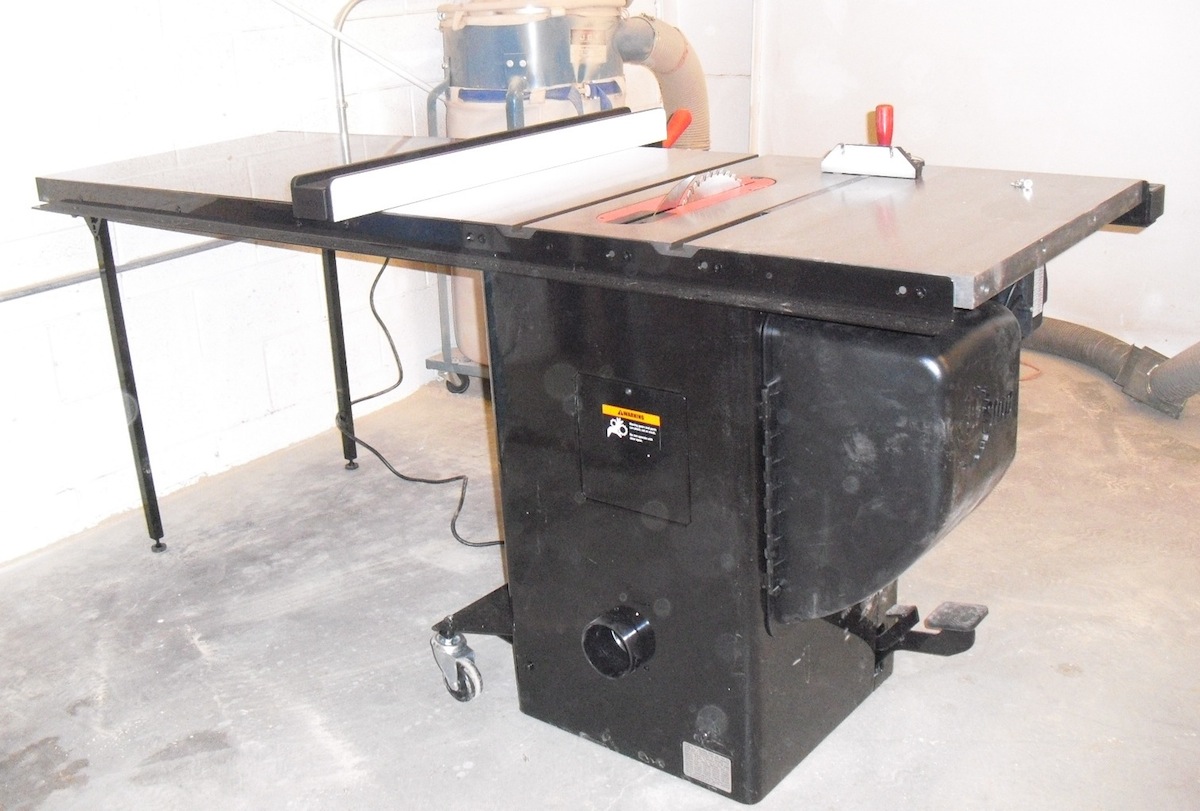
So - how is it?
After owning all three versions of their tablesaws, I feel that the Professional saw is the best model for the money. I'm not sure I notice a huge difference between the Industrial saw versus this Professional one. If I had it to do all over again, I would have gone with this model from the start. It's hefty and powerful, and every bit as accurate as the higher priced model.
Just my two cents...
Tuesday, December 13, 2011
A time for turning...
A friend and I decided to take a lathe class, so last week we spent a few days with Jimmy Clewes. You remember my friend - we went to the Star Trek convention together.

She's adventurous and hilarious, smart and supportive - people like that don't come into your life all that often. So when she mentioned wanting to learn more about lathe work, I jumped at the opportunity. A refresher course is always a good thing!
Jimmy doesn't waste a lot of time talking about what you'll be doing - he assesses your level of expertise, and within minutes, you're starting your first piece. Ann began making a small lidded box

while I started a shallow platter.

Along the way, Jimmy will stop the class and demonstrate a technique, or speak about a pertinent design point - anything from dying wood

to tool sharpening, to polishing compounds.


After day one, we both felt much more confident about everything - and left with a much better sense of what we could accomplish.
Way back when I first started teaching, I asked a friend for a bit of advice, and the one bit that really stuck with me is that people respond to praise. That may sound oversimplified, but praising one's work will elicit better results over anything else - and throughout the years, I've always kept that in the back of my mind. Even if someone's project isn't coming out in a spectacular fashion, you can always find something about it to compliment.
Jimmy teaches quite similarly - he's quick to praise, yet will step in to help when he sees that you need it. The best thing I can say about him is that he teaches with an open heart, which is a wonderful quality to employ. He loves what he does, and still has that zest for sharing his expertise.
Day two, I tackled a slightly more complex project - a square lidded piece. Here it is mounted on the lathe, this will eventually become the bottom of the piece.

A small tenon is formed in the bottom, so that I'll be able to mount it in a chuck.

A little more wood is removed, and you can see the form is starting to take shape.


A coat of sanding sealer and a coat of Watco make this piece start to sing.

Then it's flipped around and the bowl is starting to emerge.

It's not really that difficult turning a square piece, but you have to know where those corners are spinning. There were a few times when I lost track of them, and whacked a knuckle or two on the wood.

Once the base was completed, coffee and some critiquing allowed me to rest up a bit before I started the lid.

My main goal for taking this class was to familiarize myself with various lathe accessories that are available. I'd never used a chuck before, but instead, had relied upon gluing scrap wood to the bottom of a piece, so that I wouldn't screw a faceplate directly into the bottom of a bowl. This class was a great introduction to lathe accessories - and with the plethora of products out there, now it's just a matter of deciding which ones I want to add to my tool arsenal.
Back to the lid - here it is in the chuck, and I'm forming the bottom lip that will fit into the base. Calipers and a good eye make this easy.

Once I've got a good fit, I flip the lid around in the chuck, and tackle the top. This lid is fairly small, about three inches square, so a delicate touch is necessary.

And finally - the finished piece.


Ann finished a small lidded box on the first day, so she started a platter the next day. Here is the bottom being sealed with a bit of Watco.

When dry, it is flipped around in the lathe chuck and top of the bowl is worked. A lathe chuck is quite similar to a drill chuck, it has jaws that tighten around something, to hold it in place. Those jaws can hold something inside, much the way a drill chuck holds a drill bit.

Or then can exert pressure outward. I know it sounds confusing, but there are tons of videos on YouTube that will help illuminate how lathe chucks work.
These platter projects were a perfect introduction to aniline dyes, something I've been wanting to add into my work for a long time.
Jimmy gently blends the dyes together with the help of a spray-on top coat.

If you've considered taking a lathe class, but can't muddle through all the offerings out there, you might want to consider taking a class with Jimmy. I've been to quite a few classes/workshops/seminars/wastesoftime - and have to say that Jimmy's class was one of the best I've attended. He shares his talent in a multitude of ways - both in the shop, as well as in the kitchen (he cooked lunch for us both days) - and is a pure joy to be around. His enthusiasm is infectious, so here is my prediction - the turning bug will bite you. Hard.
Friday, December 09, 2011
Pneumatic table saw
This has been a hectic week in the shop, but I just had to share this with you. One of my students mentioned that she'd purchased a pneumatic benchtop tablesaw - wow, not like you're going to find one of those at a garage sale every day!
But that's exactly where she found it. She brought it to class the other night, and we hooked it up to the air compressor to give it a look-see.

But that's exactly where she found it. She brought it to class the other night, and we hooked it up to the air compressor to give it a look-see.

Sure, it is small, but with the right blade, it has the capability of making some decent cuts. The fence was actually pretty accurate!

Here is the air hose attachment fitting - I've been around tablesaws for almost my entire life and I've never seen one of these!


The "on/off" switch is pretty simple, too.

So how does it cut?
Sunday, December 04, 2011
The most romantic holiday gift ever
This might be the most romantic holiday gift ever!
About ten months ago, a very nice gentleman stopped by my shop with some ideas about things he wanted me to build. His only request - the pieces had to be done by the time the holidays rolled around. The first piece was a small carving, and even though I don't consider myself that skilled with a carving chisel, I have to say - that piece was amazing!

About ten months ago, a very nice gentleman stopped by my shop with some ideas about things he wanted me to build. His only request - the pieces had to be done by the time the holidays rolled around. The first piece was a small carving, and even though I don't consider myself that skilled with a carving chisel, I have to say - that piece was amazing!

Well here it is, the holidays are creeping up, and a few weeks ago, I started on the second one of his pieces - a Wheel of Fortune game.

Only there is a little twist. Instead of dollar amounts in each segment, he will be putting the names of various destinations on the segments. When his wife spins the wheel, she will be spinning for a trip to someplace like Paris, or Hawaii, or London, or ... well, you get the idea.
Luckily, I've had months to work out all the details in my head. That is usually how I build something - by building it in my mind first.
I started with the individual wheel segments; I figured that everything else could be scaled around those dimensions. Since we'd agreed on twelve different segments, a little geometry was in order.

I needed to cut twelve identical pie shaped pieces, so I made a simple tapering jig for cutting each piece.

My angle was off just a bit, so I "corrected" it by adding a small shim to the jig, to get the angle perfect.

And I cut a few scrap pieces to see if my angles were correct. They were.

Here is the selection of wood I used - walnut, ash, mahogany and maple. I planed them all to a uniform thickness,

and then used the jig to cut them into segments.


The ends had to be tweaked slightly, so I headed to the chop saw for that.

Once I reassembled this - all I could hear was...
Wheel!
Of!
Fortune!
If you live in Vegas, you know that chant well. It blasts inside nearly every casino.
Wheel!
Of!
Fortune!
If you live in Vegas, you know that chant well. It blasts inside nearly every casino.

The base and upright support for the wheel were next. With the help of a large lazy susan mechanism, building it went well. I have to say - I enjoy building by the seat of my pants. No plans, no constraints, just a clear vision of what I need for the piece.


The only problem with working this way is that there is a sense of mania in the woodshop. I'm more concerned with solving design problems than cleaning up after myself, so the place tends to get a bit messy.
When it gets to the point where I can't find anything on my bench, I straighten it up and then the mess starts all over again.
When it gets to the point where I can't find anything on my bench, I straighten it up and then the mess starts all over again.


These wheel segments still have to be painted. One side will be plain, and the other will have the destination on it. So they need to be reversible. I love the small walnut hub that I made for the center of the wheel. It holds the tips of all the segments in place, and looks very cool when the wheel is spinning.


I'm not sure what it's called, but the little pointer that separates the segments had me stumped. That's when two heads are better than one - my buddy Tom wandered into my shop, watched me for a few minutes, and had the perfect solution. I'd probably spent two hours thinking about it as I was working, and he solved the dilemma in just two minutes.
Isn't it odd how our minds work like that?
Isn't it odd how our minds work like that?


Over the years, I've made some really odd/interesting pieces - like a display case for a vintage bedpan, which was a retirement gift for a nurse. Or the couch made from old bleacher seats from Cleveland Stadium. Or the fighter jet flight ejection handle trophy. Or the... well, there have been many cool ones.
But this one might be one of my more memorable pieces.
But this one might be one of my more memorable pieces.
Subscribe to:
Posts (Atom)