Sunday, November 20, 2011

American Restoration

My buddy Tom told me the other day that the hit TV show American Restoration is filmed right in my neighborhood. (He was only half right - it was filmed just up the street, but has since moved.) I've never seen the show, so I set the DVR to tape a few episodes.

It's a pretty cool concept, with the guys restoring anything from old candy or coke machines to vintage motorcycles. But I nearly fell off the couch when I saw one of the fellows cutting a 2x4 on the tablesaw like this.


My first thought was - how are you going to restore your teeth if this board you're cutting kicks back and hits you in the mouth!?!

(Hint: when crosscutting, use the mitergauge or a sled.)

Thursday, November 17, 2011

World's Worst Ruler

... no, I'm not talking about Gaddafi, Kim Jong-Il, or Mugabe.

I'm referring to rulers as in - what we use to measure things.
Most of the time, I use a wooden rule for measuring things in my shop.

But every now and then, I'll pick up a steel rule like the ones shown below. They're perfect for measuring and marking smaller pieces of wood.


Not too long ago, I bought this one at an art supply store. It looked perfect, and since I already have a 24" rule in the shop, I wanted to add a smaller (12") one.


The only problem? This rule has an 1/8" space on the end, unlike the other rule where the scale begins right at the edge of the metal. (Did that make any sense?)


Every time I use this rule and put it's end flush with the piece of wood I am measuring, I am off by 1/8".

Who the hell would make a steel rule like this?

Oh wait - here is who made it! Nice job, folks!


I may have to take this to my belt sander and sand that extra bit off the end. What's the worst that can happen- I render it useless? It already is!


Speaking of rulers, I bought this one when I was gallery hopping in Asheville. I don't plan on using it, but it sure looks nice sitting on my desk.


Monday, November 14, 2011

Attention to detail

If I had to pinpoint one thing that separates good woodworkers from great woodworkers, it would be their attention to detail. How much time do they spend prepping their surfaces before applying a finish? Or ensuring that all traces of glue are removed? Or that all their edges are slightly broken, so that there are no sharp corners that can splinter away?

That "good enough" attitude makes a huge difference between being a good or being a great woodworker. Here is a perfect example - I'm building a large mirror frame that will have a small detail of inlaid tile in the top rail.


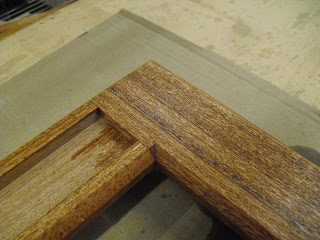
I'm a big fan of treating the edges with a chamfer bit, but when routing inside corners, you end up with a rounded cut, like the one shown below. The bearing just can't negotiate that tightly into the corner, so the bit stops short of cutting right into the corner. I know a lot of people who would just leave it that way.

Me? I'd lose sleep at night, thinking about it.


I mean - if you're going to have nice crisp edges on the corners, why wouldn't you want crisp inside corners? Hello?


Its hard to see in the photo below, but I drew a line over the area that needed cleaning up.


Then I grabbed a sharp chisel. No, not this one , I just wanted to brag on it. Two inches, baby! Awesome!


We just spent last Saturday sharpening almost every chisel in the shop, so I had a bunch to choose from.


It is easiest to lay the frame down on carpet - people who work in my shop know I'm a freak about placing carpet under whatever I'm working on - but that's because the workbench tops are a little cruel to pristine wood. I'd rather be anal about carpet than scratch whatever piece of wood I'm working on.


Now this cut is a little tricky, you have to hold your chisel at that 45˚ angle, cutting into each corner.


Cut from one direction, and then flip the chisel to the other side and cut from that direction.


Eventually, your two cuts will intersect right into the corner.


And you'll wind up with a crisp corner.


Now don't you think this looks much better than the top photo?


It didn't take more than ten minutes to clean up these four corners, but in my opinion, it makes all the difference in the world.

Thursday, November 10, 2011

One potter's passing

You know what makes me feel good? When people write to ask me what the hell my problem is, and why haven't I blogged lately. In a funny sort of way, it feels good to be missed.

This won't be much of a post, because I'm up to my elbows in work right now. I've got two commissions that are behind schedule and kicking my ass, and a pile of stuff to take care of - so blogging just has to take a back seat for a few more days.

But - here's the scoop, and it makes me almost teary to talk about it...

Yesterday, I bought the entire ceramic studio of a potter that passed away a few years ago. Her studio was like a scene out of a science fiction movie - it was as if she just walked away from everything in the middle of an afternoon of throwing pots. Brushes still in glaze. Pots still wrapped in plastic. Tools still covered in clay. Time stood still.

Her throwing stool makes me want to weep.


Her husband only asked that I take everything. Everything. I think he couldn't bear the thought of going through her stuff. And to tell you the truth, it's very hard on me, too.

So with the help of a couple of friends (thanks Lupe and Dan!), everything was loaded in my van and a trailer. We dropped the kiln off at my school, but almost everything else went to my studio at home, where I could sort through the boxes more slowly.


It took an hour for me to empty only two boxes, sorting everything into piles.


This is going to take days - maybe weeks. And doing this makes me think about my own stuff - what will become of it someday, when I'm gone? I know, that's morbid, but - it is reality.

I don't want to leave you on a sad note, so this should make you laugh. I've been saving up some outtakes from the videos I make. Bloopers. I have a few I'm editing into one video, but this one just cracks me up. If you don't like colorful language, don't watch it. Wuss. (Double click on the video below to watch it full-screen.)

And don't write to me if you think it's bad to post this. Lighten up. Life is short.


Tuesday, November 01, 2011

Trestle table base

A couple of posts ago, I wrote about making this Mahogany trestle table base. It was a gorgeous design, and it finally went together this past weekend. I felt like this was a very successful piece - and based on the comments from others wandering through my shop, they did, too.


The table top was a massive lamination - a 2 1/4" thick slab of African Mahogany that the clients procured from someone in their family. Seriously, we could barely move the top from their truck to my workbench.

When making a table base, I always leave easily accessible holes on them, in order to mount the base to the top. In this case, as I was attaching the base to the top, I hit something hard - possibly a piece on metal within the slab. There wasn't any screw that was going to penetrate it!


My clients promised to send a photo of the table, once it is in their home. Photos like that are always great to received - it's nice to know how the pieces I build look in place.

Meanwhile, I liked this design so much, I think I am going to build a similar version for the dining table that I'm building for my home. The ash top - four feet by seven feet - is already made, and I've got some designs rolling around in my brain. This is going to be interesting!

Friday, October 28, 2011

Woodworking at Biltmore

One of the things I really miss about woodworking back east is the availability of good wood. The lumberyards I used to purchase from back in Amish country stocked everything from all the domestic hardwoods in dimensioned sizes to obscure domestic species, like elm or sassafras. You haven't really experienced the joy of woodworking until you've worked with sassafras, enjoying its aroma.

Here? You're lucky to find decent boards of the domestics - maple, walnut, and cherry. Much of it is twisted and split, probably from the dry conditions here in the desert. It's odd to me that alder is so popular here - it's boring and dull, but some people just love it. It reminds me of Basswood, now who would build a kitchen out of that?

As my friend John says - people here often have champagne budgets and beer taste.

A few weeks ago, I slipped in a short vacation to Asheville, North Carolina to visit family, and had a chance to visit Biltmore. We toured the house, which was quite amazing. As a woodworker, it was hard to ignore all the work that went into the home and the furnishings.

After the tour, I headed over the woodshop, to see where the magic happens.


The woodshop isn't much bigger than a small garage, but it contained an impressive number of tools.


Ahh.... I miss seeing logs like this!


The interior had the standard tools you'd expect to find -


including this lathe


the bandsaw


this drillpress and mortiser


and these handtools.


The display of hand planes was quite nice, and you could tell that these weren't just for display. There were shavings on the ground, and some nicely milled boards on the bench.


Since there were a few craftspeople working in some of the shops, I'd hoped that there might be a woodworker on site, but... no such luck.


If you closed your eyes to blot out all the people taking photos with their iPhones or digital cameras, you could almost transport yourself back to an era where woodshops looked like this.


On a good note, I may have some sassafras arriving in Las Vegas any day now. I've arranged to buy some, the shipping details are still being worked out. I'm not sure what I'll make, but I'm sure I'll wind up doing something special with it. If you detect a lovely sarsaparilla smell coming from my dust bags, you'll know what I've been doing.

Monday, October 24, 2011

Designing on the fly

If I had a better memory, then I would remember where I saw my new favorite quote. I was reading a few blogs last week, when I came across this line - creativity is just a series of decisions. I forget who said it - but damn, I love that!

Speaking of decisions - I am building a base for a dining room table, and although my clients give me a rough idea of they want, there are still a multitude of design decisions to make.

Here's a rough full-sized sketch on a piece of cardboard of what I am building.


I prepped the African mahogany to size, planing it and cutting it to length and width. Then I cut the tenons on the top and bottom.


But before I can go much further, I need to make a plywood template of the curve that will be cut in each piece. That's where a beam compass like this comes in really handy.


It is a simple device - two ends that clip on to any scrap piece of wood.


In this case, I'm using a scrap piece of 3/4" MDF.


Clamp the centerpoint onto one end,


and the pencil point to the other.


I know that the diameter is roughly 18", so I set the beam compass to half that, or about 9".


The plywood is cut to the exact size of my mahogany panels.


Here, the semi circle is drawn on the plywood.


I have a spare router base with a piece of plywood attached to it. This allows me to use the router as a giant compass. The curves you cut by hand, with a jig saw or a bandsaw, will never achieve the perfection of one cut with a router and compass. Trust me, I've tried it many times.


Here is a quick video on using this compass set-up, to cut a pattern. Then, I'll use the pattern to rout all the parts. Sound complicated? Just watch the video - it's easy!


Here is the pattern, trimmed up a little bit, so that it mimics the shape I want to wood to be cut into.


Use a straight bit in your router, with a template guide bushing.


In just a few minutes, I've cut all of these parts the same exact shape.


This will give you an idea of what the table base will look like, but there is a small detail that is bugging me. Remember what I said about
creativity being a series of decisions? I have a few decisions to make.


This bottom transition area really bothers me - it looks clunky and doesn't fit in with the rest of the piece.


Thinking on the fly is a must when you get to this stage of the game. I made a few sketches, and came up with a curve that I think works better. Making a pattern of it was easy - I just cut up a piece of that larger template, and made a small pattern to use. Here is it, clamped to the leg base.


Since the wood is nearly 2" thick, it had to be routed in several passes.


And I needed to pull out the big gun - a 3" straight bit for my router. Actually, it was easier to use two routers - one with a short bit, and one with a long one.


I started routing the piece with the short bit, and then once some of the wood was removed, I switched to the longer one. Again - on my last cut - I moved the pattern back just a teeny bit, and made one full pass, every so slightly trimming the wood to the final shape.


Routing makes a ton of dust, make sure you wear a mask and sweep up the floor afterwards, or you'll just keep kicking those particles into the air.


And finally, the finished shape. One I can live with. I'm still going to tweak that area right above where the curve starts, rounding it over to eliminate that sharp corner.


Here is one of the ends; it just needs a little sanding and it will be ready to assemble. Later, I'll connect both ends with two stretchers. Hopefully, my clients will be sitting at their table in time for Thanksgiving!


I hope this post illustrates the fact that designing on the fly is a necessary part of the craft. You can come up with all the plans you want on paper, but until you see them machined on the wood, it's hard to know if they work or not. Each step of the process allows you to see more, and if you spot something that looks wrong, you can correct it.

That's what I love about wood - the forgiving nature of it.